This tutorial is from Maria Jose and was translated with your permission
| Tutorial | Original HERE |
| Credits | Luz Cristina / Maria José |
| Material | HERE |
| Plugins | Mehdi Toadies Unlimited 2 Simple Graphic Plus VanDerLee / Unplugged-X Mura's Seamless |
| Download Plugins |
HERE |
| Remembering | * Change blend mode, opacity and
apply drop shadow according to your tubes * The Pick Tool in older versions of the PSP, is called Deformation * In old PSP versions: Mirror / Mirror Horizontal = Mirror Mirror / Mirror Vertical = Flip |
| Contacts |
E-mail: HERE Facebook: HERE Your Versions: HERE |
SCRIPT
(click on the prints for a better view)
01. Place color # 5a4611 in the foreground and color # f8e27c in the backgorund
02. open a new transparent image with 1000x700px
03. effects / plugins / mehdi / wavy lab 1.1
color sequence: 1-2-3-4
1- # 5a4611
2- # f8e27c
3- # 2193c5
4- # d92820
04. effects / plugins / toadies / metalic onion
05. effects / plugins / unlimited 2 / paper texture / mineral paper, sandstone / default
06. effects / plugins / simple / pizza slice mirror
07. effects / reflections effects / rotating mirror
08. effects / plugins / simple / blintz
09. image / flip / vertical flip
10. effects / plugins / simple / blintz
11. effects / plugins / graphic plus / vertical mirror / default
12. effects / plugins / reflections effects / rotating mirror
13. effects / plugins / vanderlee / unplugged-x / defocus
14. adjust / sharpness / sharpen
15. open the tube (deco-original-mj) / copy and paste as a new layer
16. open the tube (deco-original-1-mj) / copy and paste as a new layer
17. layers / properties / blend mode: overlay
18. add new layer
19. fill with color # b33117
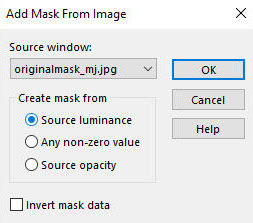
20. open the mask (originalmask-mj)
21. layers / new mask layer / from image / mask above
22. merge group
23. effects / plugins / mura's seamless / emboss at alpha / default
24. layers / properties / blend mode: screen
25. layers / arrange / move down - apply 2 times
26. open your main tube / copy and paste as a new layer
27. Position as desired
28. apply a Drop Shadow of your choice
29. the layers will look like this:
30. image / add borders / 2px / # b33117
31. selections / select all
32. image / add borders / 50px / #ffffff
33. selections / invert
34. effects / plugins / mehdi / wavy lab 1.1 / same colors
change the setting:
35. effects / plugins / unlimited 2 / paper textures / mineral paper, sandstone / default
36. adjust / sharpness
37. drop shadow: 0 0 60 60 black
38. selections / select all
39. selections / modify / contract: 25px
40. repeat the drop shadow
41. selections / modify / contract: 25px
42. repeat the drop shadow
43. select none
44. image / add borders / 2px / # b33117
45. place your signature
46. merge all
47. image / resize: 1000px (width)
48. save: file / export / jpeg optimizer
Thank you for doing my translations


Nenhum comentário:
Postar um comentário
Observação: somente um membro deste blog pode postar um comentário.