terça-feira, 20 de julho de 2021

Rough Pastels - PSP Magnifique


Muito obrigado PSP Magnifique por me dar a permissão para traduzir seus tutoriais

Original aqui

Material aqui

Tubes: 
TJ

Mask:
Cameron

Textura:
Winni

Plugins:
Unlimited 2
Simple
Penta.com

Download: aqui

Alguma informação:

Você pode alterar o blend mode,  opacidade e drop shadow, bem como colorizar os materiais, de acordo com os tubes / cores que você está usando

Ao aplicar o Resize com a opção All layers marcada, isso será informado no tutorial, caso contrário, aplique o resize, com esta opção desmarcada

Algumas ferramentas ou recursos têm outros nomes em versões anteriores do PSP. veja a tabela abaixo:

Pick Tool - Deformation

Mirror Horizontal - Mirror

Mirror Vertical - Flip


ROTEIRO


Abra o material no PSP, dupliue, feche os originais, trabalhe com as cópias e sempre salve o seu trabalho

Abra as masks no PSP e minimize

Salve a seleção na pasta Selections do PSP

Salve a textura na pasta textures do PSP


Cores usadas:

Foreground: #dbcfd3

Background: #80434c


Abra uma nova imagem trabsparente com 700 x 500px


Pinte com a cor do foreground


Adicione uma nova layer


Selections / Select All


Abra a imagem <achterground-2> / Copie e cole na seleção

(Se estiver usando outras cores, colorize usando o Adjust / Hue and Saturation / Colorize ou use o Color change)


Select none


Layers / New Mask Layer / From image / Mask <maskcameron239>


Merge Group


Effects / User Defined Filter / Emboss 3


Effects / Edge Effects / Enhance


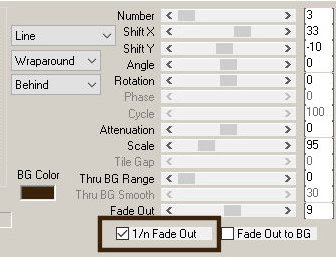
Prepare um gradiente Linear conforme o print:


Ative a layer Raster 1 e pinte com o gradiente acima


Effects / Plugins / Penta.com / Color Dot / Default


Ative a layer do topo: Group Raster 2


Adicione nova layer


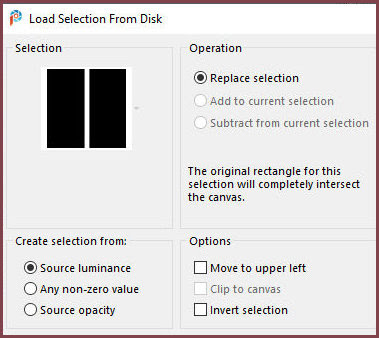
Selections / Load selection from disk / Selection <sel ger 1>


Pinte com a cor do background


Select none


Effects  / Distortion Effects / Displacement Map (textura: Winni.texture.5)


Adicione nova layer


Pinte com a cor branca


Layers / New Mask Layer / From Image / Mask <mask_circle_008>


Merge Group


Effects / User Defined Filter / Emboss 3


Abra o tube <TJ_Woman_311> 


Image / Resize: 311 x 500px


Copie e cole como nova layer


Posicione 


Drop Shadow de sua escolha


Adicione nova layer


Selections / Load selection from disk / Selection < sel ger 2>


Pinte com a cor branca

(Se ficar muito claro, pinte novamente)


Select none


Image / Mirror / Mirror Horizontal


Image / Add borders / 2px / cor do foreground

Image / Add borders / 50px / cor do background


Selecione esta borda de 50px com a Magic Wand


Effects / Plugins/ Simple / Diamonds


Adjust / Blur / Radial Blur


Effects / plugins / Unlimited 2 / Buttons & Frames / Glass Frame 3


Effects / Edge Effects / Enhance More


Select none


Assine


Merge All


Salve como JPEG Optimizer


Se for enviar para PSP Magnifique, reduza para width: 800px


*****


Obrigado por fazer minhas traduções
Por favor, envie suas versões para mim e ao compartilhar,
coloque um link para minha tradução

*

Contatos:
E-mail: AQUI
Facebook: AQUI
Suas versões: AQUI


segunda-feira, 19 de julho de 2021

Beauty Full Live - PSP Magnifique


Muito obrigado PSP Magnifique por me dar a permissão para traduzir seus tutoriais

Original aqui

Material aqui

Tubes: 
Alejandra Rosales
Tust
Jet

Mask:
Sharlimar

Plugins:
Unlimited 2 / Andrew's Filters 48 / Mixing dots and more dots

Download: aqui

Alguma informação:

Você pode alterar o blend mode,  opacidade e drop shadow, bem como colorizar os materiais, de acordo com os tubes / cores que você está usando

Ao aplicar o Resize com a opção All layers marcada, isso será informado no tutorial, caso contrário, aplique o resize, com esta opção desmarcada

Algumas ferramentas ou recursos têm outros nomes em versões anteriores do PSP. veja a tabela abaixo:

Pick Tool - Deformation

Mirror Horizontal - Mirror

Mirror Vertical - Flip


ROTEIRO


Abra o material no PSP, duplique, feche os originais, trabalhe com as cópias

abra a mask no psp e minimize


Cores usadas:


Foreground: #eaedf4
Background: #2f3e5d


Abra uma nova imagem transparente com 900 x 650px

Pinte com a cor do background

Effects / Plugins / Unlimited 2 / Andrew's 48 / Mixing Dots and More Dots / Default


Adicione nova layer

Pinte com a cor do foreground

Layers / New Mask Layer / From Image/ Mask <sharlimarMask94>


Merge Group

Abra o tube <AA Achterground> / Copie e cole como nova layer

Mova um pouco para a direita conforme o modelo

Abra o tube <Black Chopper> / Copie e cole como nova layer

Posicione à esquerda conforme o modelo

Aplique um Drop Shadow de sua escolha

Abra o tube personagem <jet-man2-January-2008 / Copie e cole como nova layer

Posicione à direita conforme o modelo

Reduza a imagem usando a pick tool, deixando na mesma proporção da imagem do modelo

Adjust / Sharpness / Sharpen More

Aplique um Drop Shadow de sua escolha

Abra o tube <copy tel> / copie e cole como nova layer

Posicione conforme o modelo

Aplique um Drop Shadow de sua escolha

Abra o tube <drie ball> / Copie e cole como nova layer

Posicione conforme o modelo

Image / Add borders / 4px / cor do background
Image / Add borders / 20px / cor do foreground

Selecione esta borda de 20px com a Magic Wand

Effects / Texture Effects / Fine Leather (cor do background)


Selections / Invert

Drop Shadow: 3  3  100  40  cor do background

Select none

Assine

Merge All

Se for enviar para PSP Magnifique, reduza para width: 800px


*****

Obrigado por fazer minhas traduções
Por favor, envie suas versões para mim e ao compartilhar,
coloque um link para minha tradução

*

Contatos:
E-mail: AQUI
Facebook: AQUI
Suas versões: AQUI


domingo, 18 de julho de 2021

Beauty in Yellow - Lady Tess - in english


Thank you so much LadyTess for giving me your permission to translate your tutorials

Original aqui

*

Material here


*

Tubes: Luz Cristina

*

Plugins:

Mura´s Meister - Copies
AAA Frames - Foto Frame
Flaming Pear - Flexify 2
Mura´s Meister - Copies
Mura´s Meister - Perspective Tiling
Unlimited 2.0 - Tramages - Pool Shadow
Unlimited 2.0 - VM Toolbox - Instant Tile
Alien Skin Eye Candy 5: Impact - Perspective Shadow

You can download plugins Here

*

Some information:

You can change the blend mode, opacity and drop shadow, as well as colorize the materials, according to the tubes / colors you are using

When applying the Resize with the All layers option checked, this will be informed in the tutorial, otherwise, apply the resize, with this option unchecked

Some tools or features have other names in earlier versions of the PSP. See the table below:

Tools:Old versions:
Pick ToolDeformation
Mirror HorizontalMirror
Mirror VerticalFlip


SCRIPT


Initial Step

Open your material in PSP, duplicate, close the originals, work on the copies
Save the selection in the PSP's Selections folder
Double click on the Alien Skin preset to export it to the plugin

Colors used:


Foreground: #c5ac54
Background: #3b220b


Continuing:

Open a new transparent image with 900 x 550px

Selections / Select all

Open the tube <6602-Luz Cristina> / Activate the Raster 2 layer of the tube


Copy and paste as new image

Image / Rotate right


Copy and paste as new image / Reserve this image, we'll use it later (minimize or save to a folder)

Activate your startup image and paste the same image into the selection

select none

Adjust / Blur / Gaussian Blur: 50


Result:

Layers / Duplicate

Open the tube <6597_Luz Cristina> / Copy

Activate the reserved image above and paste it as a new layer

Image / Resize: 70%

Effects / Plugins / Mura's meister / Copies / Option: Line
Note: Click (1/n Fade Out) only once


Result:


Adjust / Sharpen / Sharpen More

Drop Shadow: 0 0 60 30 Black

Layers / Duplicate

Image / Mirror / Horizontal Mirror

Merge visible

Effects / plugins / AAA Frames / Photo Frame


Activate the working image (Starting Image)

add new layer

Selections / Load selection from disk / Selection <Beauty_sel_1>


Activate the reserved image above / Copy and paste into the selection

Select none

Result:


Image / Resize: 70%

Effects / Geometric Effects / Skew


Activate the Pick Tool tool and configure: (X=-2/Y=-2) / click on M


Effects / Reflection Effects / Rotating Mirror


Layers / Duplicate

Effects / plugins / Flaming Pear / Flexify 2


Image / resize: 70%

Effects / Plugins / Mura's Meister / Copies / option: Throw


Result:


Layers / Duplicate

Image / Mirror / Horizontal Mirror

Merge Down

Activate the Copy of Raster 1 layer (second from below)

Layers / Duplicate

Effects / Plugins / Mura's Meister / Perspective Tiling


Click again on the Copy of Raster 1 layer

Effects / Image Effects / Page Curl


Repeat page Curl, with the second corner marked


Result:


Activate the Raster 1 layer

Copy and paste as new image / Reserve

Activate your initial image / Merge visible

Image / Add borders / 1px / black

Selections / Select all

Image / Add borders / 30px / color #3b220b

Selections / Invert

Effects / plugins / unlimited 2 / Tramages / Pool shadow


Selections / Select all

image / Add borders / 40px / black

Selections / invert

Activate reserved image / Copy / Return to your initial image and paste in selection

Effects / Plugins / unlimited 2 / VM Toolbox / Instant Tile


Effects / Plugins / unlimited 2 / Tramages / Pool Shadow / Same as above
Attention: if your colors are too light, you don't need to do this step

Effects / Reflection Effects / Rotating Mirror / Same as above

select none

Open the tube <6602-Luz Cristina> / Copy and paste as new layer

Image / Resize: 77%

Adjust / Sharpness / Sharpen

Effcts / Plugins / Eye Candy 5: Impact / Perspective Shadow / Preset <LTDStudio_Beauty_in_Yellow_01>


Image / Add borders / 1px / black

Open the tube <LTDStudio_Beauty_in_Yellow_Texto / Copy and paste as new layer

Activate the Pick Tool and configure: (X=68 - Y=32) / click on M


Merge All

Put your signature and Lady Tess watermark

Save to JPEG Optimizer

If sending your version to Lady Tess, reduce the Width to 900px and apply: Adjust / Sharpness / unsharp Mask:


*****

Thanks for doing my translations
Please send your versions to me and when sharing,
put a link to my translation

*

Contatos:
E-mail: AQUI
Facebook: AQUI
Suas versões: 
AQUI


Beauty in Yellow - Lady Tess


Muito obrigado LadyTess por me dar sua permissão para traduzir seus tutoriais

Original aqui

*

Material aqui

*

Tubes: Luz Cristina

*

Plugins:

Mura´s Meister - Copies
AAA Frames - Foto Frame
Flaming Pear - Flexify 2
Mura´s Meister - Copies
Mura´s Meister - Perspective Tiling
Unlimited 2.0 - Tramages - Pool Shadow
Unlimited 2.0 - VM Toolbox - Instant Tile
Alien Skin Eye Candy 5: Impact - Perspective Shadow

Você pode baixar os plugins Here

*

Alguma informação:

Você pode alterar o blend mode,  opacidade e drop shadow, bem como colorizar os materiais, de acordo com os tubes / cores que você está usando

Ao aplicar o Resize com a opção All layers marcada, isso será informado no tutorial, caso contrário, aplique o resize, com esta opção desmarcada

Algumas ferramentas ou recursos têm outros nomes em versões anteriores do PSP. veja a tabela abaixo:

Ferramentas: Versões antigas:
Pick Tool Deformation
Mirror Horizontal Mirror
Mirror Vertical Flip


ROTEIRO


Etapa inicial


Abra seu material no PSP, duplique, feche os originais, trabalhe nas cópias
Salve a seleção na pasta Selections do PSP
Clique duas vezes no preset Alien Skin para exportá-lo para o plugin

Cores usadas:


Foreground: #c5ac54

Background: #3b220b


Continuando:

Abra uma nova imagem transparente com 900 x 550px

Selections / Select all

Abra o tube <6602-Luz Cristina> / Ative a layer Raster 2 do tube


Copie e cole como nova imagem


Image / Rotate right


Copie e cole como nova imagem / Reserve esta imagem, usaremos depois (minimize ou salve em uma pasta)


Ative sua imagem inicial e cole a mesma imagem na seleção

Select none

Adjust / Blur / Gaussian Blur: 50


Resultado:


Layers / Duplicate


Abra o tube <6597_Luz Cristina> / Copie

Ative a imagem reservada acima e cole como nova layer

Image / Resize: 70%

Effects / Plugins / Mura's meister / Copies / Opção: Line
Observação: Clique em (1/n Fade Out) somente uma vez


Resultado:


Adjust / Sharpen / Sharpen More

Drop Shadow: 0 0 60 30 preto

Layers / Duplicate

Image / Mirror / Mirror Horizontal

Merge visible

Effects / plugins / AAA Frames / Foto Frame


Ative a imagem de trabalho (Imagem Inicial)


Adicione nova layer

Selections / Load selection from disk / Selection <Beauty_sel_1>


Ative a imagem reservada acima / Copie e cole na seleçao

Select none

Resultado:


Image / Resize: 70%


Effects / Geometric Effects / Skew


Ative a ferramenta Pick Tool e configure: (X=-2/Y=-2) / clique em M


Effects / Reflection Effects / Rotating Mirror


Layers / Duplicate


Effects / plugins / Flaming Pear / Flexify 2


Image / resize: 70%


Effects / Plugins / Mura's Meister / Copies / opção: Throw


Resultado:


Layers / Duplicate


Image / Mirror / Mirror Horizontal

Merge Down

Ative a layer Copy of Raster 1 (segunda a partir de baixo)

Layers / Duplicate

Effects / Plugins / Mura's Meister / Perspective Tiling


Clique novamente na layer Copy of Raster 1


Effects / Image Effects / Page Curl


Repita o page Curl, com a segundo corner marcado


Resultado:


Ative a layer Raster 1


Copie e cole como nova imagem / Reserve

Ative a sua imagem inicial / Merge visible

Image / Add borders / 1px / preto

Selections / Select all

Image / Add borders / 30px / cor #3b220b

Selections / Invert

Effects / plugins / unlimited 2 / Tramages / Pool shadow


Selections / Select all


image / Add borders / 40px / preto

Selections / invert

Ative a imagem reservada / Copie / Retorne para a sua imagem inicial e cole na seleção

Effects / Plugins / unlimited 2 / VM Toolbox / Instant Tile


Effects / Plugins / unlimited 2 / Tramages / Pool Shadow / Igual ao anterior
Atenção: se suas cores forem muito claras, não precisa fazer este passo

Effects / Reflection Effects / Rotating Mirror / Igual ao anterior

Select none

Abra o tube <6602-Luz Cristina> / Copie e cole como nova layer

Image / Resize: 77%

Adjust / Sharpness / Sharpen

Effcts / Plugins / Eye Candy 5: Impact / Perspective Shadow / Preset <LTDStudio_Beauty_in_Yellow_01>


Image / Add borders / 1px / preto


Abra o tube <LTDStudio_Beauty_in_Yellow_Texto / Copie e cole como nova layer

Ative a Pick Tool e configure: (X=68 - Y=32) / clique em M


Merge All


Coloque sua assinatura e a marca d'água de Lady Tess

Salve em JPEG Optimizer

Se for enviar sua versão para Lady Tess, reduza a Largura para 900px e aplique: Adjust / Sharpness / unsharp Mask:


*****

Obrigado por fazer minhas traduções
Por favor, envie suas versões para mim e ao compartilhar,
coloque um link para minha tradução

*

Contatos:
E-mail: AQUI
Facebook: AQUI
Suas versões: 
AQUI