Mostrando postagens com marcador Maria José. Mostrar todas as postagens

sábado, 13 de junho de 2020

Maria José - Remembering


This tutorial is by Maria José and was translated with your permission

.......

Tutorial: Remembering
Original HERE

.......

Credits:
Maria José

.......

Material

.......

Plugins:
Fantastique Machine
Flaming Pear

Download: HERE

.......

Contacts:

E-mail: HERE
Facebook: HERE
Your Versions: HERE

.......


Remembering:

* Change the blend mode and opacity of the layers and apply drop shadow according to your tubes.

* The Pick Tool in older versions of the PSP is called Deformation

* In old PSP versions:

Mirror / Mirror Horizontal = Mirror

Mirror / Mirror Vertical = Flip

.......


SCRIPT


(click on the prints for a better view)


01-put the color # 70452f in the foreground and the color # e5c58e in the background

02-prepare a Linear gradient

03-open a new image with 1000x700px

04-Paint with the gradient above

05-selections / select all

06-copy the tube (tube as-29) and paste in the selection

07-select none

08-effects / image effects / seamless tiling


09-effects / plugins / fantastic machine / paint engine / preset oil angles - apply 2 times
Note.: If you do not have a preset (oil angles), configure according to the print

11-adjust / sharpness / sharpen

11.1 the image will look like this:

12-layers / new mask layer / from image / mask (maskborder-mj)

13-merge group

13.1 apply the mask above again

14-layers / duplicate

15-adjust / blur / gaussian blur: 15

16-effects / texture effects / blinds

17-adjust / sharpness / sharpen

18-effects / geometric effects / skew

19-drop shadow: 0 0 80 40 black

20-effects / geometric effects / circle

21-with the magic wand (tolerance and feather = 0) select the part of the image shown in the print

21.1 press delete on your keyboard

22-select none

23-drop shadow just like the previous one

24-activate the layer (group - group - raster 1)

25-effects / plugins / flaming pear / flood
Note: change the color in the square shown in the print, according to your colors.

26-copy the tube (tube as-29) and paste it as a new layer

27-position according to the model

28-add new layer

29-layers / arrange / send to bottom

30-fill with gradient

31-selections / select all

32-copy the tube misted (tube as-29) and paste in the selection

33-select none

34-effects / image effects / seamless tiling


35-effects / plugins / fantastic machine / paint engine / preset oil angles - apply 1 time

36-adjust / sharpness / sharpen

36.1 activate the top layer

37-copy the tube (mistedface1-mj) and paste it as a new layer

37.1 image / mirror / mirror horizontal

38-image / resize: 90%

39-position according to model

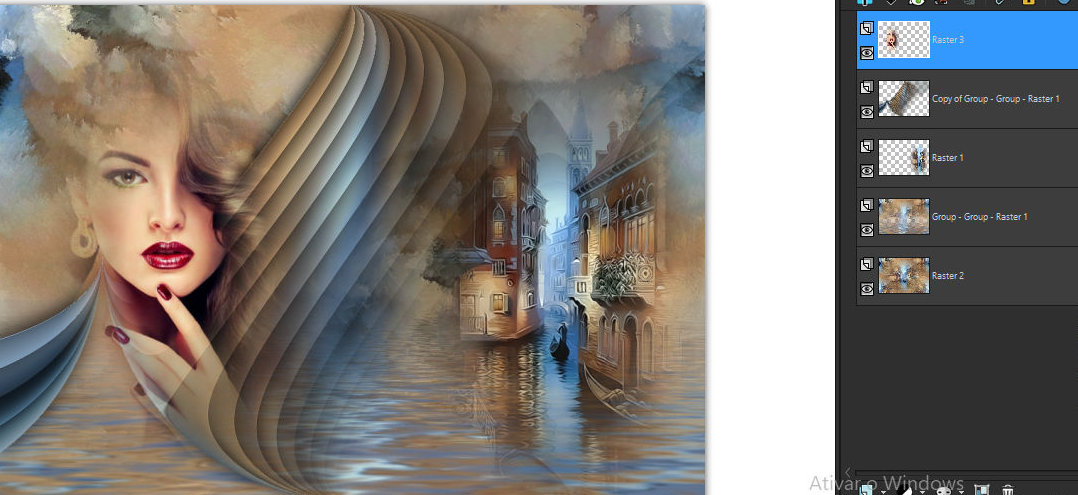
40-the image and layers will look like this
41-image / add borders / 1px / # 644632

42-image / add borders / 2px / # 627d95

43-image / add borders / 1px / # 644632

44-selections / select all

45-copy this layer (will be in memory)

46-image / add borders / 50px / white

47-selections / invert

48-paste the image copied above into the selection

49-adjust / blur / gaussian blur: 15

50-effects / plugins / fantastique machine / paint engine / preset oil angles - apply 1 time

51-selections / invert

52-selections / modify / expand: 8px

53-drop shadow: 0 0 80 40 black

54-select none

55-image / add borders / 1px / # 644632

56-place your signature

57-merge all

58-image / resize: 1000px (width)

59-save: file / export / jpeg optimizer


Thank you for doing my translations


quinta-feira, 28 de maio de 2020

Maria José - Original


This tutorial is from Maria Jose and was translated with your permission


Tutorial Original
HERE
Credits Luz Cristina / Maria José
Material HERE
Plugins Mehdi
Toadies
Unlimited 2
Simple
Graphic Plus
VanDerLee / Unplugged-X
Mura's Seamless
Download

Plugins
HERE
Remembering * Change blend mode, opacity and apply drop shadow according to your tubes

* The Pick Tool in older versions of the PSP, is called Deformation

* In old PSP versions:
Mirror / Mirror Horizontal = Mirror
Mirror / Mirror Vertical = Flip
Contacts E-mail: HERE

Facebook: HERE

Your Versions: HERE


SCRIPT


(click on the prints for a better view)


01. Place color # 5a4611 in the foreground and color # f8e27c in the backgorund

02. open a new transparent image with 1000x700px

03. effects / plugins / mehdi / wavy lab 1.1
color sequence: 1-2-3-4
1- # 5a4611
2- # f8e27c
3- # 2193c5
4- # d92820


04. effects / plugins / toadies / metalic onion


05. effects / plugins / unlimited 2 / paper texture / mineral paper, sandstone / default


06. effects / plugins / simple / pizza slice mirror

07. effects / reflections effects / rotating mirror


08. effects / plugins / simple / blintz

09. image / flip / vertical flip

10. effects / plugins / simple / blintz

11. effects / plugins / graphic plus / vertical mirror / default


12. effects / plugins / reflections effects / rotating mirror


13. effects / plugins / vanderlee / unplugged-x / defocus


14. adjust / sharpness / sharpen

15. open the tube (deco-original-mj) / copy and paste as a new layer

16. open the tube (deco-original-1-mj) / copy and paste as a new layer

17. layers / properties / blend mode: overlay


18. add new layer

19. fill with color # b33117

20. open the mask (originalmask-mj)

21. layers / new mask layer / from image / mask above


22. merge group

23. effects / plugins / mura's seamless / emboss at alpha / default


24. layers / properties / blend mode: screen


25. layers / arrange / move down - apply 2 times

26. open your main tube / copy and paste as a new layer

27. Position as desired

28. apply a Drop Shadow of your choice

29. the layers will look like this:


30. image / add borders / 2px / # b33117

31. selections / select all

32. image / add borders / 50px / #ffffff

33. selections / invert

34. effects / plugins / mehdi / wavy lab 1.1 / same colors
change the setting:


35. effects / plugins / unlimited 2 / paper textures / mineral paper, sandstone / default


36. adjust / sharpness

37. drop shadow: 0 0 60 60 black

38. selections / select all

39. selections / modify / contract: 25px


40. repeat the drop shadow

41. selections / modify / contract: 25px


42. repeat the drop shadow

43. select none

44. image / add borders / 2px / # b33117

45. place your signature

46. ​​merge all

47. image / resize: 1000px (width)

48. save: file / export / jpeg optimizer


Thank you for doing my translations


quarta-feira, 20 de maio de 2020

Maria José - Taina


This tutorial is from maria José and was translated with your permission


  Tutorial               Taina
Original AQUI
Créditos Lily Garnier / Nena Silva / Monaiekje
Material AQUI
Plugins Mura's Seamless
Carolaine and Sensibility
Simple
Eye Candy 5: Impact
DownloadsPlugins AQUI
Atenção! Double click on the Extrude preset to export to the plugin
Contatos E-mail: AQUI

Facebook: AQUI

Your Versions: AQUI


SCRIPT

(click on the prints for a better view)

01. put color # 343924 in the foreground and color # a4a18e in the background

02. Prepare a Linear gradient
26


03. open the alpha channel file (alphachannel-taina) / duplicate (shift + d)
/ close the original

04. fill the image with light color (# 3a3724)

05. layers / new mask layer / from image / mask (monaiekje-mask17)
28


06. merge group

07. effects / plugins / mura's seamless / emboss at alpha / default
29


08. effects / plugins / carolaine and sensibility / cs-ldots / default
30


09. layers / properties / blend mode: multiply
31


10. add new layer

11. layers / arrange / send to bottom

12. fill the layer with the gradient

13. adjust / blur / gaussian blur: 50
32


14. merge visible

15. effects / plugins / simple / pizza slice mirror

16. selections / load selection from alpha channel / selection 1
33


17. selections / promote selection to layer

18. adjust / blur / gaussian blur: 50
34


19. selections / invert
20. drop shadow: 0 0 100 50 black

21. selections / invert

22. add new layer

23. open the misted face / copy and paste into the selection

24. selections / invert

25. drop shadow same as previous

26. merge down

27. select none

28. activate the bottom layer - merged

29. selections / load selection from alpha channel / selection 2
35


30. selections / promote selection to layer

31. adjust / blur / gaussian blur: 50
36


32. selections / invert

33. drop shadow: 0 0 100 50 black

34. selections / invert

35. minimize your work image, we'll come back to it later

36. open your landscape misted tube

37. effects / image effects / seamless tiling / default
38


38. copy this image / return to your working image

39. add new layer

40. paste the image copied above, in the selection

41. effects / texture effects / mosaic-antique
39


42. selections / invert

43. drop shadow: 0 0 100 50 black

44. selections / invert

45. merge down

46. ​​select none

47. layers / properties / blend mode: luminance (l)
40


48. selections / load selection from alpha channel / selection 3
40


49. add new layer

50. fill the selection with the gradient
42


51. select none

52. effects / plugins / eye candy 5: impact / extrude
/ preset (extrude-taina-mj)
43


53. effects / geometric effects / skew
44


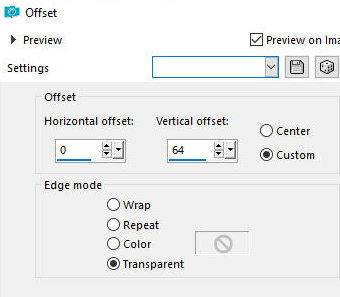
54. effects / image effects / offset (0/64)
45


55. layers / duplicate

56. image / mirror / mirror vertical (flip)

57. merge down

58. effects / reflection effects / rotating mirror


59. selections / load selection from alpha channel / selection 4
46


60. press delete on your keyboard - apply 2 times

61. select none

62. drop shadow: 0 0 60 30 black

63. activate the top layer

64. open the decorative tube / copy and paste as a new layer

65. Image / resize: 1 x 55%; 1 x 80% - all layers unchecked

66. position according to model

67. drop shadow of your choice

68. the layers will look like this:
48


69. merge visible

70.effects / plugins / aaa filters / custom / landscape (Optional)
49


71. image / add borders / 1px / color # a4a18e

72. image / add borders / 20px / color # 3a3924

73. image / add borders / 1px / color # a4a18e

74. image / add borders / 30px / color # 3a3924

75.image / add borders / 1px / color # a4a18e

76. select the 30px edge with the magic wand

77.drop shadow: 0 0 60 30 black

78. selections / invert

79. drop shadow like the previous one

80. select none

81. place your signature

82. merge all

83. image / resize: 1000px (width)

84. save: file / export / jpeg optimizer


Thank you for doing my translations