terça-feira, 28 de novembro de 2017

FAIRY FANTASY (in english)

This tutorial belongs to Mabel Design. Original here
The translation was made with your permission. Thank you Mabel


PLUGINS - here
AP 01[Innovations]
tramages


Tubes:
LisaT
Min@
Mabel

COLORS PALETTE

* Open the mask on PSP
* Save selection mabelbarras to your PSP selections folder
* Open the color palette on the PSP and capture the colors with the dropper tool
* Adjust blend mode and layer opacity according to your images

--x--x--

* If you have any difficulties performing this tutorial, please contact me: E-mail
* When doing one of the tutorials of my blog, I would appreciate it if you put a link to the tutorial.
* Send me your version and I will be happy to put it in my gallery
* Before you share this tutorial, read the author's terms


SCRIPT:

1. Open a new image with 900x700px

2. In the color Palette set your foreground with the color #5c5f11 and the background #dee6b7 - Set your foreground with a gradiente Linear:


3. Fill the image with the gradient - Selections - select all

4. Open the file Min@.4712.mist paesaggio.05.17 - edit/copy - Edit/Paste into selection - select none

5. Effects - image effects - seamless tiling - default

6. Adjust - blur - Radial Blur:


7. Effects - user Defined filter - emboss 3

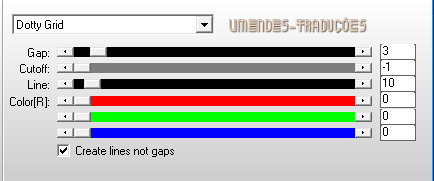
8. Effects - Plugins -  AP 01 [Innovations] - Lines silverlining - Dotty Grid


9. Layers - duplicate

10. Effects - Plugins - AP 01 [innovations] - Emboss - EmbossPic - Addition


11. Layers - new mask layer - from image - Mask Narah_mask_1175 - Merge group


12. Effects - User Defined filter - emboss 3

13. Open the file min@.4712 Mist Paesaggio.05.17 - Edit/Copy  - Edit/paste as new layer

14. In the Layer palette - Click twice with the left button and set the Blend Mode: soft Light

15. Layer Palette: click on layer of the mask (group-copy of raster 1) - Layers - new mask layer - from image - Mask 00invertida - adjust the mask - merge group


16. Layers - new raster layer - Seletions - load selection from disk - Selection mabelbarras - fill the selection with the gradiente


17.  Effects - 3D Effects - inner Bevel


18. Effects - 3D effects - Drop shadow: 3/5/85/25 - black - select none

19. Layers - duplicate - Layers - merge - merge down

20. Layers - duplicate - Image - Mirror

21. Open the file florylazo - edit/copy - Edit/paste as new layer - Position as model

22. Effects = 3D effects - Drop shadow same configuration as before

23. Open the file fantasy-toons-0029-lisat - Image - Mirror 
Edit/copy - Edit/paste as new layer -Image
Resize 80% - Resize all layers unchecked
Position as model

24. Effects - 3D effects - Drop shadow same configuration as before

25. Layers - merge - merge visible

26. Image - add borders - symmetric checked - 5px - color #c5cc73

27. Image - add borders - 15 px - color White
Select this border with the magic Wand - Fill with the gradiente

28. Effects - Plugins - Tramage - Pool shadow - default - Select none


29. Image - add borders - 5px - color #c5cc73

30. Layers - new raster layer - add your signature
Layers/Merge/merge all (flatten)
Save as JPEG

I hope you enjoyed.
Thank you for doing my translations


FAIRY FANTASY


Este tutorial pertence a Mabel Design. Original aqui
Tutorial traduzido com a permissão da autora. Obrigada Mabel.

PLUGINS - aqui
AP 01[Innovations]
tramage


Tubes:
LisaT
Min@
Mabel

PALETA DE CORES

*Abra a mask no PSP
*Salve a seleção mabelbarras  na sua pasta de seleções do PSP
*Abra a paleta de cores no PSP e capture as cores com a dropper tool
*Ajuste o blend mode e a opacidade das layers de acordo com suas imagens


--x--x--


*Se você tiver alguma dificuldade na execução desse tutorial, entre em contato comigo: E-mail
*Ao fazer um dos tutoriais do meu blog, eu agradeceria muito se você colocasse um link para o tutorial.
*Envie para mim sua versão e eu terei o maior prazer em colocar na minha galeria
*Antes de você compartilhar este tutorial, leia os termos da autora


ROTEIRO:


1. Abrir uma nova imagem com 900x700px

2. Colocar a cor #5c5f11 no foreground e a cor #dee6b7 no background. Preparar um gradiente linear


3. Preencher a imagem com o gradiente - select all

4. Abrir o arquivo Min2.4712.mist paesaggio.05.17 - copiar e colar na seleção - Select none

5. Effects - image effects - seamless tiling - default

6. Adjust - blur - Radial blur


7. User Defined filter - emboss 3

8. Plugin Ap (Lines) - Silverlining - Dotty grid


9. Layers - duplicate

10. Plugin AP 01 [Innovations] - Emboss - EmbossPic - Addition


11. Layers - new mask layer - from image - Narah_mask_1175 - Merge group


12. User Defined Filter - emboss 3

13. Abra o arquivo Min@.4712. Mist paesaggio.05.17 - Copie e cole como nova layer

14. Blend Mode: Soft Light

15. Ative a layer da mask(Group-copy of raster 1) - Layers - new mask layer - from image - mask 00invertida - ajuste a mask - merge group


16. Adicione nova layer - Selections - load selection from disk - Selection mabelbarras - pinte com o gradiente


17. Effects - 3D effects - Inner Bevel


18. Drop shadow: 3/5/85/25 - preto - select none

19. Layers - duplicate - merge down

20. Layers - duplicate - image - Mirror

21. Abra o arquivo florylazo - Copie e cole como nova layer - posicione conforme o modelo

22. Drop shadow igual ao anterior

23. Abra o arquivo fantasy-toons-0029-lisat - image/mirror - Copie e cole como nova layer - Resize 80% - posicione conforme o modelo

24. Drop shadow igual ao anterior

25. Merge visible

26. Image - add border - 5px - c5cc73

27. Image - add border - 15 px - branco - selecione esta borda com a magic wand - pinte com o gradiente

28. Plugin Tramage - Pool shadow - default - select none


29. Image - add borders - 5px - cor #c5cc73

30. Adicione nova layer - Coloque sua assinatura - merge all(flatten) - Salve como JPEG


Espero que tenham gostado.
Obrigada por fazerem minhas traduções.


A CABALGAR (in english)


This tutorial belongs to Mabel Design. Original here
The translation was made with your permission. Thank you Mabel


PLUGINS - here
Mehdi - Mura's Meister - Flaming Pear - AFS import - Nick Software


Tubes:
Rooskes
Mabel

COLORS PALETTE


* Open the mask on PSP
* Open the color palette on the PSP and capture the colors with the dropper tool
* Adjust blend mode and layer opacity according to your images


* If you have any difficulties performing this tutorial, please contact me: E-mail
* When doing one of the tutorials of my blog, I would appreciate it if you put a link to the tutorial.
* Send me your version and I will be happy to put it in my gallery
* Before you share this tutorial, read the author's terms


SCRIPT:


1. Open a new image with 900x700px

2. In Color Palette set your foreground with color #61594f and your background with #e3e6f5. 
Set your foreground with a gradient Linear:


3. Fill your image with the gradient

4. Selections - select all - Open the file misted-caballo-mabel - Edit/copy - Edit/paste into selection - select none

5. Effects - image effects - seamless tiling - default

6. Effects - Plugins - Mehdi - weaver


7. Effects - User Defined filter - Emboss3

8. Layers - new raster layer

9. Effects - Plugins - Mura's Meister - Cloud

10. Layers - new mask layer - from image - Mask: 1-gradiente ancha

11. Effects - image effects - offset


12. Open the file misted-caballo-mabel - Edit/Copy - Edit/Paste as new layer

13. Effects - image effects - offset


14. Open the file misted-arboles-mabel - Edit/Copy - Edit/Paste as new layer - Position as model

15. Layers - merge - merge down

16. Open the file Mabel-pasto - Edit/copy - Edit/paste as new layer - Position as print:


17. Effects - Plugins - Mura's Meister - Copies - preset Line


18. Layers - merge - merge visible

19. Open the file roosketubeddesign-dame-197 - edit/copy - Edit/Paste as new layer 

Image - Resize 80% - resize all layers unchecked  - Posicione as model

20. Adjust - sharpness - sharpen

21. Layers - merge - merge visible

22. Effects - Plugin - flaming pear - Flood


23. Effects - plug-ins - unlimited - AFS import - BordeFade3


24. Image - add borders - symmetric checkd - 5px - color #b5b4ba

25. Effects - Plugins - Nick Software - Bi-color User Defined - Upper color #c0c0c0 - Lower color #735658


26. Layers - new raster layer  - Add your signature - Layers/merge/Merge all(flatten) - Save as JPEG


I hope you enjoyed.
Thank you for doing my translations


A CABALGAR


Este tutorial pertence a Mabel Design. Original aqui
A tradução foi feita com sua permissão. Obrigada Mabel.

PLUGINS - aqui
Mehdi - Mura's Meister - Flaming Pear - AFS import - Nick Software


Tubes:
Rooske Tubes
Mabel

PALETA DE CORES


*Abra a mask no PSP
*Abra a paleta de cores no PSP e capture as cores com a dropper tool
*Ajuste o blend mode e a opacidade das layers de acordo com suas imagens


*Se você tiver alguma dificuldade na execução desse tutorial, entre em contato comigo: E-mail
*Ao fazer um dos tutoriais do meu blog, eu agradeceria muito se você colocasse um link para o tutorial.
*Envie para mim sua versão e eu terei o maior prazer em colocar na minha galeria
*Antes de você compartilhar este tutorial, leia os termos da autora


ROTEIRO:

1. Abrir uma nova imagem com 900x700px

2. Colocar a cor #61594f no foreground e a cor #e3e6f5 no background e preparar um gradiente linear


3. Pintar a imagem com o gradiente

4. Selections - Select all - Abrir o arquivo Misted-caballo-mabel - copiar e colar na seleção - select none

5. Effects - image effects - seamless tiling - default

6.Plugin Mehdi - weaver


7. User Defined Filter - emboss 3

8. Adicione uma nova layer

9. Plugin Mura's Meister - Cloud 

10 Layers - New mask layer - from image - 1-gradiente ancha

11. Effects - image effects - offset


12. Abrir o arquivo misted-caballo-mabel - copie e cole como nova layer

13. Effects - image effects - offset


14. Abrir o arquivo Misted-arboles-mabel - copie e cole como nova layer - Posicione conforme o modelo

15. Merge down

16. Abrir o arquivo Mabel-pasto - copie e cole como nova layer - posicione conforme o print


17. Plugin Mura's Meister - Copies - Preset Line


18. Merge visible

19. Abrir o arquivo Roosketubeddesign-dame-197 
Copie e cole como nova layer
Resize 80% - Resize all layers desmarcado
Posicione conforme a imagem.

20. Adjust - sharpness - sharpen

21. Merge visible

22. Plugin flaming Pear - Flood  - cor #004100


23. Plugin unlimited - AFS Import - bordfade3


24. Image - add borders 5px - cor #b5b4ba

25. Plugin Nick software - Bi-color User Defined - Upper color: #c0c0c0 - Lower color: #735658


26. Adicione nova layer 
Coloque sua assinatura
Merge all
Salve como JPEG


Espero que tenham gostado.
Obrigada por fazerem minhas traduções.


X-MAS 2017


Este tutorial pertence a Cre@nnie. Original: aqui
Tradução feita com a permissão da autora. Obrigada Annie


PLUGINS - aqui

Xenofex 2 - Eye Candy 5:impact - Graphic Plus -
Mura's Meister - Simple - Tramages - Unlimited -
BKG Designer sf10 I - VM Natural


Tubes:

PALETA DE CORES
(Abra a paleta de cores no seu PSP e capture as cores com a dropper tool)

*Abra a mask no PSP
*Salve as seleções na sua pasta de seleções do PSP
*Duplo clique no preset para instalar no plugin
*Abra a paleta de cores no PSP e capture as cores com a dropper tool
*Ajuste o blend mode e a opacidade das layers de acordo com suas imagens


*Se você tiver alguma dificuldade na execução desse tutorial, entre em contato comigo: E-mail
*Ao fazer um dos tutoriais do meu blog, eu agradeceria muito se você colocasse um link para o tutorial.
*Envie para mim sua versão e eu terei o maior prazer em colocar na minha galeria
*Antes de você compartilhar este tutorial, leia os termos da autora


ROTEIRO:

1. Abra uma nova imagem com 600x500px

2. Coloque a cor #c17b36 no foreground e a cor #701012 no background

3. Selections - select all

4. Abra o arquivo Trend-2017 - copie

5. Cole na seleção

6. Select none

7. Adjust - blur - gaussian blur: 20

8. Effects - seamless tiling - default

9. Effects - image effects - offset - cor #c17b36

10. Ative a Magic Wand e clique na parte com a cor sólida para selecionar

11. Plugin Graphic Plus - Cross shadow


12. Selections - Invert

13. Drop shadow: 15/-15/75/25 - preto

14. Select none

15. Image - add borders - symmetric desmarcado - cor #701012

16. Plugin Unlimited - BKG Designer sf10 I - Cruncher

17. Plugin Graphic Plus - Cross shadow - igual ao anterior

18. Ative a Selection tool - Custom Selection

19. Promote selection to layer

20. Plugin tramage - Tow the line

21. Select none

22. Blend Mode: Screen

23. Effects - Geometric Effects - Cylinder horizontal

24. Layers - duplicate

25. Image - Mirror - Mirror horizontal

26. Image - Mirror - Mirror vertical

27. Ative a bottom layer

28. Ative a Selection Tool - custom Selection

29. Promote selection to layer

30. Plugin Unlimited - BKG Designer sf10 I - Alf's Border Mirror Bevel

31. Select none

32. Plugin simple - Top Bottom Wrap

33. Effects - seamless tiling - igual ao anterior

34. Drop shadow: 0/0/75/25 - preto

35. Image - add borders - symmetric desmarcado - Cor #c17b36

36. Effects - image effects - seamless tiling:

37. Adicione nova layer

38. Preencha a layer com a cor #701012

39. Layers  new mask layer - from image - Narah_Mask_0474

40. Merge group

41. Ajuste a opacidade da layer para 75

42. Merge down

43. Adicione nova layer

44. Selections - load selection from disk - Selection: x-mas-2017-1-cre@nnie

45. Preencha a seleção com a cor #701012

46. Selections - Modify - contract: 5px

47. Abra o arquivo trend-2017 - copie e cole como nova layer

48. Selections - invert

49. Edit - clear

50. Select none

51. Merge down

52. Plugin Eye Candy 5:Impact - Extrude
Setting: Selecione x-mas-2017-cre@nnie-extrude

53. Drop shadow: 15/-15/75/25 - preto

54. Abra o arquivo KaraT46273 - copie

55. Cole como nova layer

56. Resize 80% - Resize all layers desmarcado

57. Effects - image effects - offset

58. Abra o arquivo X-mas-2017 - copie

59. Cole como nova layer

60. Effects - image effects - offset

61. Layers - duplicate

62. Ative a layer Raster 3

63. Plugin Eye Candy 5:impact - Motion Trail 
Setting: Selecione o preset x-mas-2017-cre@nnie-mt

64. Plugin Xenofex 2 - constellation 
Setting: selecione big gaseous stars

Edit: Como no print:

65. Blend Mode: Dodge

66. Ajuste a opacidade da layer para 75

67. Ative a top layer

68. Plugin Eye Candy 5:Impact - Perspective Shadow:
Settings:Selecione o preset x-mas-2017-cre@nnie-ps-1 - OK

69. Adicione nova layer

70. Pinte com a cor #701012

71. Layers - new mask layer - from image - mask cre@nnie_49

72. Merge group

73. Blend mode difference

74. Layers - duplicate

75. Blend Mode dissolve

76. Ajuste a opacidade da layer para 80

77. Ative a bottom layer

78. Layers - duplicate

79. Clique no olho para fechar a layer

80. Merge visible

81. Plugin AAA Frame - Foto Frame

82. Image -  resize 60% - Resize all layers desmarcado

83. Plugin Eye Candy 5:Impact - Perspective Shadow
Setting: Selecione o preset x-mas-2017-cre@nnie-ps-2

84. Ative a bottom layer

85. Clique no olho para abrir a layer

86. Plugin Mura's Meister - perspective - cor #701012

87. Clique na área com a cor sólida, com a magic wand

88. Plugin Graphic Plus - Cross shadow - igual ao anterior

89. VM Natural - Sparkle

90. Adicione nova layer

91. Pinte com a cor #701012

92. Plugin Graphic Plus - Cross shadow - igual ao anterior - select none

93. Layers - new mask layer - from image - Narah_mask_0474

94. Merge group

95. Effects - edge effects - enhance

96. Selections - Select all

97. Image - add borders - 25px - cor #701012

98. Effects - image effects - seamless igual ao anterior

99. Selections - Invert

100. Adjust - blur - gaussian blur: 20

101 - Selections - invert

102. Drop shadow: 0/0/75/25 - preto

103. Select none

104. Abrir o arquivo TDS0007 - remova a marca d'água - Copie

105. Cole como nova layer

106. Image - Mirror - Mirror horizontal

107.Image - Resize 80% - Resize all layers desmarcado

108. Posicione conforme o modelo

109. Drop shadow igual ao anterior

110. Adicione nova layer e coloque sua assinatura

111. Image - add borders - 1px - cor #701012

112. Image - Resize Width: 800px - resize all layers marcado

113. Salve como JPEG

Espero que tenham gostado.
Obrigada por fazerem minhas traduções.
Se você enviar a sua versão, ficarei feliz em colocar no meu site: E-mail