sábado, 10 de fevereiro de 2018

PUESTA DE SOL - in english


PUESTA DE SOL
by Bea


This tutorial has the permission of the author. Thank you Bea
Original Tutorial here


PLUGINS - here
Mura's Meister - Xero - BKG Designers sf10 II


MATERIAL - here
anna.br_lake-savica-by-bfrkovïc
Grisi_Woman_926
sel252_aliciar
Marca de agua


PALETA DE CORES
* Open the color palette on the PSP and capture the colors with the dropper tool
* Adjust blend mode and layer opacity according to your images

* If you have any difficulties performing this tutorial, please contact me: e-mail
* When doing one of the tutorials of my blog, I would appreciate it if you put a link to the tutorial.
* Send me your version and I will be happy to put it in my gallery
* Before you share this tutorial, read the author's terms
* Help me improve the quality of my translations and my blog: if you find any errors in the links, in the translations, in the blog, please let me know by the email above. Thankful.


ROTEIRO

1. Open a new image of 900x600px.
Fill with a gradient formed by the colors #6b6a26 and #d9d899


2. Plugin Unlimited - BKG Designer sf10 II - Dodgers Done


3. Layers - Duplicate
Image - Mirror
Change the layer's opacity to 50

4. Layers - Merge - Merge Down
Image - Flip

5. Layers - New Raster Layer

6. Selections - Load Selection from disk - sel22_aliciar
Fill with color #414017 
Select none


7. Plugin Mura's Meister - Copíes - Blur(v-wave)


8. Effects - User Defined Filter - Emboss 3

9. Layers - Duplicate
Image - Flip
Layers - Merge - merge down

10. Layers - Duplicate
Image - Mirror
Layers - Merge - Merge Down

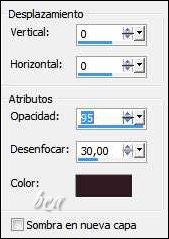
11. Drop Shadow: 1/1/75/2 - color #414017

12. With Magic Wand, select the corners of the image as in print


13. Selections - Invert
New Raster Layer
Edit/Copy and Paste into selection, the tube anna.br.lake-savica-by-bfrkavic(landscape)
Selections - Select none
Layers - Arrange - Move Down

14. Activate the Raster 2
Effects - User Defined Filter - Emboss 3

15. Edit/Copy and Paste as new layer the tube Grisi-woman-926

16. Image - Resize 57% - All layers unchecked
Image - Mirror

17 - Effects - image effects - offset


18. Plugin Xero - Soft Vignotte (Opcional, depending on the image you use, it's to give a little shade)


19. Drop Shadow: 0/0/75/20 - color #414017

20. Image - add borders - 2px - color #414017
 Image - Add borders - 20px - color #a9a867

21. Select the 20px border with Magic Wand -
Selections - Invert
Drop Shadow: 0/0/75/30 - color #414017
Select none

22. New Raster layer
Add your signature
Save as JPEG

I hope you enjoyed.
Thank you for doing my translations

Other model


EL RETRATO - IN ENGLISH


EL RETRATO
by Bea


This tutorial has the permission of the author. Thank you Bea.
Original Tutorial here

PLUGINS - here
Flaming Pear - Mura's Meister - Toadies - Bordermania - Mehdi - AAA Frame


MATERIAL - here
Tube-Woman 084_BeaSol
tube-SvB Asie'n Stilife
cadre_jaune_texture
Mask-59-Bea


PALETA DE CORES


* Open the color palette on the PSP and capture the colors with the dropper tool
* Adjust blend mode and layer opacity according to your images

* If you have any difficulties performing this tutorial, please contact me: e-mail
* When doing one of the tutorials of my blog, I would appreciate it if you put a link to the tutorial.
* Send me your version and I will be happy to put it in my gallery
* Before you share this tutorial, read the author's terms
* Help me improve the quality of my translations and my blog: if you find any errors in the links, in the translations, in the blog, please let me know by the email above. Thankful.


ROTEIRO

1. Open a new image of 800x600px

2. Fill with a gradiente formed by colors #f4cab2 in Foreground and #b3060e in Background


3. New Raster Layer
Selections - Select all
Edit/Copy and Paste into selection the tube Woman-021=BeaSoll-tube

4. Select none
Change the layer's opacity to 50

5. Merge visible

6. Adjust - Blur - Gaussian Blur: 15

7. Plugin Flaming Pear - Swerve
Change chop mode as print


8. Paste as new layer the tube Woman-021-BeaSol-tube(still in memory)

9. Effects - image effects - offset


10. Merge visible

11. Layers - Duplicate 
Take the visibility of the copy and work on the original

12. Plugin Toadies - Weaver


13. Layers - Duplicate

14. Plugin Mura's Meister - Perspective Tiling


15. Make the copy of step 11 visible and activate

16. Plugin Bordermania - Flat Solid - use color #f4ca62


17. Repeat the same filter, but with color#b3060e and the following configuration:


18. Image - Resize - 65% - All layers unchecked

19. Layers - Duplicate
Take the copy visibility and work on the original

20. Plugin Mehdi - Weaver


21. Drop Shadow: 2/2/65/2 - black

22. Repeat with V and H negatives

23. Change Blend Mode to multiply

24. Effects - User Defined filter - Emboss 3

25. Return copy visibility of the step 19 and activate

26. Layers - Duplçicate

27. Image - Resize 90% - All layers unhecked

28. Merge Down

29. So far, we have these layers:


30. New Raster Layer
Fill with the pattern: cadre_jaune_texture


31. New Raster layer
Apply mask Mask-59-Bea


32. Layers - Merge - Merge group

33. Drop Shadow: 2/2/80/2 - black

34. Effects - Image effects - Offset


35. Copy and Paste as new layer the tube divers-0008-lisat

36. Resize if necessary
Plas as model

37. Change Blend Mode for Luminance(L)

38. Merge visible

39. Plugin AAA Frame - Foto Frame


40. Add your signature
Save as JPEG


I hope you enjoyed.
Thank you for doing my translations

Other model
Tube: BeaSol

Obrigada Polyak


PALABRAS DE AMOR (IN ENGLISH)


PALABRAS DE AMOR
by Bea


This Translation has the permission of the author. Thank you Bea.
Original tutorial here


PLUGINS - here
VM Toolbox - Eye Candy 5:impact


MATERIAL - here
2332 - woman - misted - LB TUBES
Textura_flores(guardar en la carpeta de Texturas)
WordArt_amor_bea
sel100_bea(Guardar en la carpeta de selecciones)
sel101_bea(Guardar en la carpeta de selecciones)
Marca de agua


PALETA DE CORES
* Open the color palette on the PSP and capture the colors with the dropper tool
* Adjust blend mode and layer opacity according to your images

* If you have any difficulties performing this tutorial, please contact me: E-mail
* When doing one of the tutorials of my blog, I would appreciate it if you put a link to the tutorial.
* Send me your version and I will be happy to put it in my gallery
* Before you share this tutorial, read the author's terms
* Help me improve the quality of my translations and my blog: if you find any errors in the links,
in the translations, in the blog, please let me know by the email above. Thankful.


ROTEIRO


1. Open a new image with 900x600px
Fill with the gradiente formed by the colors #7d4a63 in the Foreground and the color #d7c6c5 in the Background


2. Effects - Texure effects - Texture - textura flores


3. Selections - Load selection from disk - Selection sel100_bea


4. New Raster Layer
Fill with the color #7d4a63
Select none

5. Selections - Load selection from disk - Selection sel101_bea

New Raster Layer
Fill with the gradiente of the step 1

6. Plugin VM Toolbox - Brigthness Noise


7. Select none
Layers - Arrange - Move Down

8. Click on Raster 2
Merge down

9. Effects - distortion Effects - Wave


10. Plugin Eye Candy 5: Impact - Motion Trail


11. Image - Free Rotate

Effects - Image Effects - Offset


12. Layers - Duplicate
Image - Flip

13. Edit/Copy and Paste as new layer the tube 2332_woman_LB
Image - Resize 70% - All layers unchecked

14. Image - Mirror
Effects - Image effects - Offset


15. Edit/Copy and Paste as new layer the WordArt_amor-Bea
Effects - Image effects - Offset

Blend Mode: Overlay - Opacity: 90%

16. Image - Add borders - 2px - color #843f5b
Image - Add borders - 20px - color #d7c6c5
Image - Add borders - 2px - color #843f5b

17. Select the 20px borders with Magic Wand
Fill in the gradiente of the step 1 - change the Angle to 135


18. Plugin Toolbox - Brigthness Noise - same as step 6

19. Drop Shadow - color #221219


20. Selections - invert 
Repat Drop shadow from step 19
Select none

21. Add your signature
Save as JPEG


I hope you enjoyed
Thank you for ding my translations.

Other model

Tube: Luz Cristina

quinta-feira, 8 de fevereiro de 2018

PALABRAS DE AMOR


PALABRAS DE AMOR
by Bea


Esta tradução tem a permissão da autora. Obrigada Bea
Tutorial original aqui


PLUGINS - aqui
VM Toolbox - Eye Candy 5: impact


MATERIAL  - aqui
2332 - woman - misted - LB TUBES
Textura_flores(guardar en la carpeta de Texturas)
WordArt_amor_bea
sel100_bea(Guardar en la carpeta de selecciones)
sel101_bea(Guardar en la carpeta de selecciones)
Marca de agua


PALETA DE CORES
*Abra a paleta de cores no PSP e capture as cores com a dropper tool
*Ajuste o blend mode e a opacidade das layers de acordo com suas imagens

*Se você tiver alguma dificuldade na execução desse tutorial, entre em contato comigo: E-mail
*Ao fazer um dos tutoriais do meu blog, eu agradeceria muito se você colocasse um link para o tutorial.
*Envie para mim sua versão e eu terei o maior prazer em colocar na minha galeria
*Antes de você compartilhar este tutorial, leia os termos da autora
*Ajude-me a melhorar a qualidade das minhas traduções e do meu blog: se você encontrar algum erro nos links, nas traduções, no blog, por favor me avise pelo e-mail acima. Grata.


ROTEIRO


1. Abrir uma nova imagem com 900x600px
Preencher com o gradiente formado pelas cores #7d4a63 no foreground e a cor #d7c6c5 no Background


2. Effects - Texture Effects - Texture - textura flores


3. Selections - Load selection from disk - Selection sel100_bea


4. New Raster Layer
Preencher com a cor #7d4a63
Select none

5. Selections - Load selections from disk - Selection sel101_bea

New Raster layer
Preencher com o gradiente

6. Plugin VM Toolbox - Brightness Noise


7. Select none
Layers - Arrange - Move down

8. Clique na Raster 2
Merge down

9. Effects - Distortion Effects - Wave


10. Plugin Eye Candy 5 Impact - Motion Trail


11. Image - Free Rotate

Effects - image effects - Offset


12. Layers - Duplicate
Image - Flip

13. Copiar e colar como nova layer o tube 2332 -woman-LB
Image - Resize 70% - All layers desmarcado

14. Image - Mirror
Effects - Image effects - offset


15. Copiar e colar como nova layer o WordArt_amor_bea
Effects - Image Effects - Offset

Blend Mode: Overlay 
Opacidade: 90%

16. Image - Add borders - 2px - cor #843f5b
Image - Add borders - 20px - cor #d7c6c5
Image - Add borders - 2px - 843f5b

17. Selecione a borda de 20px com a Magic Wand
Preencha com o gradiente - Mude o Angle para 135


18. Plugin Toolbox - Brightness Noise - igual ao item 6.


19. Drop Shadow - cor #221219


20. Selections - Invert selection
Repita o Drop shadow do item 19
Select none

21. Adicione sua assinatura
Salve como JPEG

Espero que tenham gostado.
Obrigada por fazerem minhas traduções.

Outros modelos:
Tube: Luz Cristina