

This tutorial is from Saturnella and was translated with your permission
| Tutorial | Futura Original HERE |
| Credits | Saturnella |
| Material | HERE |
| Tutorial's Plugins |
Mehdi / Sorting Tile Unlimited 2 / Paper Texture Mura's Meister / Perspective Tiling VM Extravaganza / Aura Detector Eye Candy 5: Impact / Perpsective Shadow AAA Frame / Foto Frame |
| Blog's Plugins |
HERE |
| Atention | Clique no preset Alien Skin para exportá-lo para o Plugin |
| Contacts | E-mail:
HERE Facebook: HERE Your Versions: HERE |
SCRIPT
(click on the prints for a better view)
01. put color 1 in the foreground and color 2 in the background
Note: The yellow color is indispensable, so that it can be configured the sun
02. open the alpha file (calque alpha-futura) / duplicate (shift + D) /close the original / rename to raster 1
03. Fill with this Linear gradient:


04. adjust / blur / gaussian blur: 35


05. copy the tube (camp-23) and paste it as a new layer
06. position at the top, left as the model


07. copy the tube (camp-25) and paste it as a new layer
08. image / mirror / mirror horizontal (mirror)
09. position harmoniously below, on the right according to the model


10. merge visible
11. effects / plgins / unlimited / paper texture / canvas, fine


12. add new layer
13. paint with white
14. layers / new mask layer / from image / mask (narah-mask-1536)


15. effects / edge effects / enhance
16. merge group
17. drop shadow: -2 -2 80 10 black
18. layers / properties / blend mode: soft light / opacity: 55%


19. image / mirror / mirror horizontal (mirror)
20. activate the bottom layer - merged
21. add new layer
22. selections / select all
23. copy the tube (sat-deco 2) and paste in the selection
24. select none
25. drop shadow: -2 -2 50 10 black
26. layers / properties / blend mode: overlay / opacity: 50%


27. activate the bottom layer - merged
28. selections / load selection from alpha channel / selection 1


29. selections / promote selection to layer
30. effects / plugins / mehdi / sorting tile


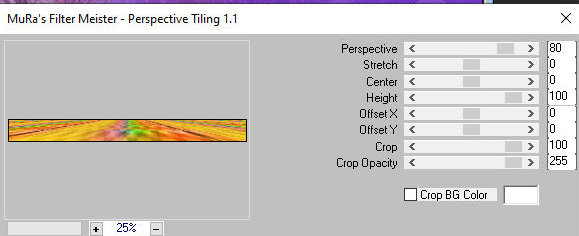
31. effects / plugins / mura's meister / perspective tiling / default

32. select none
33. layers / duplicate
34. image / mirror / mirror horizontal (mirror)
35. layers / properties / opacity: 50%


36. merge down
37. drop shadow: 5 0 50 30 black
38. layers / arrange / bring to top
39. activate the top layer
40. add new layer
41. selections / load selection from alpha channel / selection 2


42. activate the airbrush tool and configure as per the print


43. click inside the circle just once, using yellow
44. select none
45. effects / plugins / vm extravaganza / aura detector


46. selections / load selection from alpha channel / selection 2 again


47. selections / modify / select selection borders


48. activate the flood fill tool (bucket) and set the opacity to 60


49. paint with yellow
50. select none
51. add new layer
52. selections / load selection from alpha channel / selection 3


53. activate the flood fill tool (bucket) and set the opacity to 100%
54. paint with yellow
55. select none
56. layers / duplicate
57. image / mirror / mirror vertical (flip)
58. position according to model
(Note: position the dash from top to top a little bit, so that when rotating, the position is harmonious)

(Note: position the dash from top to top a little bit, so that when rotating, the position is harmonious)

59. merge down
60. layers / duplicate
61. image / free rotate right 90


62. layers / duplicate
63. image / free rotate right 45


64. merge down - apply 3 times
65. drop shadow: 1 1 60 1 color 2
66. activate the pick tool and configure according to the print: (466/27) / press M


67. copy the female tube and paste it as a new layer
68. image / mirror / mirror horizontal (mirror)
69. image / resize: 75%
70. position according to model
71. effects / plugins / eye candy 5: imapct / perspective shadow / preset (futura-shadow)


72. copy the fantastique tube and paste it as a new layer
73. image / resize: 75%
74. position left according to model
75. layers / duplicate
76. layers / properties / blend mode: screen


77. merge down
78. copy the tube text and paste it as a new layer
79. drop shadow: 1 1 60 1 black
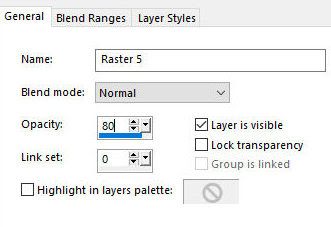
80. layers / properties / opacity: 80%

81. image / add borders / 1px / color 2
82. image / add borders / 3px / color 1
83. image / add borders / 1px / color 2
84. image / add borders / 30px / color 3
85. image / add borders / 1px / color 2
86. image / add borders / 3px / color 1
87. image / add borders / 1px / color 2
88. selections / select all
89. image / add borders / 50px / color 3
90. selections / invert
91. effects / plugins / mehdi / kaleidoscope 2.1


92. effects / edge effects / enhance
93. effects / plugins / aaa frame / foto frame


94. selections / invert
95. drop shadow: 0 0 80 40 black
96. select none
97. repeat the photo frame with widt = 5


98. place the Saturnella watermark
99. place your signature
100. image / add borders / 1px / black
101. save: file / export / jpeg optimizer
Thank you for doing my translations
Nenhum comentário:
Postar um comentário
Observação: somente um membro deste blog pode postar um comentário.