This tutorial is from Saturnella and was translated with your permission
| Tutorial | Coquelicots Original HERE |
| Credits | Elly / Saturnella / Narah |
| Material | HERE |
| Plugins | Mehdi AAA Filters FM Tile Tools Simple Graphic Plus Carolaine and Sensibility Eye Candy 5: Impact |
| DownloadPlugins | HERE |
| Attention | * Double click on the Alien Skin presets to export to the plugin |
| Remembering |
* Change blend mode, opacity and apply drop shadow according to your tubes * The Pick Tool in older versions of the PSP, is called Deformation * In old PSP versions: Mirror / Mirror Horizontal = Mirror Mirror / Mirror Vertical = Flip |
| Contatos |
E-mail: HERE Facebook: HERE Your Versions: HERE |
SCRIPT
(click on the prints for a better view)
01. put color 1 in the foreground and color 2 in the background
02. open the alpha file (alpha-coquelicots) / duplicate (shift + d) /close the original / rename to raster 1
03. effects / plugins / mehdi / wavy lab 1.1
color sequence: 2-1-3-4
04. adjust / blur / radial blur
05. effects / edge effects / enhance more
06. effects / plugins / aaa filters / custom / grain
07. add new layer
08. selections / select all
09. open image (image-fond) / copy and paste into selection
10. select none
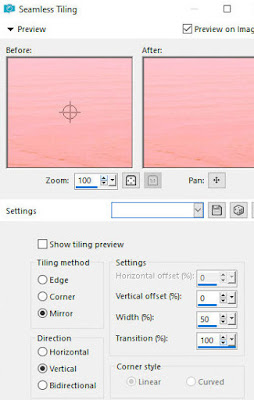
11. effects / image effects / seamless tiling
12. layers / properties / blend mode: multiply / opacity: 40
13. effects / plugins / fm tile tools / saturation emboss / default
14. layers / duplicate
15. effects / plugins / simple / blintz - apply 2 times
16. effects / plugins / simple / quick tile
17. effects / reflection effects / rotating mirror
18. effects / plugins / graphic plus / vertical mirror / default
19. selections / load selection from alpha channel / selection 1
20. selections / promote selection to layer
21. add new layer
22. open the landscape tube / copy and paste into the selection
23. select none
24. drop shadow: 0 0 50 20 dark color (red)
25. merge down
26. layers / duplicate
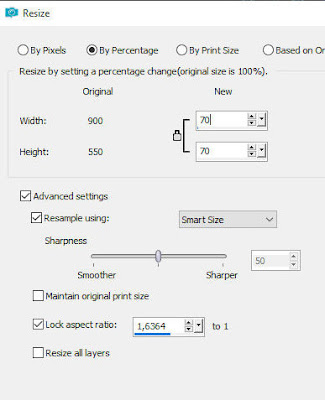
27. image / resize: 85%
28. drop shadow like the previous one
29. layers / duplicate
30. image / resize: 85%
31. merge down - apply 2 times
32. drop shadow: 0 0 80 30 dark color
33. activate the copy of raster 1 layer
34. selections / load selection from alpha channel / selection 2
35. selections / promote selection to layer
36. effects / plugins / carolaine and sensibility / cs-halloween2 / default
37. select none
38. effects / plugins / eye candy 5: impact / gradient glow
39. To change colors:
40. click on the "bucket" to choose the color
41. click on Color to place the color. In the window that opens,
put the color code. Do this in the other color as well.
41. click on Color to place the color. In the window that opens,
42. click OK
43. layers / duplicate
44. image / mirror / mirror horizontal
45. merge down
46. effects / plugins / eye candy 5: Impact / glass
preset: (coquelicots-glass)
47. drop shadow like the previous one
48. activate the copy of raster layer 1
49. effects / art media effects / brush stroke
50. activate the top layer
51. add new layer
52. paint with color 4
53. open the mask (narah-mask-1542)
54. layers / new mask layer / from image / mask above
55. effects / edge effects / enhance
56. merge group
57. drop shadow: 1 1 100 3 dark color
58. layers / properties / blend mode: hard light
59. add new layer
60. paint with color 4
61. open the mask (narah-mask-0878)
62. layers / new mask layer / from image / mask above
63. image / mirror / mirror horizontal
64. effects / edge effects / enhance
65. merge group
66. drop shadow like the previous one
67. layers / properties / blend mode: overlay
68. activate the top layer
69. open the tube (sat-fem01) / copy and paste as a new layer
70. image / resize: 70%
71. adjust / sharpness / sharpen
72. position right
73. effects / plugins / eye candy 5: impact / perspective shadow /preset (coquelicots-shadow)
74. open the vase tube / copy and paste as a new layer
75. image / mirror / mirror horizontal
76. image / resize: 70%
77. adjust / sharpness / sharpen
78. position left
79. effects / plugins / eye candy 5: impact / perspective shadow just like the previous one
80. open the tube (title) / copy and paste as a new layer
81. position according to model
82. drop shadow: 1 1 10 1 black
83. image / add borders / 1px / color 2
image / add borders / 5px / color 4
image / add borders / 1px / color 2
image / add borders / 3px / color 1
image / add borders / 10px / color 4
image / add borders / 1px / color 2
image / add borders / 3px / color 3
image / add borders / 25px / color 4
image / add borders / 1px / color 2
image / add borders / 3px / color 1
84. selections / select all
85. image / add borders / 50px / color 4
86. drop shadow: 2 2 60 40 black
87. select none
88. open the tube (deco cadre) / copy and paste as a new layer
89. drop shadow like the previous one
90. place your signature
91. image / add borders / 1px / color 5
92. image / resize: 900px (width)
93. adjust / sharpness / unsharp mask
94. save: file / export / jpeg optimizer
Thank you for doing my translations


Nenhum comentário:
Postar um comentário
Observação: somente um membro deste blog pode postar um comentário.