This tutorial is by Maria José and was translated with your permission
.......
Tutorial: Remembering
Original HERE
.......
Credits:
Maria José
.......
Material
.......
Plugins:
Fantastique Machine
Flaming Pear
Download: HERE
.......
Contacts:
E-mail: HERE
Facebook: HERE
Your Versions: HERE
.......
Remembering:
* Change the blend mode and opacity of the layers and apply drop shadow according to your tubes.
* The Pick Tool in older versions of the PSP is called Deformation
* In old PSP versions:
Mirror / Mirror Horizontal = Mirror
Mirror / Mirror Vertical = Flip
.......
SCRIPT
(click on the prints for a better view)
01-put the color # 70452f in the foreground and the color # e5c58e in the background
02-prepare a Linear gradient
03-open a new image with 1000x700px
04-Paint with the gradient above
05-selections / select all
06-copy the tube (tube as-29) and paste in the selection
07-select none
08-effects / image effects / seamless tiling
09-effects / plugins / fantastic machine / paint engine / preset oil angles - apply 2 times
Note.: If you do not have a preset (oil angles), configure according to the print
11-adjust / sharpness / sharpen
11.1 the image will look like this:
12-layers / new mask layer / from image / mask (maskborder-mj)
13-merge group
13.1 apply the mask above again
14-layers / duplicate
15-adjust / blur / gaussian blur: 15
16-effects / texture effects / blinds
17-adjust / sharpness / sharpen
18-effects / geometric effects / skew
19-drop shadow: 0 0 80 40 black
20-effects / geometric effects / circle
21-with the magic wand (tolerance and feather = 0) select the part of the image shown in the print
21.1 press delete on your keyboard
22-select none
23-drop shadow just like the previous one
24-activate the layer (group - group - raster 1)
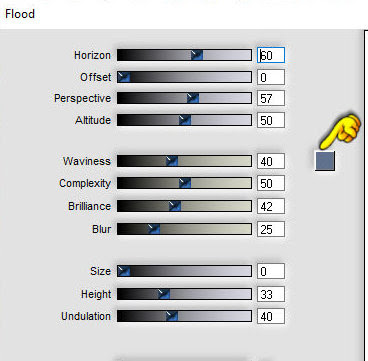
25-effects / plugins / flaming pear / flood
Note: change the color in the square shown in the print, according to your colors.
26-copy the tube (tube as-29) and paste it as a new layer
27-position according to the model
28-add new layer
29-layers / arrange / send to bottom
30-fill with gradient
31-selections / select all
32-copy the tube misted (tube as-29) and paste in the selection
33-select none
34-effects / image effects / seamless tiling
35-effects / plugins / fantastic machine / paint engine / preset oil angles - apply 1 time
36-adjust / sharpness / sharpen
36.1 activate the top layer
37-copy the tube (mistedface1-mj) and paste it as a new layer
37.1 image / mirror / mirror horizontal
38-image / resize: 90%
39-position according to model
40-the image and layers will look like this
41-image / add borders / 1px / # 644632
42-image / add borders / 2px / # 627d95
43-image / add borders / 1px / # 644632
44-selections / select all
45-copy this layer (will be in memory)
46-image / add borders / 50px / white
47-selections / invert
48-paste the image copied above into the selection
49-adjust / blur / gaussian blur: 15
50-effects / plugins / fantastique machine / paint engine / preset oil angles - apply 1 time
51-selections / invert
52-selections / modify / expand: 8px
53-drop shadow: 0 0 80 40 black
54-select none
55-image / add borders / 1px / # 644632
56-place your signature
57-merge all
58-image / resize: 1000px (width)
59-save: file / export / jpeg optimizer
Thank you for doing my translations


Nenhum comentário:
Postar um comentário
Observação: somente um membro deste blog pode postar um comentário.