Mostrando postagens com marcador Mabel Design. Mostrar todas as postagens

quinta-feira, 21 de dezembro de 2017

VERY PINK (in english)


This tutorial belongs to Mabel Design. Original here
translation have the permission of the author. Thank you Mabel.


PLUGINS - here


Tubes: Mabel


COLOR PALETTE:

*Save the selection in your PSP selections folder
*Open the color palette in PSP and capture the colors with the dropper tool
*Set the blend mode and opacity of layers according to your pictures


* If you have any difficulty in the execution of this tutorial, please contact me:  E-mail
* When one of the tutorials on my blog, I would greatly appreciate it if you put a link to the tutorial.
* Send me your version and I'll be happy to put in my gallery
* Before you share this tutorial, please read the terms of author
* Help me to improve the quality of my translations and my blog: if you find any error in links, in translation, blog, please let me know by e-mail above. Thankful.


SCRIPT:


1. MATERIALS PALETTE:
Foreground: #a96c6f
Background: #fed8e5
Other color: #64413b
Gradient: Radial

2. Open a new image with 800x600px
3. Fill with gradient
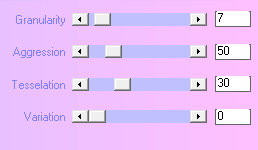
4. Plugin Mock - Mosaic

5. Effects - Edge Effects - Enhance More
6. Layers - duplicate
7. Plugin Mura's Meister - perspective tiling

8. Effects - Reflections Effects - Rotating  Mirror

9. Open the file Mabel-lavanda-plantas
10. Edit/Copy and Paste as new layer
11. Place the right as model
12. Add a new layer
13. layers - Arrange - Bring to top
14. Selections - load selection from disk - Selection cuadrado-mabel-15

15. Fill with the gradient
16. Effects - Texture effects - blinds

17. Drop Shadow: 1/1/100/15 - cloro #64413b
18. Repeat Drop shadow: V and H negative
19. Select none
20. Layers - duplicate
21. Image - Flip
22. Merge down
23. Effects - image effects - seamless tiling - default
24. Open the file Lady 5
25. Edit/Copy and Paste as new layer
26. Image - Resize 80% - Resize all layers desmarcado
27. Place the left as model
28. Layers - duplicate
29. Merge visible
30. Image - add borders - 3px - color #a96c6f
31. Image - add borders - 30px - color White
32. Select the White border with the Magic Wand
33. Effects - 3D Effects - buttonize - color #a96c6f

34. Repeat the buttonize
35. Select none
36. Image - add borders - 3px - color #a96c6f
37. Add a new layer
38. Put your signature
39. Merge all(flatten)
40. File - Export - JPEG Optmizer


I hope you enjoyed.
Thank you for doing my translations


VERY PINK


Este tutorial pertence à Mabel Design. Original aqui
A tradução tem a permissão da autora. Obrigada Mabel.


PLUGINS - aqui


Tubes: Mabel


PALETA DE CORES:


*Salve a seleção na sua pasta de seleções do PSP
*Abra a paleta de cores no PSP e capture as cores com a dropper tool
*Ajuste o blend mode e a opacidade das layers de acordo com suas imagens

*Se você tiver alguma dificuldade na execução desse tutorial, entre em contato comigo: E-mail
*Ao fazer um dos tutoriais do meu blog, eu agradeceria muito se você colocasse um link para o tutorial.
*Envie para mim sua versão e eu terei o maior prazer em colocar na minha galeria
*Antes de você compartilhar este tutorial, leia os termos da autora
*Ajude-me a melhorar a qualidade das minhas traduções e do meu blog: se você encontrar algum erro nos links, nas traduções, no blog, por favor me avise pelo e-mail acima. Grata.


ROTEIRO:

1. MATERIALS PALETTE:
Foreground: #a96c6f
Background: #fed8e5
Outra cor: 64413b
Gradiente: Radial


2. Abrir uma imagem de 800x600px
3. Pinte com o gradiente
4. Plugin Mock - Mosaic

5. Effects - Edge effects - Enhance more
6. Layers - Duplicate
7. Plugin Mura's Meister - Perspective Tiling

8. Effects - Reflection Effects - Rotating Mirror

9. Abra o arquivo Mabel-lavanda-plantas
10. Copie e cole como nova layer
11. Posicione à direita conforme o modelo
12. Adicione nova layer
13. Layers - Arrange - Bring to top
14. Selections - Load selection from disk - Selection cuadrado-mabel-15

15. Pinte com o gradiente
16. Effects - Texture Effects - Blinds

17. Drop Shadow: 1/1/100/15 - cor #644136b
18. Repita o Drop Shadow com V e H negativos
19. Select None
20. Layers - Duplicate
21. Image - Flip
22. Merge Down
23. Effects - Image Effects - seamless tiling - default
24. Abra o arquivo Lady 5
25. Copie e cole como nova layer
26. Image - Resize 80% - all layers desmarcado
27. Posicione à esquerda conforme modelo
28. Layers - duplicate
29. Merge visible
30. Image - add borders - 3px - cor #a96c6f
31. Image add borders - 30px - branco
32. Selecione a borda branca com  a Magic Wand
33. Effects - 3D effects - buttonize - cor #a96c6f

34. Repita o buttonize
35. Select none
36. Image - add borders - 3px - cor #a96c6f
37. Adicione nova layer
38. coloque sua assinatura
39. Merge all(flatten)
40. File - Export - JPEG Optimizer


Espero que tenham gostado.
Obrigada por fazerem minhas traduções.

domingo, 10 de dezembro de 2017

ADORNO MI NAVIDAD - In English


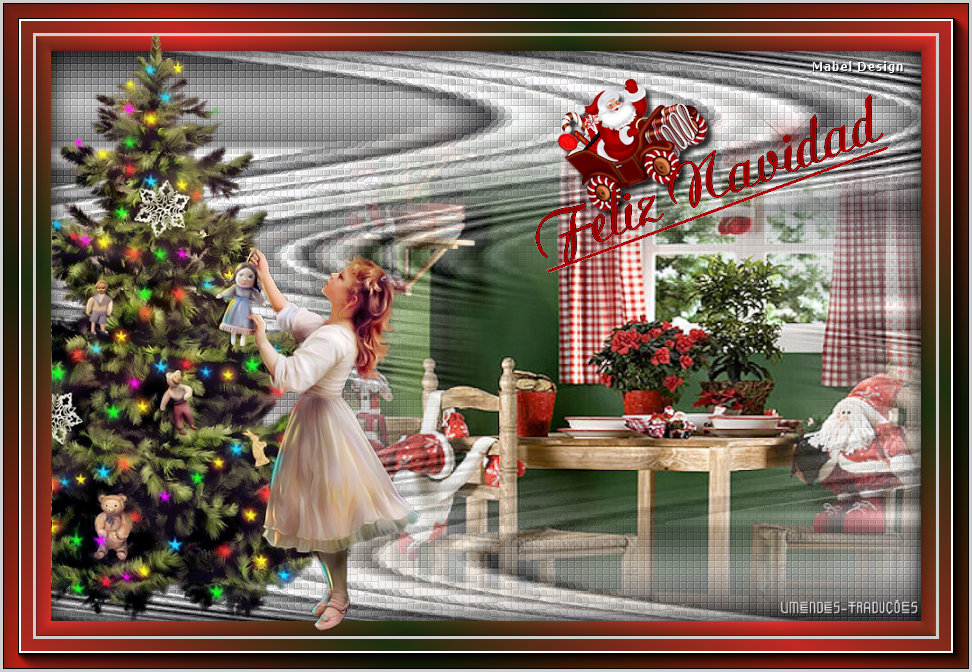
This tutorial belongs to Mabel design. Original here
The translation was made with your permission. Thank you Mabel


PLUGINS - here


Tube:
Mabel
Nikita - here


COLOR PALETTE

* Open the color palette on the PSP and capture the colors with the dropper tool
* Adjust blend mode and layer opacity according to your images


* If you have any difficulties performing this tutorial, please contact me: E-mail
* When doing one of the tutorials of my blog, I would appreciate it if you put a link to the tutorial.
* Send me your version and I will be happy to put it in my gallery
* Before you share this tutorial, read the author's terms
* Help me improve the quality of my translations and my blog: if you find any errors in the links, in the translations, in the blog, please let me know by the email above. Thankful.


SCRIPT:

1. Open a new image with 800x600px
2.  Material Palette - Foreground #c12823   Background#1c3010
3. Materials Palette - Prepare a Linear gradiente


4. Materials Palette - Select the Silver gradient (1) saved at the beginning. Fill in the image with the gradiente
5. Plugin VanDerLee - unplugged-X - Wavemaker

6. Plugin Xero - Frittilary

7. Layers - new raster layer - Selections - Select all
8. Open the file misted-mabel-navidad2017
9. Edit/Copy and Paste into selection
10. Select none
11. Position according to model
12. Layers - new raster layer
13. Fill with the gradiente
14. Selections - Select all
15. Selections - Modify - contract: 15px
16. Press the Delete key on your computer
17. Selections - Invert
18. Effects - 3D effects - Inner Bevel

19. Selections - invert
20. Effects - 3D effects - cutout

21. Select none
22. Open the file 13508436262-noel-nikita
23. Edit/Copy - Paste as new layer
24. Image - resize 80% - Resize all layers  unchecked
25. Position according to model
26. Adjust - Sharpness - sharpen
27. Open the file Adorno
28. Edit/Copy - Paste as new layer
29. Position according to model
30. Layers - merge - merge visible
31. image - add borders - 3px - color #cfcfcf
32. Image - add borders - 30px - color #ffffff
33. Select this 30px border with Magic Wand
34. Fill with the gradiente
35. Plugin AAA Frame - Foto Frame

36. Select none
37. Image -add borders - 3px - color #cfcfcf
38. Layers - new raster layer
39. Place your signature
40. Merge all (flatten)
41. File - Export - JPEG Optimizer


I hope you enjoyed.
Thank you for doing my translations

Bea


ADORNO MI NAVIDAD


Este tutorial pertence a Mabel Design. Original aqui
A tradução tem a permissão da autora. Obrigada Mabel


PLUGINS - aqui


Tubes:
Mabel
Nikita - aqui


PALETA DE CORES


*Abra a paleta de cores no PSP e capture as cores com a dropper tool
*Ajuste o blend mode e a opacidade das layers de acordo com suas imagens


*Se você tiver alguma dificuldade na execução desse tutorial, entre em contato comigo: E-mail
*Ao fazer um dos tutoriais do meu blog, eu agradeceria muito se você colocasse um link para o tutorial.
*Envie para mim sua versão e eu terei o maior prazer em colocar na minha galeria
*Antes de você compartilhar este tutorial, leia os termos da autora
*Ajude-me a melhorar a qualidade das minhas traduções e do meu blog: se você encontrar algum erro nos links, nas traduções, no blog, por favor me avise pelo e-mail acima. Grata.


ROTEIRO:
1. Abra uma nova imagem com 800x600px
2. Materials Palette - Foreground #c12823   Background#1c3010
3. Materials Palette - prepare um gradiente Linear:


4. Materials Palette - Selecione o gradiente Silver(1) salvo no início - Preencha a imagem com ele.
5. Plugin VanDerLee - Unplugged_X - Wavemaker

6. Plugin Xero - Frittilary

7. Adicione uma nova layer - Selections - Select all
8. Abra o arquivo Misted_mabel_navidad2017
9. Copiar e colar na seleção
10. Select none
11. Posicione conforme o modelo
12. Adicione uma nova layer
13. Preencha com o gradiente
14. Selections - Select all
15. Selections - Modify - Contract: 15
16. Pressione a tecla Delete
17. Selections - invert
18. Effects - 3D Effects - Inner Bevel
19. Selections  - invert
20. Effects - 3D Effects - Cutout

21. Select none
22. Abra o arquivo 13508436262_noel-nikita
23. Copie e cole como nova layer
24. Image - resize 80% - all layers desmarcado
25. Posicione conforme o modelo
26. Adjust - Sharpness - sharpen
27. Abra o arquivo Adorno
28. Copie e cole como nova layer
29.Posicione conforme o modelo
30. Layers - merge - merge visible
31. Image - add borders - 3px - cor #cfcfcf
32. Image - add borders - 30px - cor #FFFFFF
33. Selecione esta borda de 30px com a Magic Wand
34. Pinte com o gradiente
35. Plugin AAA Frame - Foto Frame

36. Select none
37. Image - add borders - 3px - cor #cfcfcf
38. Adicione uma nova layer
39. Coloque sua assinatura
40. Merge all(flatten)
42. File - Export - JPEG Optimizer

Espero que tenham gostado.
Obrigada por fazerem minhas traduções.

Bea


terça-feira, 28 de novembro de 2017

FAIRY FANTASY (in english)

This tutorial belongs to Mabel Design. Original here
The translation was made with your permission. Thank you Mabel


PLUGINS - here
AP 01[Innovations]
tramages


Tubes:
LisaT
Min@
Mabel

COLORS PALETTE

* Open the mask on PSP
* Save selection mabelbarras to your PSP selections folder
* Open the color palette on the PSP and capture the colors with the dropper tool
* Adjust blend mode and layer opacity according to your images

--x--x--

* If you have any difficulties performing this tutorial, please contact me: E-mail
* When doing one of the tutorials of my blog, I would appreciate it if you put a link to the tutorial.
* Send me your version and I will be happy to put it in my gallery
* Before you share this tutorial, read the author's terms


SCRIPT:

1. Open a new image with 900x700px

2. In the color Palette set your foreground with the color #5c5f11 and the background #dee6b7 - Set your foreground with a gradiente Linear:


3. Fill the image with the gradient - Selections - select all

4. Open the file Min@.4712.mist paesaggio.05.17 - edit/copy - Edit/Paste into selection - select none

5. Effects - image effects - seamless tiling - default

6. Adjust - blur - Radial Blur:


7. Effects - user Defined filter - emboss 3

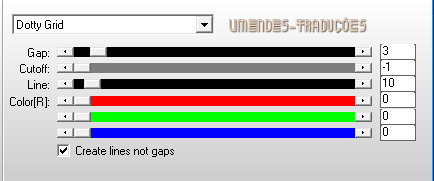
8. Effects - Plugins -  AP 01 [Innovations] - Lines silverlining - Dotty Grid


9. Layers - duplicate

10. Effects - Plugins - AP 01 [innovations] - Emboss - EmbossPic - Addition


11. Layers - new mask layer - from image - Mask Narah_mask_1175 - Merge group


12. Effects - User Defined filter - emboss 3

13. Open the file min@.4712 Mist Paesaggio.05.17 - Edit/Copy  - Edit/paste as new layer

14. In the Layer palette - Click twice with the left button and set the Blend Mode: soft Light

15. Layer Palette: click on layer of the mask (group-copy of raster 1) - Layers - new mask layer - from image - Mask 00invertida - adjust the mask - merge group


16. Layers - new raster layer - Seletions - load selection from disk - Selection mabelbarras - fill the selection with the gradiente


17.  Effects - 3D Effects - inner Bevel


18. Effects - 3D effects - Drop shadow: 3/5/85/25 - black - select none

19. Layers - duplicate - Layers - merge - merge down

20. Layers - duplicate - Image - Mirror

21. Open the file florylazo - edit/copy - Edit/paste as new layer - Position as model

22. Effects = 3D effects - Drop shadow same configuration as before

23. Open the file fantasy-toons-0029-lisat - Image - Mirror 
Edit/copy - Edit/paste as new layer -Image
Resize 80% - Resize all layers unchecked
Position as model

24. Effects - 3D effects - Drop shadow same configuration as before

25. Layers - merge - merge visible

26. Image - add borders - symmetric checked - 5px - color #c5cc73

27. Image - add borders - 15 px - color White
Select this border with the magic Wand - Fill with the gradiente

28. Effects - Plugins - Tramage - Pool shadow - default - Select none


29. Image - add borders - 5px - color #c5cc73

30. Layers - new raster layer - add your signature
Layers/Merge/merge all (flatten)
Save as JPEG

I hope you enjoyed.
Thank you for doing my translations