


This tutorial belongs to Mabel Design. Original here
The translation was made with your permission. Thank you Mabel
The translation was made with your permission. Thank you Mabel
PLUGINS - here
AP 01[Innovations]
tramages
Tubes:
LisaT
Min@
Mabel
COLORS PALETTE

* Open the mask on PSP
* Save selection mabelbarras to your PSP selections folder
* Open the color palette on the PSP and capture the colors with the dropper tool
* Adjust blend mode and layer opacity according to your images
* Save selection mabelbarras to your PSP selections folder
* Open the color palette on the PSP and capture the colors with the dropper tool
* Adjust blend mode and layer opacity according to your images
--x--x--
* If you have any difficulties performing this tutorial, please contact me: E-mail
* When doing one of the tutorials of my blog, I would appreciate it if you put a link to the tutorial.
* Send me your version and I will be happy to put it in my gallery
* Before you share this tutorial, read the author's terms
* When doing one of the tutorials of my blog, I would appreciate it if you put a link to the tutorial.
* Send me your version and I will be happy to put it in my gallery
* Before you share this tutorial, read the author's terms
SCRIPT:
1. Open a new image with 900x700px
2. In the color Palette set your foreground with the color #5c5f11 and the background #dee6b7 - Set your foreground with a gradiente Linear:

3. Fill the image with the gradient - Selections - select all
4. Open the file Min@.4712.mist paesaggio.05.17 - edit/copy - Edit/Paste into selection - select none
5. Effects - image effects - seamless tiling - default
6. Adjust - blur - Radial Blur:

7. Effects - user Defined filter - emboss 3
8. Effects - Plugins - AP 01 [Innovations] - Lines silverlining - Dotty Grid
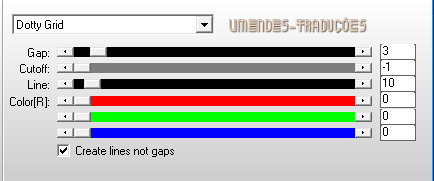
9. Layers - duplicate
10. Effects - Plugins - AP 01 [innovations] - Emboss - EmbossPic - Addition

11. Layers - new mask layer - from image - Mask Narah_mask_1175 - Merge group

12. Effects - User Defined filter - emboss 3
13. Open the file min@.4712 Mist Paesaggio.05.17 - Edit/Copy - Edit/paste as new layer
14. In the Layer palette - Click twice with the left button and set the Blend Mode: soft Light
15. Layer Palette: click on layer of the mask (group-copy of raster 1) - Layers - new mask layer - from image - Mask 00invertida - adjust the mask - merge group

16. Layers - new raster layer - Seletions - load selection from disk - Selection mabelbarras - fill the selection with the gradiente

17. Effects - 3D Effects - inner Bevel

18. Effects - 3D effects - Drop shadow: 3/5/85/25 - black - select none
19. Layers - duplicate - Layers - merge - merge down
20. Layers - duplicate - Image - Mirror
21. Open the file florylazo - edit/copy - Edit/paste as new layer - Position as model
22. Effects = 3D effects - Drop shadow same configuration as before
23. Open the file fantasy-toons-0029-lisat - Image - Mirror
Edit/copy - Edit/paste as new layer -Image
Resize 80% - Resize all layers unchecked
Position as model
24. Effects - 3D effects - Drop shadow same configuration as before
25. Layers - merge - merge visible
26. Image - add borders - symmetric checked - 5px - color #c5cc73
27. Image - add borders - 15 px - color White
Select this border with the magic Wand - Fill with the gradiente
28. Effects - Plugins - Tramage - Pool shadow - default - Select none

29. Image - add borders - 5px - color #c5cc73
30. Layers - new raster layer - add your signature
Layers/Merge/merge all (flatten)
Save as JPEG
I hope you enjoyed.
Thank you for doing my translations
I hope you enjoyed.
Thank you for doing my translations


