  This tutorial is from Edith Spigai and has been translated into English with your authorization Original here  ****** Material 1 Tube Character (not supplied) 1 tube misted of landscape (not supplied) PSP Effects ****** Plugins: XE Xtras / Elemental Mura's Meister  ****** My e-mail:  you have issues with the material or tutorial ****** See you versions here:  ******  01. Open a new image with 1024x600px 01.1 With Dropper Tool, Capture two colors of your tubes. One light and one dark 02. Fill the Image with a Radial Gradient  03. Effects / Distortion Effects / Warp * -100 -100 100 100 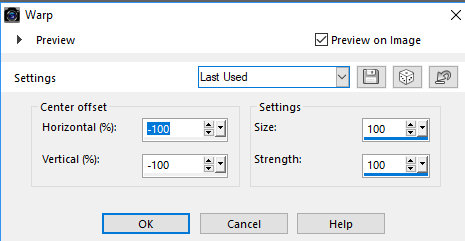 04. Layers / Duplicate 05. Image / Mirror 06. Layers / Properties / Blend Mode: Lighten 07. Merge Down 08. Layers / Duplicate 09. Image / Mirror / Vertical Mirror 10. Layers / Properties / Blend Mode: Hard Light 11. Merge Down 12. Effects / Edge Effects / Enhance More 13, Layers / Duplicate 14. Activate the Freehand Selection Tool and configure as in print:  15. Make a selection as shown in print  16. Selections / Modify / Expand: 6  17. Effects / Plugins / Xe Xtras / Elemental / Organics / Drifter  18. Adjust / Sharpness / Sharpen 19. Keep Selection 20. Drop Shadow: 2 11 80 40 - White 21. Repeat Drop shadow: 2 -11 80 40 - White 22. Layers / New Raster Layer 23. Open landscape misted tube / Copy and paste to selection 24. Layers / properties / Blend Mode: soft Light 25. Select None 26. Enable Raster Layer 1 27. Effects / Plugins / Mura's Meister / Perspective Tiling * Height: 15 other defaults  28. Layers / Arrange / Move Up 29. Drop Shadow: 0 0 80 40 Black 29.1 Activate the upper layer 30. Open your tube character / Copy and Paste as new layer 31. Apply a Drop Shadow of your choice 32. Image / Add borders / 2px / dark color 33. Image / Add borders / 2px / light color 34. Image / Add borders / 2px / dark color 35. Image / Add borders / 20px / light color 36. Image / Add borders / 2px / dark color 37. Adjust / Brightness Contrast / Brightness / Contrast * -25 / 0  38. Merge All 39. Put your signature 40. Save: File> Export> JPEG Optimizer Thank you for doing my translations. Other version Tube: Nena Silva  |

domingo, 11 de agosto de 2019
Edith Spigai - Element
Assinar:
Postar comentários (Atom)
Ficou linda sua versão. Obrigado !!!
ResponderExcluirObrigada Edith.
Excluir