Mostrando postagens com marcador Edith Spigai. Mostrar todas as postagens

domingo, 26 de abril de 2020

Edith Spigai - My Friend


Este tutorial é de Edith Spigai e foi traduzido com a sua permissão

Tutorial: My Friend - Original AQUI
Créditos:
Tube Principal: Misstyca
Flore: Lecture33
Mask: Narah
Outros materiais: Edith
Material - AQUI
Plugins:
Tramages
Simple / Top Left Mirror
FM Tile Tools / Blend emboss
Eye Candy 5: Impact / Glass
AAA Filters
Plugins - AQUI
Meu e-mail: AQUI
Meu grupo no Facebook: AQUI
Suas versões: AQUI


SCRIPT


(click on the prints for a better view)

01. Open a new transparent image with 900x600px

02. Place the color # 3a4860 in the foreground and the color # e0cbb4 in the background

03. Fill with this Linear gradient


04. Effects / Plugins / Tramages / Glass Pyramids


05. effects / plugins / simple / top left mirror


06. effects / edge effects / enhance more

07. add new layer

08. paint with the color # e0cbb4

09. layers / new mask layer / from image / mask (narah-maks-1260)


10. merge group

11. effects / texture effects / weave


12. merge visible

13. layers / duplicate

14. image / resize: 85% - all layers unchecked

15. remove the visibility of the layer merged by clicking on the eye (continue on the layer copy of merged)

16. select the transparent part of the layer with the magic wand

17. selections / invert

18. effects / plugins / tramages / wee scratches


19. effects / plugins / aaa filters / tweed frame


20. adjust / sharpness / sharpen

21. drop shadow: 4 4 80 40 black

22. select none

23. activate and open the layer merged

24. effects / plugins / tramages / tow the line


25. effects / plugins / fm tile tools / blend emboss / default


26. activate the copy of merged layer

27. selections / load selection from disk / selection (selection_1)


28. selections / promote selection to layer

29. adjust / blur / gaussian blur: 15


30. adjust / add / remove noise / add noise


31. adjust / sharpness / sharpen more

32. copy your flower tube and paste in the selection

33. selections / modify / expand: 4px


34. selections / modify / select selection borders


35. add new layer

36. fill with color # e0cbb4

37. effects / plugins / eye candy 5: impact / glass
/ preset (clear, no drop shadow)


38. drop shadow: 4 4 80 40 black

39. select none

40. merge down

41. drop shadow: 0 0 76 56 black

42. effects / image effects / offset (-100/0)


43. copy the tube (deco-myfriend-edith) and paste it as a new layer

44. layers / duplicate

45. merge down

46. ​​adjust / sharpness / sharpen

47. copy your main tube and paste it as a new layer

48. apply a drop shadow of your taste

48.1 position according to model

49. add a new layer

50. open the brush in the psp / file / export / custom brush / name: Brush / OK


51. activate the paint brush / locate the brush / apply according to the model / foreground color


52. effects / edge effects / enhance more

53. image / add borders / 2px / # 3a4860

54. image / add borders / 40px / white

55. effects / plugins / aaa filters / aaa framer / default
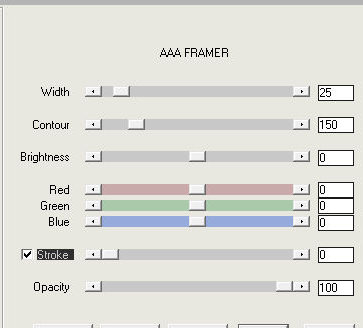


57. adjust / brightness and contrast / brightness / contrast
(Note: according to your picture)

58. place your signature

59. save: file / export / jpeg optimizer


Thank you for doing my translations


sábado, 28 de março de 2020

Edith Spigai - Flower charm - in english


This tutorial is by Edith Spigai and has been translated with your permission

Tutorial: Flower Charm - Original HERE

Credits:  
Malacka / Nicole

Material - HERE

You'll need:
1tube character
1 tube misted flower
1 Wordart

Plugins:
Tramages
Carolaine and Sensibility
AAA filters
It @ lian Edistors Effects
FM tiles tool
AAA Frame

Plugins - HERE

Meu e-mail: AQUI
Meu grupo no Facebook: AQUI
Suas versões: AQUI


SCRIPT:


(Click on the prints to see better)


01. Open a new transparent image with 950x600px

02. Place colors # 4f6342 in the foreground and color # cfbeb7 in the background

03. Prepare a Linear Gradient


04. Paint the image with this gradient

05. Selections / Select All

06. Copy your tube misted and paste in the selection

07. Select None

08. Effects / Image Effects / Seamless tiling / Preset Side by Side

09. Adjust / Blur / Radial Blur


10. Effects / Reflection Effects / Rotating Mirror


11. Effects / Edge Effects / Enhance More

12. Selections / Load selection from disk / selection (Selection A)

13. Selections / Promote Selection to layer

14. Select None

15. Effects / Plugins / Tramages / Gradiente / Spokes Ratio Maker / Default


16. Layers / Duplicate

17. Effects / Distortion Effects / Wave


18. Adjust / Sharpness / Sharpen More

19. Layers / Properties / Blend Mode: Hard Light

20. Layers / Arrange / Move down

21. Activate the top layer

22. Layers / duplicate

23. Image / Mirror / Mirror Vertical

24. Merge down

25. Layers / Duplicate

26. Effects / Geometric Effects / skew


27. Activate the Promocted Selection layer

28. Drop Shadow: 0 0 80 40 black

29. Activate the top layer

30. Add new layer

31. Selections / Load selection from disk / Selection B

32. Paint with the gradient of item 2 or with the solid color

33. Effects / Plugins / Carolaine and Sensibility / CS_LDots / Default


34. Effects / Edge Effects / Enhance

35. Select None

36. Layers / duplicate

37. Image / Mirror / Mirror Horizontal

38. Image / Mirror / Mirror Vertical

39. Merge down - apply 2 times

40. Effects / Plugins / It @ lian Editors Effects / Effetto Fantasma


41. Adjust / Sharpness / Sharpen

42. Effects / plugins / FM Tile Tools / Blend Emboss

43. Layers / Properties / Blend Mode: Multiply

44. Adjust / Brightness and Contrast / Brightness / Contrast


45. Open the tube (Deco_edith_1) and Merge down joining the 2 layers

45.1 Copy the tube (Deco_edith_1) and paste it as a new layer

46. ​​Layers / Duplicate

Note: you can colorize according to your colors

47. Position according to model

47.1 Merge Down

47.2 Layers / duplicate

47. 3 Image / Mirror / Mirror Horizontal

47.4 Image / Mirror / Mirror Vertical

47.5. Merge down

48. Copy the tube (deco_edith_2) and paste it as a new layer

49. Position according to the model

50. Select the interior with the Magic Wand

51. Copy your tube misted (or other) and paste it into the selection

52. Adjust / Sharpness / Sharpen

52.1 Select None

53. Copy your main tube and paste it as a new layer

54. Apply a Drop Shadow of your choice

55. Decorate with text, a wordart or brush if you prefer

56. Merge visible

57. Image / Add borders / 3px / # 4f6342
Image / Add borders / 40px / #ffffff
Image / Add borders / 3px / # 4f6342

58. Effects / plugins / AAA Frame / Photo Frame


59. Effects / Plugins / AAA Filters / Custom / Sharp

60. Place your signature

61. Merge All

62. Save: File / Export / Jpeg Optimizer


Thank you for doing my translations


quarta-feira, 15 de janeiro de 2020

Edith Spigai - Sublime

 Edith Spigai's original version

My version with Kad's Tube


This tutorial is by Edith Spigai and was translated with your permission.

Original HERE


****

Credits:
LB Tubes
Anna.br


****

Material - HERE


If any material does not open, contact me

****

Plugins:
Carolaine and Sensibility
Simple / Pizza Slice Mirror
VM Distortion / Vision Impossible
AAA Frames / Photo Frame

Plugins - HERE


****

Orientations:

Click on the prints for a better view.
Remember to save work as it runs
Change Blend Mode, Opacity, and Drop Shadow to Your Images
Pick Tool replaces Deform tool from older versions of PSP

***

My E-Mail: HERE

Send us your versions or let me know if you have any problems
with the tutorial or material

***

Versions: HERE

***

Groups:


********


SCRIPT:


01. Kharnorric font is in the material.

02. Save the selections below to the PSP Selections folder
- Selection-1/2 and 3

03. Open a new image with 900x600px

04. Selections / Select All

05. Open the tube (1608_woman - LB Tubes)

06. Copy and paste in selection

07. Select None

08. Merge All

09. Layers / Promote background layer

10. Effects / Image Effects / Seamless Tiling / Default


11. Adjust / Blur / Gaussian Blur: 25


12. Effects / Plugins / Unlimited 2 / VM Distortin / vision Impossible


13. Effects / Plugins / Simple / Pizza Slice Mirror

14. Effects / Edge Effects / Enhance

15. Selections / Load selection from disk / Selection 1


16. Selections / Promote selection to layer

17. Effects / Plugins / Carolaine and Sensibility / CS_LDots


18. Adjust / Sharpness / Sharpen

19. Layers / Duplicate

20. Image / Mirror / Vertical Mirror

20.1 Select None

21. Merge Down

22. Drop Shadow: 5 5 50 20 Black

23. Enable layer Raster 1

24. Selections / Load selection from disk / Selection 2


25. Selections / promote selection to layer

26. Adjust / Blur / Gaussian Blur 25


27. Effects / Texture Effects / Texture (Dither 25 pct (PSP Texture)


28. Effects / Edge Effects / Enhance

29. Effects / 3D Effects / Chisel / Color # 7f8561


30. Drop Shadow: Same as Previous

31. Select None

32. Enable layer Raster 1

33. Selections / Load selection from disk / Selection 3


34. Add new layer

35. Open the tube (anna.br_cisnes.1071)

36. Copy and paste to selection

37. Effects / 3D Effects / Chisel - Same as above, just put 5 in the Size field.


38. Select None

39. Open the tube (Deco-Sublime)

40. Copy and paste as new layer

41. Position in the upper right corner as shown

42. Layers / Duplicate

43. Image / Mirror / Vertical Mirror

44. Merge down

44.1 Activate Top Layer

45. Open the tube (text) / Colorize according to your colors (You can use:
Adjust / Hue and Saturation / Colorize, or the Color Change tool)

46. ​​Copy and paste as new layer

47. Position by model

(Note. The author used the Kharnorric font (in the material) to make the text, applied Chisel and Drop Shadow)

48. Open the tube (Deco-2_Sublime)

49. Copy and paste as new layer

50. Position by model

51. Layers / properties / Blend Mode: Lighten


52. Merge visible

53. Effects / Plugins / AAA Frames / Photo Frame
- Apply 2 times


54. Open the tube (1608-woman-LB Tubes)

55. Copy and paste as new layer

56. Resize, Drop shadow and position as you like

57. Adjust / Brightness and Contrast / Brightness / Contrast
(-12 10

58. Enter your signature

59. Merge All

60. Save: File / Export / Jpeg Optimizer


Thank you for doing my translations.