

Este tutorial é de Eniko e foi traduzido com a sua permissão
ROTEIRO:

(CLIQUE NOS PRINTS PARA VISUALIZAR MELHOR)
01. Abra uma nova imagem transparente com 900x500px
02. Effects / Plugins / Mehdi / Wavy Lab 1.1
Seq. de cores: #030561 - #090ee8 - cor 3 e 4 default

03. Effects / Plugins / Unlimited 2 / BKG Kaleidoscope / Mirrored & Scaled


04. Effects / Plugins / Unlimited 2 / BKG Kaleidoscope / BluePerry Pie


05. Adjust / Sharpness / Sharpen
06. Abra o arquivo alpha (sel.pspimage) e minimize
07. Volte ao seu trabalho
08. Selections / Load selection from alpha channel / Selection 1


09. Selections / Promote selection to layer
10. Selections / Modify / Contract: 15


11. Effects / Plugins / Carolaine and Sensibility / CS_Texture

12. Adicione nova layer
13. Effects / 3D Effects / Cutout

14. Merge down
15. Selections / Select All
16. Selections / Float / Selections / Defloat
17. Adicione nova layer
18. Effects / 3D Effects / Cutout igual ao anterior


19. Select None
20. Merge down
21. Ative a layer Raster 1
22. Selections / Load selection from alpha channel / Selection 2


23. Selections / Promote selection to layer
24. Select None
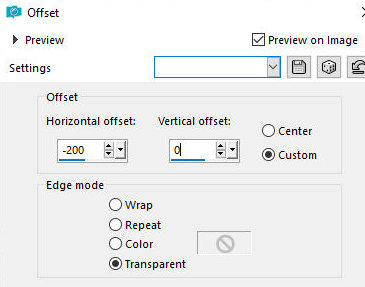
25. Effects / Image Effects / Offset (-200/0)

26. Layers / Duplicate
27. Image / Mirror / Mirror Horizontal
28. Merge Down
29. Selections / Select All
30. Selections / Float / Selections / Defloat
31. Effects / Plugins / VanDerLee / Unplugged-X / Transition

32. Select None
33. Ative a Selection Tool / Custom Selection e configure:

34. Adicione uma nova layer
35. Effects / 3D Effects / Cutout igual ao anterior


36. Selections / Modify / Contract: 10


37. Effects / 3D Effects / Cutout igual ao anterior


38. Merge down
39. Select None
40. Selections / Load selection from alpha channel / Selection 3


41. Effects / Plugins / Carolaine and Sensibility / CS_HLines

42. Adjust / Sharpness / Sharpen More
43. Select None
44. Drop Shadow: 0 0 80 35 preto
45. Ative a layer superior
46. Adicione nova layer
47. Pinte com branco
48. Abra a mask (02021)
49. Layers / New Mask Layer / From Image


50. Merge Group
51. Drop Shadow: 1 1 100 1 branco
52. Copie o tube (virág) / Cole como nova layer
53. Effects / Image Effects / Offset (0/-15)


54. Adjust / Sharpness / Sharpen More
55. Drop Shadow: 0 0 80 35 preto
56. Ative a layer Raster 1
57. Adjust / Blur / Gaussian Blur: 25


58. Adjust / Add/Remove Noise / Add Noise

59. Merge All
60. Image / Add borders / 1px / branco
Image / Add borders / 5px / cor #090ee8
Image / Add borders / 1px / branco
61. Copie o tube (irás) / cole como nova layer
62. Effects / Image Effects / Offset (-400/0)


63. Effects / Reflection Effects / Rotating Mirror
*0 180 0 reflect
64. Drop Shadow: 1 1 100 1 preto
65. Coloque sua assinatura
66. Merge All
67. Salve: File / Export / Jpeg Optimizer
Obrigada por fazer minhas traduções
Nenhum comentário:
Postar um comentário
Observação: somente um membro deste blog pode postar um comentário.