This tutorial belongs to Bea. Original here
Translation have the permission of the author. Thanks Bea
PLUGINS - here
tubes:
Bea
COLOR PALETTE:
* Open the color palette in PSP and capture the colors with the dropper tool
* Set the blend mode and opacity of layers according to your pictures
* Set the blend mode and opacity of layers according to your pictures
* If you have any difficulty in the execution of this tutorial, please contact me: E-mail
* When one of the tutorials on my blog, I would greatly appreciate it if you put a link to the tutorial.
* Send me your version and I'll be happy to put in my gallery
* Before you share this tutorial, please read the terms of author
* Help me to improve the quality of my translations and my blog: if you find any error in links, in translation, blog, please let me know by e-mail above. Thankful.
SCRIPT:
1. Open an image with 900x600px
2. Activate the Selection tool - custom selection
3. Fill the selection with color # 1b3b5d
4. Add a new layer
5. Fill with color # a7e2e8
6. Add a new layer
7. Fill with color # 92b1c3
8. Select none
9. Layers palette - activate Raster 1
10. Effects - image effects - offset
11. Layers palette - activate Raster 2
12. Effects - image effects - offset
13. Layers - merge - merge visible
14. Effects - user Definef Filter - Emboss 8
15. Effects - distortion Effects - warp
16. Image - Mirror
17. Effects -image effects - offset
18. With the Magic Wand select the left part, transparent
19. Selections - Modify - Expand 3px
20. Add a new layer
21. Fill the layer with linear gradient formed with the colors # 1b3b5d and #92b1c3
22. Select none
23. Layers - Arrange - Move down
24. Plugin DSB Flux - Bright Noise
25. Layers palette - remains in the same layer
26. With the Magic Wand select the transparent part
27. Fill in the Sunburst gradient using the same colors that are in the materials palette:
28. Adjust - blur - Gaussian Blur: 10
29. Select none
30. Open the file navidade227_beas_misted
31. Copy and paste as new layer
32. Position depending on model
33. Layers palette: activate the top layer (merged)
34. Drop Shadow: 0/0/100/30 - Black
35. Layers - merge - merge visible
36. Layers Palette - click on the eye to close the layer
37. Add a new layer
38. Fill with the gradient of item 21
39. Effects - Geometric Effects - circle
40. Image - Resize 25% - all layers unchecked
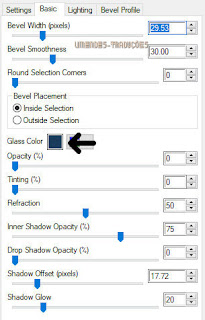
41. Plugin Eye Candy 5: Impact - Glass - Default. Change the color to one used in his work:
PREPARE BALLS:
(At this point, I suggest you to duplicate the image (Shift + D) and minimize for later use. Do this 3 times, as it will prepare four balls.)
42. Add a new layer
43. Turn on the Air Brush tool - Select one of four brushes that you saved (or tip_nik_cdesign178 179) - put in Size, the size you see fit. I used 140.
44. Apply with Air Brush in your image using the silver pattern (you can use another pattern or texture, or gradient, or only one color, is up to you)
45. Open the file deco-navidad
46. Copy and paste as a new layer (the file has two options: A golden and one silver Choose according to what is going to use the pattern of balls Click the layer and copy)
47. Image - Resize according to the size of the sphere, to be proportional - all layers unchecked
48. Layers palette - Activate the top layer
49. Layers - merge - merge down (joined stream to the sphere)
50. Maximize one of the duplicate images that has been minimized and do likewise, item 42 to 49. Do the same thing in the other two.
51. After preparing these three other spheres, each copy and paste the first image by placing the beads as the model.
52. Layers - merge - merge visible
53. Plugin Eye Candy 5: Impact - Perspective Shadow
Setting: Select Floating, Low
Basic: as print. Place the color # 1b3b5d
54. Layers palette - Click on the eye of the bottom layer to open the Layer
55. Image - Add borders - symmetric marked
2px - Color # 193c5c
7px - Color # d7e1ea
1px - Color # 193c5c
25px - Color # d7e1ea
1px - Color # 193c5c
56. Add a new layer - put your signature
57. Export the JPEG Optimizer.


Nenhum comentário:
Postar um comentário
Observação: somente um membro deste blog pode postar um comentário.