quinta-feira, 8 de fevereiro de 2018

PALABRAS DE AMOR


PALABRAS DE AMOR
by Bea


Esta tradução tem a permissão da autora. Obrigada Bea
Tutorial original aqui


PLUGINS - aqui
VM Toolbox - Eye Candy 5: impact


MATERIAL  - aqui
2332 - woman - misted - LB TUBES
Textura_flores(guardar en la carpeta de Texturas)
WordArt_amor_bea
sel100_bea(Guardar en la carpeta de selecciones)
sel101_bea(Guardar en la carpeta de selecciones)
Marca de agua


PALETA DE CORES
*Abra a paleta de cores no PSP e capture as cores com a dropper tool
*Ajuste o blend mode e a opacidade das layers de acordo com suas imagens

*Se você tiver alguma dificuldade na execução desse tutorial, entre em contato comigo: E-mail
*Ao fazer um dos tutoriais do meu blog, eu agradeceria muito se você colocasse um link para o tutorial.
*Envie para mim sua versão e eu terei o maior prazer em colocar na minha galeria
*Antes de você compartilhar este tutorial, leia os termos da autora
*Ajude-me a melhorar a qualidade das minhas traduções e do meu blog: se você encontrar algum erro nos links, nas traduções, no blog, por favor me avise pelo e-mail acima. Grata.


ROTEIRO


1. Abrir uma nova imagem com 900x600px
Preencher com o gradiente formado pelas cores #7d4a63 no foreground e a cor #d7c6c5 no Background


2. Effects - Texture Effects - Texture - textura flores


3. Selections - Load selection from disk - Selection sel100_bea


4. New Raster Layer
Preencher com a cor #7d4a63
Select none

5. Selections - Load selections from disk - Selection sel101_bea

New Raster layer
Preencher com o gradiente

6. Plugin VM Toolbox - Brightness Noise


7. Select none
Layers - Arrange - Move down

8. Clique na Raster 2
Merge down

9. Effects - Distortion Effects - Wave


10. Plugin Eye Candy 5 Impact - Motion Trail


11. Image - Free Rotate

Effects - image effects - Offset


12. Layers - Duplicate
Image - Flip

13. Copiar e colar como nova layer o tube 2332 -woman-LB
Image - Resize 70% - All layers desmarcado

14. Image - Mirror
Effects - Image effects - offset


15. Copiar e colar como nova layer o WordArt_amor_bea
Effects - Image Effects - Offset

Blend Mode: Overlay 
Opacidade: 90%

16. Image - Add borders - 2px - cor #843f5b
Image - Add borders - 20px - cor #d7c6c5
Image - Add borders - 2px - 843f5b

17. Selecione a borda de 20px com a Magic Wand
Preencha com o gradiente - Mude o Angle para 135


18. Plugin Toolbox - Brightness Noise - igual ao item 6.


19. Drop Shadow - cor #221219
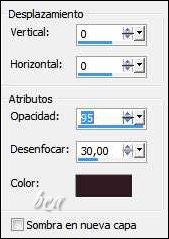

20. Selections - Invert selection
Repita o Drop shadow do item 19
Select none

21. Adicione sua assinatura
Salve como JPEG

Espero que tenham gostado.
Obrigada por fazerem minhas traduções.

Outros modelos:
Tube: Luz Cristina


TENTACION (in english)


TENTACION
by Bea


This translation has the permission of the author. Thank you Bea
Original Tutorial here


PLUGINS - here
Unlimited - Photo Aging Kit - Foto Frame - Mura's Meister - FM Tile Tool


MATERIAL - here
Mina@.4091.mist.paesaggio.06.16 (pspimage)
Grisi_Woman_914 (pspimage)


* If you have any difficulties performing this tutorial, please contact me: E-mail
* When doing one of the tutorials of my blog, I would appreciate it if you put a link to the tutorial.
* Send me your version and I will be happy to put it in my gallery
* Before you share this tutorial, read the author's terms
* Help me improve the quality of my translations and my blog: if you find any errors in the links, in the translations, in the blog, please let me know by the email above. Thankful.


ROTEIRO

1. Open a new image of 900x600px
Fill with color #a17691
Selections - Select all

2. Open the misted Min@.4091
Delete the watermark
Edit/Copy and Paste into selection
Select none

3. Effects - Image Effects -Seamless Tiling - Default

4. Effects - Geometric Effects - Perspective Vertical


5. Effects - Geometric Effects - Perspective Vertical


6. Effects - Geometric Effects - Perspective Vertical


7. Effects - distortion Effects - Warp


8. Image - Mirror
Effects - distortion Effects - Warp - Same configuration step 7

9. Effects - image effects - offset


10. Layers - duplicate
Image - Mirror
Effects - Image Effects - Offset - same configuration step 9

11. Layers - Merge - Merge Visible 
Image - Flip
Select the center of image with the magic wand
Selections - Modify - Expand - 3px


12. Layers - New Raster Layer
Layers - Arrange - Move Down
Edit/Copy and Paste into selection, the tube Misted Min@.4091 (landscape)
Select none
Note: In this case, since the design is so wide, select the most important part to copy, so that the image is not deformed


13. Click on the Top Layer
Drop shadow:

Layers - Merge - Merge visible

14. Image - Canvas Size


15. Layers - New Raster Layer
Fill with gradiente created with colors #a17691 and #706e6f

Layers - Arrange - Move down

16. Plugin Unlimited - Photo Aging Kit.db - Cracked Paper


17. Plugin FM Tile Tools - Blend Emboss

18. Layers - new raster layer
Fill with gradiente created with colors #a17691 and #706e6f


19. Plugin Mura's Meister - Perspective tiling


20. Plugin Unlimited - Photo Aging Kit - Dirt & dust

Layers - Arrange - Bring to top

21. Select with the magic wand the transparent part of  this layer
Delete key several times to blur the edge


22. Drop shadow


23. Open the tube Grisi_Woman_914
Edit/Copy and Paste as new layer
Image - Resize 60% - All layers unchecked

24. Image - Mirror
Place as model
Layers - merge - Merge visible

25. plugin AAA Frames - Foto Frame


26. Repeat the Foto Frame, but changing width to 10

27. Add your signature
Save: File - Export - JPEG Optimizer


I hope you enjoyed.
Thank you for doing my translations

Other model:


quarta-feira, 7 de fevereiro de 2018

JUST BEAUTY (in english)


JUST BEAUTY
by Bea


This translation has the permission of the author. Thank you Bea.
Original Tutorial here


PLUGINS - here
Mehdi - Mura's Meister - AP (Lines)


MATERIAL - here
Alpha_just beauty_bea
Flores003_BeaSol-Misted
woman131_beasol_tube
Texto_jbeauty_bea
Marca de agua


PALETA DE CORES
 * Open the color palette on the PSP and capture the colors with the dropper tool
* Adjust blend mode and layer opacity according to your images

* If you have any difficulties performing this tutorial, please contact me: E-mail
* When doing one of the tutorials of my blog, I would appreciate it if you put a link to the tutorial.
* Send me your version and I will be happy to put it in my gallery
* Before you share this tutorial, read the author's terms
* Help me improve the quality of my translations and my blog: if you find any errors in the links,
in the translations, in the blog, please let me know by the email above. Thankful.


ROTEIRO

1. Open the file alpha_justbeauty_bea

2. Fill with the gradiente Rectangular created with the colors: #B55DES in the Foreground and #CECCD9 in the background


3. Plugin Mehdi - Sorting tiles

Effects - User Defined Filter - emboss 3

4. Layers - duplicate
Image - Flip
Opacity: 50

5. Layers - Merge - Merge Down
Effects - User Defined filter - Emboss 3

6. Selections - Load selection from alpha channel - Selection 1

Layers - promote selection to layer
Select None

7. Plugin AP (Lines) - Lines Silverlining


8. Layers - duplicate
Image - Mirror
Layers - Merge - Merge Down

9. Layers - Duplicate
Image - Flip
Layers - Merge - Merge Down

10. Adjust - Brightness and contrast - Brightness/Contrast


11. New Raster Layer
Selections - Load selection from alpha channel - Selection 2

Fill the selection with color #ffffff
Select none

12. Effects - dirtortion Effects - Wave


13. Plugin Mura's Meister - Copies


14. Layers - Duplicate
Image - Mirror
Layers - Merge- Merge Down

15. Drop Shadow: 1/1/100/2 - color #383D46

16. New Raster Layer
Selections - Load selection from alpha channel - Selection 3

Fill with color #ffffff
Select none

17. Effects - distortion Effects - Wind


18. Layers - Duplicate
Image - Mirror
Layers - Merge - Merge Down
Opacity: 70

19. Open the tube Flores003_BeaSol_misted
Edit/Copy and Paste as new layer

20. Image - Resize 90% - All layers unchecked

21. Image - Add borders - 2px - color #b55de5

22. Selections - Select All
Image - add borders - 30px - color #ceccd9

23. Selections - invert
Plugin Graphic Plus - Cross Shadow - default

24. Adjuts - Blur - Gaussian Blur: 20
Select none

25. Open the tube Woman_131_beasol
Edit/Copy and Paste as new layer
Image - resize 85% - All layers unchecked
Place as model

26. Open texto_justbeauty
Edit/Copy and Paste as new layer
Place as model
Add your signature

27. Image - add borders - 1px - color #ceccd9
Save: File - Export - JPEG Optimizer

I hope you enjoyed.
Thank you for doing my translations

Other model
Tubes: Clo - La Manouche