terça-feira, 6 de fevereiro de 2018

BRISA DE MAR (in english)


BRISA DE MAR
by Bea

This translation has the permission of the author. Thank you Bea
Original Tutorial - here


MATERIAL  - here
TropicNightMist~EKS
MR_Thoughtful Young Woman de Maryse
Textura Blue022
(Guardar la textura en la carpeta correspondiente al psp que usen)
Marca de agua


PALETA DE CORES
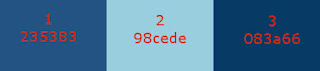
* Open the color palette on the PSP and capture the colors with the dropper tool
* Adjust blend mode and layer opacity according to your images


* If you have any difficulties performing this tutorial, please contact me: E-mail
* When doing one of the tutorials of my blog, I would appreciate it if you put a link to the tutorial.
* Send me your version and I will be happy to put it in my gallery
* Before you share this tutorial, read the author's terms
* Help me improve the quality of my translations and my blog: if you find any errors in the links,
in the translations, in the blog, please let me know by the email above. Thankful.


ROTEIRO

1. Open a new image of  900x600px
Fill with color #235383

2. Selections - select all
Open the misted TropicNightMist_EKS
Edit/Copy and Paste into selection

3. Adjust - Blur - Gaussian blur: 30
Select None

4. Effects - Texture Effects - Mosaic Antique


5. Effects - Texture Effects - Texture

Layers - Duplicate

6. New Raster Layer
Fill with color #98CEDE
Selections - Select All
Selections - Modify - contract 2px
Delete

7. On the same layer and keeping the selection, fill with color # 235383
Selections - Modify - contract - 2px
Delete

8. On the same layer and keeping the selection, fill the center with color #98CEDE
Selections - Modify - Contract - 2 px
Delete

9. On the same layer and keeping the selection , fill the center with color #235383
Selections - modify - contract - 10px
Delete

10. On the same layer  and keeping the selection, fill with color #98CEDE
Selections - modify - contract - 2px 
Delete

11. Repeat steps 7 and 8, Always on the same layer
Select none

12. Layers - Merge - Merge down
Image - Resize 80% - all layers unchecked

13. Effects - distortion Effects - Twirl

Layers - Duplicate

14. Effects - Image effects - Seamless tiling - Default

15. Opacity: 40
Layers - Arrange - Move down

16. Click on the top Layer
Drop shadow: 0/0/100/10 - cor #083A66

17. Effects - Reflection effects - Feedback


18. Open the  Misted TropicNightMist_EKS
Edit/Copy and Paste as new layer

19. Selections - Select All
Selections - Modify - contract - 15px

20. Drop shadow: 0/0/100/30 - color Black


21. Open the tube MR-ThoughtfulYoungWoman
Edit/Copy and Paste as new layer

22. Image - Resize 80% - Twice - All layers unchecked
Drop Shadow: the same on the step 20
Place as model

23. Add you signature
Save: File - Export - JPEG Optimizer.


I hope you enjoyed.
Thank you for doing my translations

domingo, 4 de fevereiro de 2018

LINEAS Y ESTILO in english


LINEAS Y ESTILO
by Bea

This translation has the permission of the author. Thank you Bea
Original Tutorial - here


PLUGINS - here
Mura's Meister  - L em K's - Graphic Pluss - Flaming Pear - Eye Candy 5 Impact


MATERIAL - here
Grisi_Woman_859
Mask nminas_masks_76
deco1_lye_bea
deco2_lye_bea
Marca de agua


PALETA DE CORES
* Open the color palette on the PSP and capture the colors with the dropper tool
* Adjust blend mode and layer opacity according to your images

* If you have any difficulties performing this tutorial, please contact me: E-mail
* When doing one of the tutorials of my blog, I would appreciate it if you put a link to the tutorial.
* Send me your version and I will be happy to put it in my gallery
* Before you share this tutorial, read the author's terms
* Help me improve the quality of my translations and my blog: if you find any errors in the links,
in the translations, in the blog, please let me know by the email above. Thankful.


ROTEIRO

1. Open a new image of 900x600px

2. Place the color #920552 in the Foreground and the color #000000 in the background
Create a gradiente Sunburst and fill the layer

Layers - Duplicate

3. Plugin Mura's Meister - Copies

Layers - Merge - merge down

4. Effects - Image Effects - seamless tiling - default
Effects - User Defined filter - emboss 3

5. Layers - duplicate
Plugin Mura's meister - Perspective tiling


6. Click on Raster 1
Plugin L em K's - Zitah


7. Layers - new raster layer
Fill with color #000000

8. Layers - New Mask layer - From Image - nminas_masks_76

Layers - Merge - Merge Group

9. Plugin flaming Pear - flexify 2


10. Image - Mirror - mirror vertical
Lower the opacity to 58

11. Edit/Copy and Paste as new layer the tube deco1-lye-bea
Effects - image effects - offset


12. Effects - Texture effects - Mosaic antique


13. Layers - Duplicate
Image - Mirror - mirror horizontal

14. Edit/Copy and Paste as new layer the tube Deco2-lye-bea
Effects - image effects - Offset


15. Plugin Eye Candy 5: impact - Glass
Em Setting: clear
Em Basic:


16. Edit/Copy and Paste as new layer the tube Grisi-_woman_859
Image - Resize 80% - All layers unchecked

17. Plugin Eye Candy 5 Impact - Perspective Shadow
Em Settings: selecione Reflect in Front - Faint

Em Basic:


18. Drop Shadow: 0/0/100/20 - color: #000000

19. Repeat the same Drop Shadow in the Mask layer (optional, depending on the colors used)

20. Image - Add borders - 2px - cor #000000
Selections - Select all
Image - add borders - 20px - color #920552

21. Selections - Invert
Plugin Graphic Plus - Cross shadow

Select None

22. Image - Add borders - 2px - color #000000

23. Add watermark
Save: File - Export - JPEG Optimizer.


I hope you enjoyed.
Thank you for doing my translations

Other models:
Tube: BeaSol


sábado, 3 de fevereiro de 2018

ISABELLA - (in english)


ISABELLA
by Bea

This translation has the permission of the author. Thank you Bea
Original Tutorial - here


PLUGINS - here
TruFilters - Unlimited - BKG Designer sf10 I - AP (Lines) - AAA Frames

MATERIAL - here
Mistesd - CAL-2417-010418 tube - .bimba.27.11.15 @ Mina
Narah_mask_0296
sel_isa_beas
Texto_isabella

COLOR PALETTE
* Open the color palette on the PSP and capture the colors with the dropper tool
* Adjust blend mode and layer opacity according to your images


* If you have any difficulties performing this tutorial, please contact me: E-mail
* When doing one of the tutorials of my blog, I would appreciate it if you put a link to the tutorial.
* Send me your version and I will be happy to put it in my gallery
* Before you share this tutorial, read the author's terms
* Help me improve the quality of my translations and my blog: if you find any errors in the links,
in the translations, in the blog, please let me know by the email above. Thankful.


ROTEIRO:

1. Open a new image with 900x600px
Foreground: # d6d6d6
Background: #00364a
Fill the image with a rectangular gradiente:


2. Plugin TruFilters - Beveled Edge Blender


3. Effects - Image Effects - Seamless Tiling - Default


4. Effects - Reflection Effects - Rotating Mirror


5. Selections - Load selection from disk: sel_isa_beas

Selections - Promote selection to layer
Select none

6. Plugin AP (Lines) Lines silverlining

Effects - user Defined Filter - emboss 3

7. Plugin Unlimited - BKG Designer sf 10 I - 4 Way Average
Drop shadow: 1/1/100/1 - color #00364a

8. Layers - New Raster Layers
Fill with color #d6d6d6

9. Layers - New Mask Layer - From Image - Narah-mask-0296

Layers - Merge - Merge group
Effects - User Defined Filter - Emboss 3

10. Layers - Duplicate
Image - Mirror - Mirror Vertical
Layers - Merge - Merge down

Your image:


11. Drop shadow: 0/51/35/10 - color #00364a

12. Edit/Copy and Paste as new layer the tube: CAL-2417-010418
Image - resize 80% - All layers unchecked

13. Effects - Image Effects - Offset


14. Activate Raster 1 - Edit/Copy


15. Image - Add borders - 1px - color #00364a
Image - Add borders - 4px - color #d6d6d6
Image - Add borders - 1px - color #00364a

16. Selections - Select all
Image - Add borders - 40px - color #d6d6d6
Selections - Invert
Edit/Paste into selection(image is in memory)

17. Selections - Invert
Drop shadow: 0/0/80/100 - color #00364a
Select none

18. Edit/Copy and Paste as new layer the tube Min@.bimba
Image - resize 75% - All layers unchecked

19. Effects - Image effects - Offset


20. Edit/Copy and Paste as new layer texto-isabella
Effects - Image Effects - offser


21. Drop shadow: 3/3/100/1 - color #00364a

22. Layers - Merge - Merge visible
Plugin AAA Frames - Foto Frame


23. Make the adjustments in your tube if necessary
Add your signature
Save: File - Export - JPEG Optimizer


I hope you enjoyed.
Thank you for doing my translations

Other model:
Tubes: Lize and Lizztish


ISABELLA


ISABELLA
by Bea


Este tradução tem a permissão da autora. Obrigada Bea
Tutorial Original aqui


PLUGINS - aqui
TruFilters - Unlimited - BKG Designer sf10 I - AP (Lines) - AAA Frames


MATERIAL - aqui
Mistesd - CAL-2417-010418tube - Mina@.bimba.27.11.15
Narah_mask_0296
sel_isa_beas
Texto_isabella


PALETA DE CORES
*Abra a paleta de cores no PSP e capture as cores com a dropper tool
*Ajuste o blend mode e a opacidade das layers de acordo com suas imagens

*Se você tiver alguma dificuldade na execução desse tutorial, entre em contato comigo: E-mail
*Ao fazer um dos tutoriais do meu blog, eu agradeceria muito se você colocasse um link para o tutorial.
*Envie para mim sua versão e eu terei o maior prazer em colocar na minha galeria
*Antes de você compartilhar este tutorial, leia os termos da autora
*Ajude-me a melhorar a qualidade das minhas traduções e do meu blog: se você encontrar algum erro nos links, nas traduções, no blog, por favor me avise pelo e-mail acima. Grata.


ROTEIRO:

1. Abrir uma nova imagem de 900x600px
Foreground: #d6d6d6
Background: #00364a
Preencher a imagem com um gradiente Rectangular:


2. Plugin TruFilters - Beveled Edge Blender:


3. Effects - image effects - seamless tiling - Defaul


4. Efects - Reflection Effects - Rotating Mirror:


5. Selections - Load selection from disk - sel_isa_beas

Selections - Promote election to layer
Select none

6. Plugin AP (Lines) - Silverlining:

Effects - User Defined filter - Emboss 3

7. Plugin Unlimited - BKG Designer sd10 I - 4 way Average
Drop Shadow: 1/1/100/1 - cor # 00364a

8. Layers - New raster layer
Preencher com a cor #d6d6d6

9. Layers - New mask Layer - From Image - Narah-Mask-0296

Layers - Merge - Merge group
Effects - User Defined Filter - Emboss 3

10. Layers - duplicate
Image - Miror- Mirror Vertical
Layers - Merge - Merge Down

Sua imagem estará assim:


11. Drop Shadow: 0/51/35/10 - cor #00364a

12. Copiar e colar como nova layer, o tube CAL-2417-010418
Image - Resize 80% - All layers desmarcado

13. Effects - Image effects - Offset:


14. Ative a Raster 1 - Edit/Copy


15. Image - Add borders - 1px - cor #00364a
Image - Add borders - 4px - cor #d6d6d6
Image - Add borders - 1px - cor #00364a

16. Selections - Select All
Image - Add borders - 40px cor #d6d6d6
Selections - Invert
Cole na seleção(a imagem está na memória)

17. Selections - Invert
Drop Shadow: 0/0/80/100 - cor #00364a
Select none

18. Copiar e colar como nova layer, o tube Min@.bimba
Image - Resize 75% - All layers desmarcado

19. Effects - Image effects - Offset


20. Copiar e colocar como nova layer, o arquivo texto_isabella
Effects - Image effects - Offset


21. Drop shadow: 3/3/100/1 - cor #00364a

22. Layers - Merge - Merge visible
Plugin AAA Frame - foto Frame:


23. Faça os ajustes que julgar necessário no seu tube
Colocar as assinaturas
Salvar: File - Export - JPEG Optimizer


Espero que tenham gostado.
Obrigada por fazerem minhas traduções.

Outro modelo:
Tubes: Lize e Lizztish