Mostrando postagens com marcador Naise M. Mostrar todas as postagens

segunda-feira, 8 de junho de 2020

Naise M - Traume


This tutorial is by Naise M and has been translated with your permission

.......

Tutorial: Traume
Original HERE


.......

Credits
Graphics Beatrice / Naise / Astrid / narah

.......

Material


.......

Plugins:
Mehdi
Unlimited 2

Download: HERE

.......

Contacts:
E-mail: HERE
Facebook: HERE
Their versions: HERE

.......

Remembering:
* Change the blend mode and opacity of the layers and apply drop shadow according to your tubes.

* The Pick Tool in older versions of the PSP is called Deformation

* In old PSP versions:
Mirror / Mirror Horizontal = Mirror
Mirror / Mirror Vertical = Flip

.......

Instructions:
* Save the gradient (gr22_hult) in the Gradients folder of the PSP
* Save the mask (Astrid 149) in the PSP Masks folder
.......


SCRIPT


(click on the prints for a better view)


01. open a new transparent image with 1000x600px

02. Click on the foreground / choose the gradient option / select the gradient (gr22-hult) /
configure as per the print

03. paint the image with this gradient

04. effects / plugins / penta.com / jeans

05. add new layer

06. paint with color # 684444

07. layers / load mask from disk / mask (astrid 149)

08. merge group

09. effects / plugins / simple / zoom out and flip

10. drop shadow: 0 4 63 23.19 black

11. effects / image effects / seamless tiling

12. effects / image effects / seamless tiling again

13. effects / edge effects / enhance

14. copy the tube (deco-2) / paste as a new layer

15. adjust / hue and saturation / colorize
(choose a tone you like according to your tubes)

16. effects / plugins / simple / 4 way average

17. drop shadow: 0 4 63 23.19 black

18. activate the selection tool / custom selection

19. activate the raster layer 1

20. selections / promote selection to layer

21. effects / plugins / aaa frames / foto frame

22. drop shadow: 0 0 100 100 black

23. select none

24. copy the tube misted / paste as a new layer

25. position on the board, according to the model

25.1 Merge down

25.2 With the Move tool, move a little to the right according to the model

26. add new layer

27. paint with #ffffff

28. layers / new mask layer / from image / mask (narah-mask-0883)

29. merge group

30. layers / arrange / bring to top

31. effects / user defined filter / emboss 4

32. image / add borders / 56px / #ffffff

33. copy the tube (deco-1) / paste as a new layer

34. adjust / hue and saturation / colorize (to your liking)

35. image / add borders / SYMMETRIC UNMARKED / color # 866f6f

36. add new layer

37. paint with #ffffff

38. layers / new mask layer / from image / mask (astrid 149)

39. merge group

40. effects / plugins / mura's meister / perspective tiling

41. access Google Translate: https://translate.google.com.br/?hl=en

42. Type the word Dreams in Portuguese and have them translated into German


43. Copy the translated word and get back to your work

44. activate the Text Tool and configure according to the print

45. Use the font (Riot Squad) provided in the material / Size: 48 /put the color #ffffff in the foreground and background

46. ​​Click on the image and paste the word Traume

47. Layers / Convert to Raster laye

48. position according to model

48.1 With the Pick Tool, increase the size according to the model

49. Drop shadow: -57 45 70 0 color # 413535

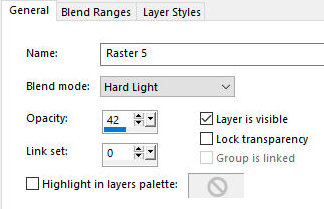
50. layers / properties / blend mode: hard light

51. merge down

52. layers / properties / opacity: 65%

53. effects / edge effects / enhance

54. copy and paste your main tube

55. resize if necessary

56. Apply drop shadow to your liking

57. position as desired

58. place your signature

59. merge all

60. image / resize: 1000px (width)

61. save: file / export / jpeg optimizer


Thank you for doing my translations


quinta-feira, 28 de maio de 2020

Naise M - Lost and Free


This tutorial is from Naise M and was translated with your permission


Tutorial Lost and Free
Original HERE
Credits Graphics Beatrice / Naise
Material HERE
Plugins Mehdi
Lotis Filters
FunHouse
DownloadPlugins HERE
Attention! * Double click on AlienSkin presets to export to the plugin

* The Lotis Filters plugin is in the material
Remembering * Change blend mode, opacity and apply drop shadow according to your tubes

* The Pick Tool in older versions of the PSP, is called Deformation

* In old PSP versions:
Mirror / Mirror Horizontal = Mirror
Mirror / Mirror Vertical = Flip
Contacts E-mail: HERE

Facebook: HERE

Your Versions: HERE


SCRIPT:

01. Place color # 04344b in the foreground and color # 072233 in the background

02. Open the alpha file (alphachannel-lost-and-free) / duplicate (shift + d) / Close the original

03. effects / plugins / mehdi / wavy lab 1.
seq. color: # 072233- # 04344b- # 8299a7- # 8299a7


04. effects / plugins / lotis filters / mosaic toolit plus


05. effects / edge effects / enhance more

06. effects / plugins / unlimited 2 / funhouse / loom


07. image / mirror / mirror horizontal

08. selections / load selection from alpha channel / selection 1


09. selections / promote selection to layer

10. effects / plugins / eye candy 5: impact / perspective shadow /preset (lost-and-free-perspective-shadow)


11. effects / plugins / unlimited 2 / funhouse / loom


12. select none

13. layers / duplicate

14. image / mirror / mirror horizontal

15. merge down

16. selections / load selection from alpha channel / selection 2


17. activate layer merged

18. selections promote selection to layer

19. effects / plugins / eye candy 5: impact / perspective shadow same as the previous


20. effects / plugins / unlimited 2 / funhouse same as above


21. select none

22. selections / load selection from alpha channel / selection 3


23. activate the layer merged

24. selections / promote selection to layer

25. effects / plugins / eye candy 5: impact / perspective shadow same as the previous
25


 26. effects / plugins / eye candy 5: impact / glass
preset (preset-lost-and-free)
26


27. select none

28. layers / arrange / bring to top

29. layers / duplicate

30. image / mirror / mirror horizontal

31. image / mirror / mirror vertical

32. merge down

33. selections / load selection from alpha channel / selection 4


34. activate the layer merged

35. selections / promote selection to layer

36. effects / plugins / eye candy 5: impact / glass
preset (preset-lost-and-free)


37. select none

38. layers / arrange / bring to top

39. layers / properties / blend mode: luminance (l)


40. open the tube (decor-nmcriacoes 113) / copy and paste as a new layer

41. layers / properties / blend mode: soft light


42. drop shadow: 1 1 73 10 black

43. effects / user defined filter / emboss 3


44. layers / arrange / move down - apply 3 times

45. image / add borders / 60px / #ffffff

46. ​​open the tube (deco-lost-and-free-naisem) / copy and paste as a new layer

47. colorize to your liking, according to your tubes

48. open your main tube / copy and paste as a new layer

49. resize if necessary

50. apply drop shadow of your choice

51. position as desired

52. Write the title (Lost and Free), using font, size of your choice

53. position as desired

54. place your signature

55. merge all

56. save: file / export / jpeg optimizer


Thank you for doing my translations


domingo, 3 de maio de 2020

Naise M - Angela das Graças


This tutorial is by Naise M and has been translated with your permission


Tutorial Angela das Graças, de Naise M

Original AQUI
Créditos Tube principal: Lily Garnier

Outros materiais: Naise
Material AQUI
Plugins do tutorial Plugins:
Toadies
Simples
AAA Frame
Texture
Unlimited 2
Plugins do blog  AQUI
  Contatos  Meu e-mail: AQUI
Meu grupo no Facebook: : AQUI
Suas versões: AQUI


SCRIPT:


(click on the prints for a better view)

01. Open a new transparent image with 950x600px

01.1 place the color #ffffff in the foreground and the color # ab4e63 in the background

02. prepare a linear gradient and paint the image


03. effects / plugins / unlimited 2 / simple / pizza slice mirror

04. layers / duplicate

05. image / mirror / mirror horizontal

06. layers / properties / blend mode: exclusion

07. merge visible

08. effects / plugins / unlimited 2 / bkg designer sf10 I / cruncher


09. effects / edge effects / enhance more

10. open the tube (deco-1) on psp / activate the layer raster 2

11. effects / plugins / nik software / color efex pro 3.0 / bi-color filters (optional) / violet / pink 2


12. copy and paste as a new layer in your work

13. activate the pen tool and configure according to the print. (The preset (small dash) is in the material)


14. add a new layer

15. draw a line according to the print, using the Linear gradient
(Note: for the line to come out perfectly, click shift along with the mouse button)

15.1 layers / convert to raster layer

16. layers / duplicate

17. image / mirror / mirror vertical (flip)

18. open the tube (deco-2) on psp

19. colorize as you wish
(Note: use: Hue and saturation / colorize or the Change Color tool)

20. copy and paste as new layer

21. layers / properties / blend mode: hard light

22. image / add borders / 64px / color #ffffff

23. effects / plugins / aaa frames / foto frame


24. select the white part of the outside edge with the magic wand

25. effects / plugins / aaa frames / texture frame


26. select none

27. select the white part inside the border with the magic wand

28. selections / promote selection to layer

29. effects / plugins / unlimited 2 / bkg designer sf10 I / cruncher


30. effects / user defined filter / edge-enhance-more (the preset is in the material)

31. drop shadow: 1 1 93 4.35 black

32. image / add borders / 6px / color # ab4e63

33. add new layer

34. activate the Paint Brush tool / locate the brush (KJC_CuteLilWorm 001) /
configure according to the print / stamp in the location indicated with the gradient
(Note: brush on the material. Export as a brush)


35. drop shadow: 1 0 74 5.80 black

35.1 layers / Duplicate / Image / Mirror / Image / flip

36. copy your main tube and paste it as a new layer

37. Make adjustments: size, drop shadow, etc.

38. position as desired

39. copy the tube (name) and paste it as a new layer

40. position according to model or as desired

41. copy your flower tube and paste it as a new layer

42. Make the necessary adjustments (size, drop shadow)

43. position as desired or as the model

44. layers / properties / blend mode: overlay (or according to your colors)

45. image / resize: width 1000px

46. ​​place your signature

47. merge all

48. save: file / export / jpeg optimizer


Thank you for doing my translations