 
Este tutorial é de Bea e foi traduzido com a sua permissão
Original aqui

******
Material - Download - aqui

******
Créditos:
Hebe
******
Plugins:
Tramages / Pool shadow
Flaming Pear / Flexify 2
AP 01 [Innovations] / Distort Sliced Turn
Plugins do blog: 
******
Meu e-mail

Enviem suas versões ou me avisem caso
tenham problemas com o material ou tutorial
******
Vejam suas versões aqui:

******
Antes de começar:
Salve as seleções na pasta de seleções do PSP
Clique nos prints para visualizar melhor
******

01. Abra uma nova imagem com 950x600px.
02. Selections / Load selection from disk / Selection (Sel-Nostalgias-1-Bea)

03. Coloque a cor #658d30 no foreground e a cor #1a3713 no background
04. Prepare um gradiente Sunburst

05. Preencha a seleção com este gradiente
06. Mantenha a seleção
07. Effects / Plugins / Tramages / Pool Shadow

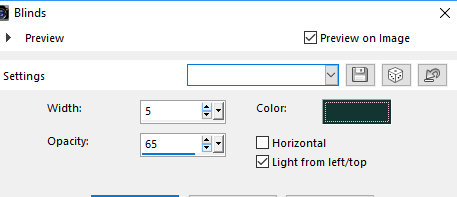
08. Effects / Texture Effects / Blinds / cor #1a3713
09. Selections / Modify / Expand:3

10. Layers /New Raster Layer
11. Preencher esta layer com uma pattern dourada configurada com Angle:45 e Scale:100

12. Select None
13. Layers / Arrange/ Move down
14. Merge visible
15. Effects / Plugins / Flaming Pear / Flexify 2
*16 -5 -157 flip des 33 0 equirectangular equirectangular

16. Drop shadow:2 2 50 10 - cor #b3e632
17. Repita o Drop Shadow em negativo: -2 -2 50 10 - cor #63e632
18. Effects / Image Effects / Offset (0/124)

19. Layers / Duplicate
20. Effects / Image Effects / Offset (0/-240)

21. Coloque a cor #011c2b no foreground e a cor #1a3713 no background
22. Prepare um gradiente Linear

23. Layers New Raster Layer
24. Preencha a layer com o gradiente
25. Layers / Arrange / Send to bottom
26. Layers / Duplicate
27. Effects / Plugins / AP 01 [Innovations] / Distort SlicedTurn

28. Layers / Properties / Opacity: 20%
29. Layers / New Raster Layer
30. Selections / Load selection from disk / Selection (Sel-Nostalgias-Bea)

31. Abra o tube (Misted_paisaje91_ByHebe) / Copie e cole na seleção
32. Select None
33. Ative a layer superior
34. Abra o tube (k@rine_ dreams _Natural _Woman_1197_JUILLET2010) / Copie e cole como nova layer
35. Image / Resize: 75% - Aplique 2 vezes - all layers desmarcado
36. Drop Shadow: 0 0 40 50 - cor #658d30
37. Effects / Image Effects / Offset (286/35)

38. Layers / Arrange / Move down
39. Com a Eraser Tool, apague a parte da imagem que aparece abaixo da barra

40. Abra o tube (Flores-nostalgias) / Copie e cole como nova layer
41. Effects / Image Effects / Offset (-330 / 80)

42. Drop shadow igual ao anterior
43. Abra o tube (texto-Nostalgias) / Copie e cole como nova layer
44. Effects / Image Effects / Offset (-103/-172)

45. Merge visible
Obrigada por fazer minhas traduções
 |

Mostrando postagens com marcador Lily. Mostrar todas as postagens
Mostrando postagens com marcador Lily. Mostrar todas as postagens
domingo, 11 de agosto de 2019
Bea - Nostalgias

quinta-feira, 8 de agosto de 2019
Tati Design - Sweet
  Este tutorial é de Tati Design e foi traduzido com a sua permissão Original aqui  *** Material - Download aqui  *** Créditos: Tube: Lily *** Plugins:
BKG Kaleidoscope / Cake Mix
Unplugged Effects / Lens Reflections / Defocus
VM 1 / Web Weaver
Toadies / What are you?
Penta.com / Jean
Carolaine and Sensibility / CS-Texture / CS-HLines
Eye Candy 4000 /Gradiente Glow
Plugins do blog:
 *** Meu e-mail:  *** Vejam suas versões aqui  ******************** Antes de começar: Salve as seleções na pasta de seleções do PSP Salve a textura (TD_Textura_Sweet) ma pasta Textures do PSP Tabela de cores versão original:  ******************** 
01. Coloque a cor #e4d8bd no foreground e a cor #a7abb4 no background
02. Abra o arquivo (TD_Background_Sweet) / Duplique (Shift +D) / Feche o original / Renomeie para Raster 1. Ele será a base do trabalho
03. Effects / Image Effects / Seamless Tiling

04. Effects / Plugins / Unlimited 2 / BKG Kaleidoscope / Cake Mix

05. Effects / Plugins / Unlimited 2 / UnPlugged Effects / Lens Reflection

06. Effects / Plugins / Unlimited 2 / UnPlugged Effects / Defocus

07. Layers / Duplicate
08. Effets / Distortion Effects / Pixelate

09. Effects / Edge Effects / Enhance
10. Effects / Plugins / Unlimited 2 / VM 1 / Web Weaver

11. Drop shadow: 10 10 50 5 - cor 482c25
12. Effects / Image Effects / Seamless Tiling

13. Ative a layer Raster 1
14. Selections / Load selection from disk / Selection (TD_Sweet_Sel1)

15. Selections / Promote selection to layer
16. Layers / Arrange / Bring to top
17. Mantenha a seleção
18. Effects / Texture Effects / Blinds / cor #a7abb4

19. Effects / Edge Effects / Enhance
20. Select None
21. Effects / Plugins / Toadies / Weaver
Nota: Lembre-se de colocar a cor #a7abb4 no background para que o efeito apareça

22. Ative a layer inferior Raster 1
23. Selections / Load selection from disk / Selection (TD_Sweet_Sel2)

24. Selections / Promote selection to layer
25. Select None
26. Layers / Arrange / Bring to top
27. Effects / Plugins / Penta.com / Jeans

28. Layers / Properties / Blend Mode: Multiply
29. Ative a layer inferior Raster 1
30. Selections / Load selection from disk / Selection (TD_Sweet_Sel3)

31. Selections / Promote selection to layer
32. Layers / Arrange / Bring to top
33. Mantenha a seleção
34. Effects / Plugins / Carolaine and Sensibility / CS_Texture

35. Select None
36. Effects / Image Effects / Seamless Tiling

37. Ative a layer Copy of Raster 1
38. Selections / Load selection from disk / Selection (TD_Sweet-Sel4)

39. Selections / promote selection to layer
40. Select None
41. Layers / Arrange / Bring to top
42. Effects / Plugins / Toadies / What are you?
Nota: Coloque a cor #a7abb4 no background

43. Effects / Plugins / Carolaine and Sensibility / CS_HLines
*5 0 10

44. Layers / Properties / Blend Mode: Multiply
45. Layers / New Raster Layer
46. Preencha a layer com a cor #e4d8bd
47. Effects / Geometric Effects / Perspective Horizontal
*90 transp

48. Layers / Properties / Opacity:50
49. Layers / New Raster Layer
50. Preencha a layer com a cor #482c25
51. Layers / New Mask Layer / From Image / Mask (TD_Mask1_Sweet)

52. Merge Group
53. Ative a layer Raster 2
54. Layers / New Raster Layer
55. Selections / Load selection from disk / Selection (TD_Sweet-Sel5)

56. Preencha a seleção com a cor #e4d8bd
57. Mantenha a seleção
58. Effects / Texture Effects / texture (TD_Textura_Sweet)
*100 0 1 0 0 br 260 60 25

59. Layers / Properties / Opacity:50
60. Mantenha a seleção
61. Ative a layer superior (Group-Raster 3)
62. Layers / New Raster Layer
63. Effects / Plugins / Eye Candy 4000 / Gradient Glow
Nota: Onde está assinalado no print, altere as cores para as que vc estiver usando
*Basic: 10 25 100 x *Color Fat

64. Select None
65. Layers / Properties / Blend Mode: Luminance (L)
66. Abra o tube (TD-WordArt_Sweet) / Copie e cole como nova layer
67. Ative a Pick Tool e configure (150/166)
Pressione M para sair da seleção

68. Drop Shadow: 5 5 30 0 - cor #482c25
69. Ative a layer Promoted Selection 3
70. Layers / New Raster Layer
71. Preencha a layer com a cor #a7abb4
72. Layers / New Mask Layer / From Image / Mask (TD_Mask2_Sweet)

73. Merge Group
74. Layers / Properties / Blend Mode: Overlay / Opacity:50
75. Adicione as bordas abaixo, com symmetric marcado:
Image / Add borders / 2px / cor #e4d8bd
Image / Add borders / 1px / cor #482c25
Image / Add borders / 15px / cor #ffffff
Image / Add borders / 1px / cor #482c25
Image / Add borders / 10px / cor #e4d8bd
Image / Add borders / 1px / cor #482c25
Image / Add borders / 15px / cor #ffffff
Image/ Add borders / 3px / cor #a7abb4
Image / Add borders / 30px / cor #ffffff
76. Abra o seu tube principal / Copie e cole como nova layer
77. Redimensione-o se necessário
78. Psocione à direita conforme o modelo
79. Se usar o mesmo tube do tutorial, ative a Pick Tool e configure: (440/20)
Pressione M para sair da seleção

80. Drop Shadow: 15 15 60 35 preto
81. Coloque sua assinatura
82. Image / Add borders / 1px / cor #482c25
83. Image / Resize: Width 900px
84. Adjust / Sharpness / Sharpen
85. Salve: File > Export > JPEG Optimizer
Obrigada por fazer minhas traduções
Outra versão
Tube: Lily
 |
Assinar:
Postagens (Atom)