

Bea's original version

My version with Nena Silva's tube
This tutorial is from Bea and has been translated with your permission
Original HERE
****
Credits:
Bea
****
Material - HERE
If any material does not open, contact me
****
Plugins:
Unlimited 2 / B KG Designer sf10 III / Twister
Unlimited 2 / BKG Designer sf10 II / Way Average
Eye Candy 5: Impact / Glass
Plugins - HERE
****
Orientations:
Click on the prints for a better view.
Remember to save work as it runs
Change Blend Mode, Opacity, and Drop Shadow to Your Images
Pick Tool replaces Deform tool from older versions of PSP
Remember to save work as it runs
Change Blend Mode, Opacity, and Drop Shadow to Your Images
Pick Tool replaces Deform tool from older versions of PSP
***
My E-Mail: HERE
Send us your versions or let me know if you have any problems
with the tutorial or material
with the tutorial or material
***
Versions: HERE
***
Groups:
********
SCRIPT:
01. Save the mask below in the PSP Masks folder
- mask.ket-fadesuave
02. Tutorial colors

03. Open the alpha file (Alpha Anairma) / Duplicate (Shift + D) / close the original
04. Place color # 1b3c6d in the foreground and color # d1c7bd in the background
05. Prepare a Linear gradient:

06. Paint the image with this gradient
07. Effects / Plugins / Unlimited 2 / BKG Designers sf10 III / Twister

08. Effects / Plugins / Unlimited 2 / BKG Designers sf10 I / 4 Way Average

09. Add new layer
10. Paint with the gradient above
11. Effects / Texture Effects / Tiles

12. Effects / Geometric Effects / Vertical perspective

13. Effects / Geometric Effects / Vertical Perspective

14. Layers / New Mask Layer / From Image / Mask (mask.ket-fadesuave)

15. Merge Group
16. Layers / Duplicate
17. Image / Mirror / Mirror Vertical
18. Merge down
19. Add new layer
20. Selections / Load selection from alpha channel / Selection 1

21. Result:

22. Open the landscape (Paisaje301) / Copy and paste into the selection
23. Keep the selection
24. Add a new layer
25. Selections / Modify / Select selection borders

26. Fill the selection with the gradient from the beginning, but with Angle = 45

27. Effects / Artistic Effects Chrome / color # 2f6abd

28. Drop Shadow: 1 1 80 3 black
29. Repeat the Drop Shadow in negative: -1 -1 80 3 black
30. Select None
31. Add a new layer
32. Selections / Load selection from alpha channel / Selection 2

33. Fill the selection with color # 1b3c6d
34. Effects / plugins / Unlimited 2 / BKG Designers sf10 I / 4 way Average

35. Select None
36. Effects / user Defined Filter / emboss 3

37. Layers / Duplicate
38. Image / Mirror / Mirror Horizontal
39. Merge Down
40. Layers / Properties / Opacity: 73%

41. Add new layer
42. Selections / Load selection from alpha channel / Selection 3
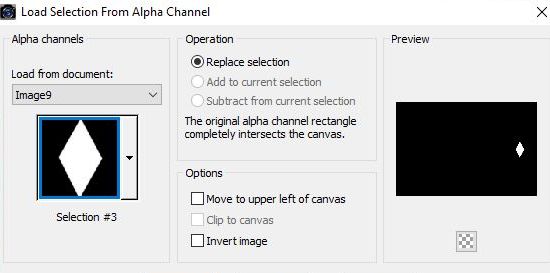
43. Fill the selection with color # 1b3c6d
44. Effects / Plugins / Eye Candy 5: impact / Glass
/ Preset (Clear)

45. Select None
46. Layers / Duplicate
47. Image / Mirror / MIrror Horizontal
48. Open the tube (woman281) / Copy and paste it as a new layer
49. Image / Resize: 80% - all layers unchecked
50. Position to the left. See model
51. Image / Add borders / 2px / color # 1b3c5d
52. Selections / Select All
53. Image / Add borders / 25px / color # d1c7bd
54. Drop Shadow: 0 0 100 50 color # 1b3c6d
55. Select None
56. Image / Add borders / 2px / color # 1b3c6d
57. Image / Resize: Width 900px
58. Place your signature and Bea's watermark
59. Save: File / Export / Jpeg Optimizer
Thank you for doing my translations
Nenhum comentário:
Postar um comentário
Observação: somente um membro deste blog pode postar um comentário.