domingo, 26 de abril de 2020

Edith Spigai - My Friend


Este tutorial é de Edith Spigai e foi traduzido com a sua permissão

Tutorial: My Friend - Original AQUI
Créditos:
Tube Principal: Misstyca
Flore: Lecture33
Mask: Narah
Outros materiais: Edith
Material - AQUI
Plugins:
Tramages
Simple / Top Left Mirror
FM Tile Tools / Blend emboss
Eye Candy 5: Impact / Glass
AAA Filters
Plugins - AQUI
Meu e-mail: AQUI
Meu grupo no Facebook: AQUI
Suas versões: AQUI


SCRIPT


(click on the prints for a better view)

01. Open a new transparent image with 900x600px

02. Place the color # 3a4860 in the foreground and the color # e0cbb4 in the background

03. Fill with this Linear gradient


04. Effects / Plugins / Tramages / Glass Pyramids


05. effects / plugins / simple / top left mirror


06. effects / edge effects / enhance more

07. add new layer

08. paint with the color # e0cbb4

09. layers / new mask layer / from image / mask (narah-maks-1260)


10. merge group

11. effects / texture effects / weave


12. merge visible

13. layers / duplicate

14. image / resize: 85% - all layers unchecked

15. remove the visibility of the layer merged by clicking on the eye (continue on the layer copy of merged)

16. select the transparent part of the layer with the magic wand

17. selections / invert

18. effects / plugins / tramages / wee scratches


19. effects / plugins / aaa filters / tweed frame


20. adjust / sharpness / sharpen

21. drop shadow: 4 4 80 40 black

22. select none

23. activate and open the layer merged

24. effects / plugins / tramages / tow the line


25. effects / plugins / fm tile tools / blend emboss / default


26. activate the copy of merged layer

27. selections / load selection from disk / selection (selection_1)


28. selections / promote selection to layer

29. adjust / blur / gaussian blur: 15


30. adjust / add / remove noise / add noise


31. adjust / sharpness / sharpen more

32. copy your flower tube and paste in the selection

33. selections / modify / expand: 4px


34. selections / modify / select selection borders


35. add new layer

36. fill with color # e0cbb4

37. effects / plugins / eye candy 5: impact / glass
/ preset (clear, no drop shadow)


38. drop shadow: 4 4 80 40 black

39. select none

40. merge down

41. drop shadow: 0 0 76 56 black

42. effects / image effects / offset (-100/0)


43. copy the tube (deco-myfriend-edith) and paste it as a new layer

44. layers / duplicate

45. merge down

46. ​​adjust / sharpness / sharpen

47. copy your main tube and paste it as a new layer

48. apply a drop shadow of your taste

48.1 position according to model

49. add a new layer

50. open the brush in the psp / file / export / custom brush / name: Brush / OK


51. activate the paint brush / locate the brush / apply according to the model / foreground color


52. effects / edge effects / enhance more

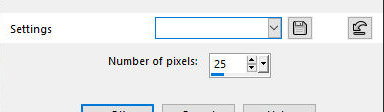
53. image / add borders / 2px / # 3a4860

54. image / add borders / 40px / white

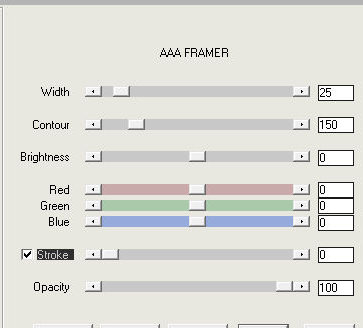
55. effects / plugins / aaa filters / aaa framer / default


57. adjust / brightness and contrast / brightness / contrast
(Note: according to your picture)

58. place your signature

59. save: file / export / jpeg optimizer


Thank you for doing my translations


Emilieta - Three


Este tutorial é de Emilieta e foi traduzido com a sua permissão


Tutorial: Three - Original AQUI
Créditos:
Tube principal: Calguis
Paisagem: Vera Mendes
Outros materiais: Emilieta
Material - AQUI
Plugins:
Fantastic Machine / Paint Engine
FM Tile Tool / Blend Emboss
Mura's Meister / Perspective Tiling
Plugins - AQUI
Meu e-mail: AQUI
Meu grupo no Facebook: AQUI
Suas versões: AQUI
*Salve o gradiente (SKTIGERSEYE) na pasta Gradients do PSP


ROTEIRO


(clique nos prints para visualizar melhor)


01. abra o arquivo alpha (canal-alfa-three) / Duplique (shift+d) /Feche o original / renomeie para raster 1

02. clique no foreground / selecione gradient / selecione o gradiente (sktigerseye) e configure conforme o print


02.1 pinte a imagem com este gradiente
(Nota: Se usar outras cores, você pode colorizar como desejar)

03. effects / edge effects / enhance more

04. effects / image effects / seamless tiling / default


05. effects / plugins / fantastic machine / paint engine


06. effects / edge effects / enhance

07. coloque a cor #612d10 no foreground e a cor #efbd6a no background

08. prepare este gradiente linear


09. selections / load selection from alpha channel / selection (alfa-three-1)


10. adicione nova layer

11. pinte com o gradiente acima

12. select none

13. effects / edge effects / enhance more

14. drop shadow: 1 1 100 2 preto

15. repita o drop shadow: -1 -1 100 2 preto

16. drop shadow novamente: 20 20 100 50 preto

17. repita em negativo -20 -20 100 50 preto

18. layers / duplicate

19. image / resize: 75%

20. effects / image effects / seamless tiling / default


21. adjust / sharpness / sharpen

22. ative a layer raster 2

23. layers / duplicate

24. effects / image effects / seamless tiling(horizontal marcado)


25. copie o tube de paisagem e cole como nova layer

26. image / resize: 75% - all layers desmarcado

27. adjust / sharpness / sharpen - aplique duas vezes

28. effects / plugins / fm tile tools / blend emboss / default


29. layers / arrange / move down

30. merge visible

31. copie esta layer (reserve)

32. layers / new mask layer / from image / mask (top fade suave)


33. layers / duplicate

34. merge group

35. cole como nova layer a imagem copiada acima

36. effects / plugins / mura's meister / perspective tiling


37. effects / image effects / seamless tiling 


38. image / add borders / 2px / cor do foreground

39. image / add borders / 2px / cor do background

40. image / add borders / 2px / cor do foreground

41. image / add borders / 45px / cor do background

42. selecione esta borda de 45 px com a magic wand

43. pinte com o gradiente Linear 

44. selections / invert

45. selections / modify / expand: 25px


46. selections / invert

47. effects / plugins / fantastic machine / paint engine igual ao anterior


48. effects / edge effects / enhance more

49. effects / plugins / fm tile tools / blend emboss / default


50. drop shadow: 1 1 100 2 preto 

51. drop shadow em negativo: -1 -1 100 2 preto

52. select none

53. adjust / sharpness  sharpen

54. copie o tube feminino e cole como nova layer

55. image / resize: 65% - all layers desmarcado

56. adjust / sharpness / sharpen - aplique duas vezes

57. posicione à esquerda conforme o modelo

58. drop shadow: 0 12 100 50 preto

59. image / add borders / 2px / cor do foreground

image / add borders / 2px / cor do background

60. coloque sua assinatura

61. merge all

62. salve: file / export / jpeg optimizer


Obrigada por fazer minhas traduções


quarta-feira, 22 de abril de 2020

Colybrix - Parfum de Fleurs


Este tutorial é de Colybrix e foi traduzido com a sua permissão

Tutorial: Parfum de Fleurs - Original AQUI
Créditos:
Tube feminino: Graphics Beatrice
Tube Flor: Vera Mendes
Masks: VSP
Outros materiais: Colybrix
Material - AQUI
Plugins:
Carolaine and Sensibility
Mura's Meister
Graphic Plus
Plugins - AQUI
My e-mail: AQUI
My Facebook Group: AQUI
Your Versions: AQUI


ROTEIRO


(clique nos prints para visualizar melhor)


01. coloque a cor #6a9628 no foreground e acor #e6e68c no background

02. abra o arquivo alpha (Parfum de fleurs) / duplique (shift+d) /feche o original

03. pinte com a cor escura

04. adicione uma nova layer

05. selections / select all

06. copie o tube (femme 645 et fleurs...) / cole na seleção

07. select none

08. effects / image effects / seamless tiling / default

09. adjust / blur / radial blur


10. effects / edge effects / enhance - repita 2 vezes

11. layers / properties / blend mode: luminance (l) / opacity: 57

12. merge down

13. adjust / blur / gaussian blur: 10

14. adjust / add/remove noise / add noise


15. adicione nova layer

16. pinte com a cor clara

17. layers / new mask layer / from image / mask (vsp262)

18. layers / duplicate

19. merge group

20. layers / duplicate

21. image / mirror / mirror horizontal

22. merge down

23. effects / edge effects / enhance

24. selections / load selection from alpha channel / selection 1

25. effects / texture effects / weave (cor escura)

26. effects / 3d effects / inner bevel


27. select none

28. selections / load selection from alpha channel / selection 2

29. effects / plugins / carolaine and Sensibility / cs-dlines / default

30. effects / 3d effects / inner bevel igual ao anterior

31. select none

32. ative a layer inferior - raster 1

33. selections / load selection from alpha channel / selection 3

34. effects / texture effects / blinds (cor clara)


35. selections / promote selection to layer

36. select none

37. layers / properties / blend mode: soft light

38. merge down

39. effects / image effects / seamless tiling / default

40. copie o tube (fleur70mist-coly) / cole como nova layer

41. image / resize: 125% - all layers desmarcado

42. effects / image effects / seamless tiling / default

43. layers / properties / opacity: 55%

44. ative a layer superior

45. cole como nova layer o tube acima (fleur70mist-coly)

46. image / resize: 50% - all layers desmarcado
(Nota: se usar outro tube, diminua de forma que fique dentro das duas linhas da mask)

47. effects / plugins / mura's meister / copies


48. ative a pick tool e configure conforme o print: (0/208) / pressione M

49. layers / arrange / move down

50. ative a layer de cima

51. adicione nova layer

52. pinte com a cor #ffffff

53. layers / new maks layer / from image / mask (vsp253)

54. effects / edge effects / enhance

55. merge group

56. selections / load selection from alpha channel / selection 1

57. pressione delete em seu teclado

58. select none

59. layers / properties / blend mode: luminance (l)

Os itens 60, 61, 62 e de 64 a 69, são opcionais:

60. ative a text tool e configure conforme o print;
Fonte: kristen ITC(no material) / size 100 / centralizado / width: 2

61. escreva o texto "Parfum de fleurs" / Letra P Maiúscula, tamanho 100 e as
outras letras tamanho 60, minúsculas.

62. layers / convert to raster layer

63. ou copie o tube (texte parfum) no material / cole como nova layer

64. Uma vez que o texto tenha sido escrito ou colado, selecione as palavras "de fleurs" com a
selection tool

65. copie / pressione delete em seu teclado / Tire a
seleção(select none)

66. cole como nova layer

67. posicione embaixo da palavra parfum, ficando a letra D embaixo da letra A. Veja o modelo para ver a posição correta

68. merge down

69. image / resize: 95% - all layers desmarcado

70. ative a pick tool e configure conforme o print: (506/28) / pressione M

71. drop shadow: 1 1 100 5 cor do foreground

72. drop shadow: -1 -1 100 5 cor do foreground

73. resultado da imagem e layers:

74. merge visible

75. copie esta imagem / cole como nova imagem (reserve)


ATENÇÃO!!!

A partir desta etapa, você tem duas opções:

A) usar o quadro fornecido no material(está numa pasta).
Neste caso, siga os passos descritos no quadro 1 e depois
continue a partir do item 103

B) preparar as bordas passo-a-passo. Neste caso continue a partir do item 76.

Quadro 1

a. merge visible na sua imagem de trabalho

b. image / canvas size
==986x686 68 68 68 68

c. copie o tube (cadre parfum-crea-coly.png) e cole como nova layer
(este quadro está dentro de uma pasta no material)

continue a partir do item 103


76. image / add borders / 1px / cor escura

77. image / add borders / 3px / cor clara

78. image / add borders / 1px / cor escura

79. image / add borders / 5px / branco

80. image / add borders / 1px / cor escura

81. image / add borders / 10px / branco

82. selections / select all

83. image / add borders / 10px / cor escura

84. selections / invert

85. effects / plugins / graphic plus / cross shadow / default

86. selections / select all

87. selections / modify / contract: 20px

88. drop shadow: 0 0 80 10 cor escura

89. select none

90. image / add borders / 1px / cor escura

91. image / add borders / 10px / branco

92. image / add borders / 1px / cor escura

93. image / add borders / 25px / branco

94. selecione a borda de 25px com a magic wand

96. 95. cole na seleção a imagem copiada acima (deverá estar na memória)

97. adjust / blur / gaussian blur: 10px

98. effects / texture effects / blinds igual ao anterior

99. effects / plugins / graphic plus / cross shadow


100. selections / invert

101. drop shadow: 0 0 80 25 preto

102. select none


se você seguiu os passos do quadro 1, continue a partir de agora;

103. copie o tube (femme et fleurs) / cole como nova layer

104. image / resize: 90% - all layers desmarcado

105. image / mirror / mirror horizontal

106. posicione à esquerda

107. drop shadow: -10  -12  40  30  preto

108. copie e cole o tube principal

109. image / resize: 60% - all layers desmarcado

110. ative a pick tool e configure conforme o print: (625/471)

111. coloque sua assinatura

112. image / add borders / 1px / cor escura

113. image / resize: width 900px

114. salve: file / export / jpeg optimizer


Obrigada por fazer minhas traduções