
ROTEIRO:
Tabela de cores:

01. Abra uma nova imagem com 950x500px
02. Preencha com a cor #fcb419 03. Effects / Plugins / Ulead Effects / Particle  04. Image / Flip 05. Effects / Flaming Pear / Flood  06. Adjust / Sharpness / Sharpen 07. Selections / Select All 08. Adicione uma nova layer 09. Abra o arquivo (MaskCeylan) / Copie e cole na seleção 10. Select None 11. Layers / Properties / Blend Mode: Overlay / Opacity: 555  12. Copie e cole como nova layer o tube (1-autumn-bulut) 13. Effects / Image Effects / Offset (0/147)  14. Layers / properties / Blend Mode: Soft Light  15. Merge Visible 16. Selections / load selection from Disk / Selection (Autumn2) 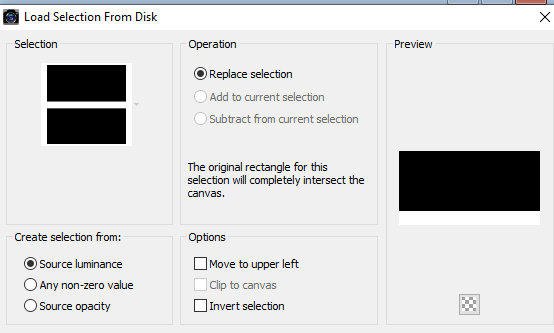 17. Adicione uma nova layer 18. Preencha com a cor #ac4a00 19. Effects / Plugins / Eye Candy 5: Textures / Brick Wall / Preset (Autumn)  20. Effects / Plugins / Eye Candy 5: Impact / Extrude / Preset (Autumn1)  21. Select None 22. Ative a Pick Tool e ajeite a imagem puxando para os lados para aumentar, conforme o print  23. Copie e cole como nova layer o tube (2-Autumn-Duvar) 24. Posicione conforme o modelo e redimensione com a ajuda da Pick Tool, conforme o print  25. Layers / Properties / Blend Mode: Multiply / Opacity: 75% 26. Adjust / Sharpness / Sharpen 27. Merge down 28. Image / Canvas Size: *950x550 / 0 50 00  29. Adicione nova layer 30. Pinte com a cor #ac4a00 31. Effects / Texture Effects / Weave / WC:4 GP:3  32. Effects / Plugins / Mura's Meister / Perspective tiling *49 13 0 12 6 1 0 29  33. Layers / Arrange / Move down 34. Copie e cole como nova layer o tube (3-Autumn-Kayik) 35. Effects / Image Effects / Offset (168/24)  36. Copie e cole como nova layer o tube (4-Autumn-Yaprak) 37. Effects / Image Effects / Offset (0/-61) 38. Copie e cole como nova layer o tube (5-Autumn-Agac) 39. Effects / Image Effects / offset (0/41) 40. Copie e cole como nova layer o tube (6-Autumn-Kus) 41. Effects / Image Effects / Offset (-14/167) 42. Copie e cole como nova layer o tube (7-Autumn-Yildiz1) 43. Effects / Image Effects / Offset (0/120) 44. Layers / Properties / Blend Mode / Screen 45. Copie e cole como nova layer o tube (8-Autumn-Yildiz2) 46. Effects / Image Effects / Offset (0/218) 47. Layers / Properties / Blend mode: Screen 48. Adjust / Sharpness / Sharpen 49. Ative a layer superior 50. Copie e cole como nova layer o tube (9-Autumn-Yaprak2) 51. Effects / Image Effects / Offset (203/47) 52. Copie e cole como nova layer o tube (10-Autumn-Yildiz3) 53. Effects / Image Effects / Offset (0/-110) 54. Layers / Properties / Opacity: 45% 55. Copie e cole como nova layer o tube (11-Autmun-Yaprak3) 56. Effects / Image Effects / Offset (14/87) 57. Copie e cole como nova layer o tube (12-Autmun-Yaprak4) 58. Effects / Image Effects / Offset (0/-186) 59. Copie e cole como nova layer o tube (13-Autumn-Kitap) 60. Effects / Image Effects / Offset (241/-117) 61. Copie e cole como nova layer o tube (14-Autumn-Vazo) 62. Effects / Image Effects / Offset (400/-151) 63. Copie e cole como nova layer o tube (15-PSD) 64. Adjust / Hue and Saturation / Colorize (33/255)  65. Layers / Properties / Blend Mode: Screen / Opacity: 90% 66. Copie e cole como nova layer o tube (16-Autumn-dog) 67. Effects / Image Effects / Offset (-208/-206) 68. Copie e cole como nova layer o tube (16-Bayan-tube) 69. Redimensione conforme desejar 70. Adjust / Sharpness / Sharpen 71. Merge visible 72. Effects / Plugins / Richard Rosenman / Solid Borders  73. Copie a imagem (Edit/Copy) 74. Selections / Select All 75. Image / Add borders / 55px / cor #ffffff 76. Selections / Invert 77. Cole na seleção a imagem copiada no item 73 78. Adjust / Blur / Radial Blur  79. Drop Shadow: 10 10 60 20 preto 80. Repita o Drop Shadow em negativo: -10 -10 60 20 preto 81. Effects / Edge Effects / Enhance 82. Select None 83. Image / Resize: Width:950px 84. Merge All 85. Effects / Plugins / AAA Filter / AAA Framer  86. Effects / Plugins / AAA Filters / Custom / Landscape  87. Copie e cole como nova layer o tube (Autumn) 88. Effects / Image Effects / Offset (108/-229) 89. Salve : File > Export > JPEG Optimizer Obrigada por fazer minhas traduções |

quarta-feira, 25 de setembro de 2019
Ceylan - Autumn

Graphics Beatrice - Aiko

ROTEIRO:
Tabela de Cores:  Etapa 1 Abra o arquivo (File Alpha) / Duplique (Shift+D) / Feche o original Etapa 1 Coloque a cor #f5658c no foreground e a cor #efe6e5 no background Effects / Plugins / Mehdi / Wavy lab 1.1 Sequência de cores: #efe6e5 - #f5658c - #7f1e2f - #ffffff  Etapa 2 Effects / Plugins / Mehdi / Sorting Tiles  Effects / Plugins / Unlimited 2 / BKG designer sf10 I / 4 Way Average / Default  Effects / Plugins / Italian Editors Effects / Effetto Fantasma  Effects / plugins / BKG Kaleidoscope / Cake Mix  Resultado:  Etapa 3 Adicione uma nova layer Ative a Selection Tool / Custom Selection  Pinte a seleção com a cor #ffffff Select None Etapa 4 Permaneça na layer Raster 2 Effects / Geometric Effects / Skew / cor #f45581 *Vertical -37 color #f45581  Selections / Load selection from alpha channel / Selection #GB 01  Selections / promote selection to layer Select None Etapa 5 Effects / Image Effects / Seamless Tiling / Preset Side by Side  Etapa 6 Ative a layer Raster 2 Effects / Image Effects / Seamless Tiling igual ao anterior IMAGE 10 Resultado:  Etapa 7 Ative a Promoted Selection Effects / Plugins / BKG Kaleidoscope / Nomad Rug  Permaneça na layer Effects / Plugins / AP 01 [Innovation] / Lines-SilverLining  Layers / Properties / Blend Mode: Multiply  Etapa 8 Ative a layer raster 2 Layers / New Mask layer / From Image / Mask (Oriental_Mask_GB_02) / Invert Marcado  Merge Group Drop Shadow: 1 1 30 0 preto  Etapa 9 Ative a layer Group - Raster 2 Adicione uma nova layer Selections / Load selection from alpha channel / Selection (02 GB)  Pinte a seleção com a cor #ffffff Selections / Promote selection to layer Pressione a tecla Delete no teclado Mantenha a seleção Etapa 10 Permaneça nessa layer Effects / 3D Effects / Cutout  Select None Etapa 11 Ative a layer Raster 2 Layers / Properties / Opacity: 55  Selecione o círculo branco com a Magic Wand (Tolerance=10,Feather=0) Selections / Modify / Contract: 6px  Etapa 12 Mantenha a seleção Ative a layer Group - Raster 2 Abra o tube (Hair Flower GB 39) no PSP / Image / Mirror Copie e cole como nova layer Posicione o tube na seleção. Veja o print  Selections / invert Pressione Delete no teclado Select None Etapa 13 Ative a layer Group-Raster 2(Mask Oriental) Copie e cole como nova layer o tube mist (Rose GB) Posicione conforme modelo Layers / Properties / Blend Mode: Hard Light / Opacity: 60%(apenas confirme se está assim)  Etapa 14 Ative a layer superior Abra o tube (Element 01 GB) / Clique na layer Raster 2 / Copie Cole como nova layer no seu trabalho Posicione à esquerda, conforme o modelo. Veja o print  Ative novamente o tube (Element 01 GB) / Clique na layer Word / Copie Cole no seu trabalho. Posicione por cima do círculo. Veja o print  Etapa 15 Abra o tube (Element 02 GB) / Clique na layer Raster 1 Copie e cole como nova layer em seu trabalho Posicione embaixo, à direita, embaixo, conforme o print 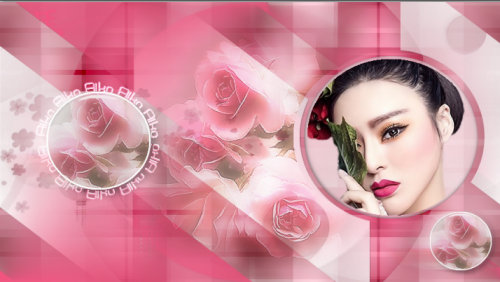 Ative novamente o tube (Element 02 GB) / Clique na layer Word Copie e cole no seu trabalho Posicione embaixo, à direita, por cima do círculo conforme o print  Layers / Properties / Blend Mode: Overlay Etapa 16 Ative a layer Group - Raster 2(oriental Mask) Adicione uma nova layer Selections / Load selection from alpha channel / Selection (03 GB)  Coloque a cor #ffffff no foreground e a cor #f5658c no background Prepare um gradiente Linear *0 1 des  Preencha a seleção com este gradiente Select None Effects / Plugins / Panopticum / PAN Alpha Strip *0 111 10 0 0 0  Layers / Properties / Blend Mode: Overlay  Effects / Distortion Effects / Wave *91 51 14 100 transp  Effects / Plugins / Xero / Improver / landscape / Ok  Etapa 17 Ative a layer superior (Raster 8) Copie e cole como nova layer o tube (wordart_aiko_GB) Posicione à esquerda conforme o modelo Etapa 18 Image / Add borders / 1px / cor #f5658c Image / Add borders / 3px / cor #ffffff Image / Add borders / 1px / cor #f5658c Image / Add borders / Symmetric desmarcado / cor #ffffff  Etapa 19 Layers / Promote Background Layer Layers / Duplicate Fique na layer da cópia Com a Magic Wand (Tolerance e Feather=0) selecione a borda branca Selections / Invert Layers / New Mask Layer / From Image / Mask (mask 07 GB 2019) (Nota: o efeito da mask aparentemente não aparece, é normal)  Merge Group Layers / Properties / Blend Mode: Multiply  Select None Resultado:  Etapa 20 Ative a layer Raster 1 Com a Magic Wand, selecione a borda branca Pressione Delete em seu teclado Mantenha a seleção Selections / Invert Adicione uma nova layer Preencha a layer com a cor #ffffff Layers / Properties / Opacity: 50  Select / Invert Adicione uma nova layer (Raster 3) Pinte com a cor #f55581 Effects / Edge Effects / Enhance Select None Layers / Arrange / Send to Bottom
Etapa 21
Ative a layer superior (Group - Copy of Raster 1)
Ative a Selection Tool / Custom Selection *141 0 50 412  Selections / promote selection to layer Select None Layers / Duplicate Image / Mirror Merge Down Etapa 22 Ative a layer inferior (Raster 3) Effects / Plugins / Unlimited 2 / BKG Kaleidoscope / @Mirrored Scaled IMAGE 35  Com a magic Wand, selecione a borda branca Drop Shadow: -1 1 100 0 preto IMAGE 35.1  Effects / Edge Effects / Enhance Select None Etapa 23 Ative a layer Raster 2 Drop Shadow: 1 -1 30 0 preto Merge visible Etapa 24 Image / Add borders / 1px / cor #ffffff Image / Add borders / 5px / cor #f45581 Image / Add borders / 1px / cor #ffffff Coloque sua assinatura Merge All Salve : File > Export > JPEG Optimizer Obrigada por fazer minhas traduções |
Assinar:
Postagens (Atom)