Mostrando postagens com marcador Merry Christmas. Mostrar todas as postagens

quinta-feira, 12 de dezembro de 2019

Lady Tess - Merry Christmas - in english


This tutorial is from Lady Tess and was translated with your permission.

Original HERE


****

Credits:


****

Material - Download HERE


If you use an older version of PSP and can't open any material
Contact me by email below


****

Plugins:
Mehdi / Wavy Lab 1.1
Mura's meister / Copies
Unlimited 2 / Simple / Top Left Mirror / Tile & Mirror / Radial Tile
Eye Candy 5: Impact / Perspective Shadow

Blog Plugins: HERE


****

Orientations:

Click on the prints for a better view.
Remember to save work as it runs
Change Blend Mode, Opacity, and Drop Shadow to Your Images
Pick Tool replaces Deform tool from older versions of PSP

If your PSP is an older version, use material labeled "PSP ANTIGO"

***

My E-Mail: HERE

Send us your versions or let me know if you have any problems
with the tutorial or material

***

Versions: HERE

***

Groups:


******


SCRIPT:


Step 01

These are the colors used in the tutorial:


Save mask to PSP Masks folder

Double click on Alien Skin preset to export to plugin


Save the gradient to the PSP Gradients folder

Put color # a8b298 in foreground and color # 363d2d in background


Step 02

Open the file (ltdstudio_MChristmas_AlphaImage)

Duplicate (Shift + D) / Close Original / Work With Copy /
Rename to Raster 1

Effects / Plugins / Mehdi / Wavy Lab 1.1
Color Sequence: # 363d2d / # a8b298 / # c8ccc0 / # e0e2dc


Step 03

Layers / Duplicate

Adjust / Blur / Gaussian Blur: 30


Add a new layer

Selections / Select All


Step 04

Open tube (b16_5138d_1) / Copy and paste to selection

Select None

Effects / Image Effects / Seamless Tiling


Merge down


Step 05

Effects / Plugins / Simple / Top Left Mirror


Add a new layer

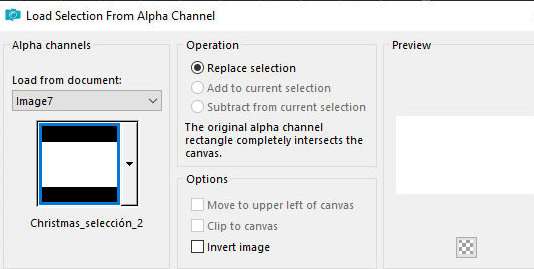
Selections / Load selection from Alpha channel / Selection 2


Under Materials click the Gradient / Select Gradient option (MerryChristmas_01) and set a Radial Gradient:


Step 06

Fill selection with gradient

Select None

Layers / Load masf from disk / Mask (Corel_07_001 = Edge Burst)


Merge group

Image / Resize: 110% - all layers unchecked

Effects / Edge Effects / Enhance


Step 07

Result:


Step 08

Open tube (b16_5138d-1_chico) / Copy and paste as new layer

Image / Resize: 70% - all layers unchecked

Adjust / Sharpness / Sharpen More

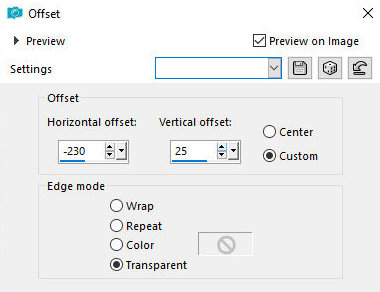
Effects / Image Effects / Offset (-230/25)


Step 09

Effects / Plugins / Mura's Meister / Copies


Effects / Image Effects / Offset (0/40)


Effects / Plugins / Eye Candy 5: Impact / Perspective Shadow / Preset
(LTDStudio_Christmas_02) /


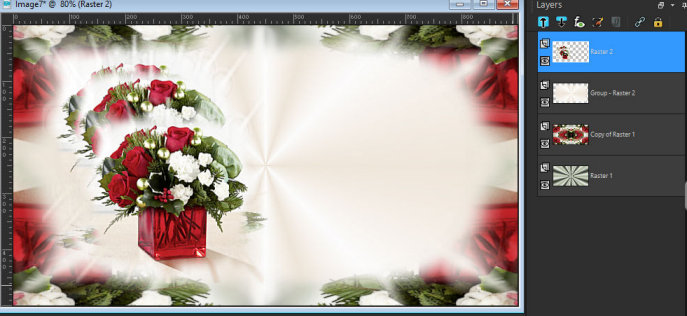
Result:


Step 10

Add a new layer

Selections / Load selection from Alpha Channel / Selection 1


Selections / Modify / Expand: 15


Fill the selection with color # d81a1e

Selections / Modify / Contract: 5px


Press Delete on your keyboard

Select None


Step 11

Effects / 3D Effects / Chisel


Layers / Duplicate

Merge down


Step 12

Result:


Step 13

Drop Shadow: 1 1 60 1 white

Open the tube (ltdstudio_Christmas_Deco)

Close weft layer 2

Copy and paste as new layer

Layers / Properties / Blend Mode: Overlay

Adjust / Sharpness / Sharpen More

Result:


Step 14

Activate the Copy of Raster 1 layer (second from below)

Copy and paste as new image / Minimize

Go back to work image

Merge visible


Step 15

Image / Add borders / 1px / white

Selections / Select All

Image / Add borders / 45px / white

Selections / Invert

Copy the copied image in Step 14

Paste in Selection


Step 16

Adjust / Blur / Gaussian Blur: 30


Effects / Plugins / Unlimited 2 / Tile & Mirror / Radial Tile


Effects / Plugins / AAA Frames / Photo Frame
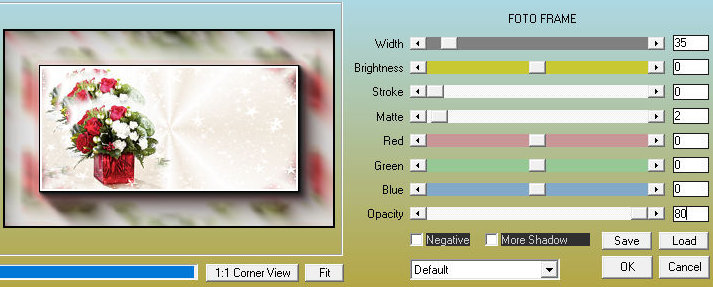

Select None


Step 17

Open the tube (fetes_noel18_tine_12.2018)

Copy and paste as new layer

Image / Resize: 50% - all layers unchecked

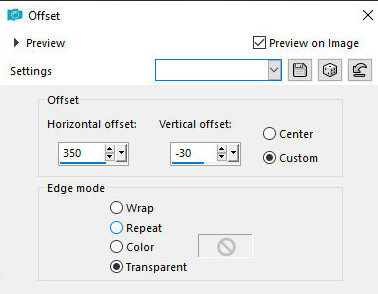
Effects / Image Effects / Offset (350 / -30)


Step 18

Layers / Duplicate

Image / Resize: 80% - all layers unchecked

Image / Free Rotate (Right / 60)


Effects / Image effects / Offset (-30 / -100)


Step 19

Merge down

Effects / Plugins / Eye Candy 5: Impact / Perspective Shadow same as above

Drop Shadow: -5 13 50 30 Black

Adjust / Sharpness / Sharpen

Merge visible

Result:


Step 20

Open the tube (ltdstudio_MChristmas_texto)

Copy and paste as new layer

Position by model

Merge visible


Step 21

Put your signature

Put the mark of Lady Tess

Save: File / Export / Jpeg Optimizer


Thank you for making my translations


Lady Tess - Merry Christmas


Este tutorial é de Lady Tess e foi traduzido com a sua permissão

Original AQUI


****

Créditos:


****

Material - Download AQUI


Se você usar uma versão antiga do PSP e não conseguir abrir algum material
entre em contato comigo pelo e-mail abaixo


****

Plugins:
Mehdi / Wavy Lab 1.1
Mura's meister / Copies
Unlimited 2 / Simple / Top Left Mirror / Tile & Mirror / Radial Tile
Eye Candy 5: Impact / Perspective Shadow

Plugins do Blog: AQUI

****

Orientações:

*Clique nos prints para visualizar melhor

*Lembre-se de salvar o trabalho durante sua execução

*Altere o Blend Mode, a cor, a opacidade e o Drop Shadow de acordo com suas imagens

*A ferramenta Pick Tool substitui a ferramente Deform das versões antigas do PSP

*Se o seu PSP for uma versão antiga, use o material marcado com "psp antigo"

***

Meu E-Mail: AQUI

* Mande suas versões
*Me avise caso tenha algum problema no tutorial

***

Vejam suas versões AQUI

***

Participe dos meus grupos:
Facebook: AQUI
Google: AQUI


****


ROTEIRO:


Etapa 01

Estas são as cores usadas no tutorial:


Salve a mask na pasta Masks do PSP 

Clique duas vezes no preset Alien Skin para exportar para o plugin

Salve o gradiente na pasta Gradients do PSP

Coloque a cor #a8b298 no foreground e a cor #363d2d no background


Etapa 02

Abra o arquivo (ltdstudio_MChristmas_AlphaImage)

Duplique (Shift+D) / Feche o original / Trabalhe com a cópia/
Renomeie para Raster 1

Effects / Plugins / Mehdi / Wavy Lab 1.1
Sequência de Cores: #363d2d/#a8b298/#c8ccc0/#e0e2dc


Etapa 03

Layers / Duplicate

Adjust / Blur / Gaussian Blur: 30


Adicione uma nova layer

Selections / Select All


Etapa 04

Abra o tube (b16_5138d_1) / Copie e cole na seleção

Select None

Effects / Image Effects / Seamless Tiling


Merge Down


Etapa 05

Effects / Plugins / Simple / Top Left Mirror


Adicione uma nova layer

Selections / Load selection from Alpha channel / Selection 2


Em Materials clique na opção Gradiente / Selecione o gradiente (MerryChristmas_01) e configure:


Etapa 06

Preencha a seleção com o gradiente

Select None

Layers / Load masf from disk / Mask (Corel_07_001= Edge Burst)


Merge Group

Image / Resize: 110% - all layers desmarcado

Effects / Edge Effects / Enhance


Etapa 07

Resultado:


Etapa 08

Abra o tube (b16_5138d-1_chico) / Copie e cole como nova layer

Image / Resize: 70% - all layers desmarcado

Adjust / Sharpness / Sharpen More

Effects / Image Effects / Offset (-230/25)


Etapa 09

Effects / Plugins / Mura's Meister / Copies


Effects / Image Effects / Offset  (0/40)


Effects / Plugins / Eye Candy 5: Impact / Perspective Shadow / Preset
(LTDStudio_Christmas_02) /


Resultado:


Etapa 10

Adicione uma nova layer

Selections / Load selection from Alpha Channel / Selection 1


Selections / Modify / Expand: 15


Preencha a seleção com a cor #d81a1e

Selections / Modify / Contract: 5px


Pressione Delete em seu teclado

Select None


Etapa 11

Effects / 3D Effects / Chisel


Layers / Duplicate

Merge Down


Etapa 12

Resultado:


Etapa 13

Drop Shadow: 1  1  60  1  branco

Abra o tube (ltdstudio_Christmas_Deco)

Feche a layer trama 2

Copie e cole como nova layer

Layers / Properties / Blend Mode: Overlay

Adjust / Sharpness / Sharpen More

Resultado:


Etapa 14

Ative a layer Copy of Raster 1 (segunda a partir de baixo)

Copie e cole como nova imagem / Minimize

Volte para a imagem de trabalho

Merge visible


Etapa 15

Image / Add borders / 1px / branco

Selections / Select All

Image / Add borders / 45px / branco

Selections / Invert

Copie a imagem copiada na Etapa 14

Cole na Seleção


Etapa 16

Adjust / Blur / Gaussian Blur: 30


Effects / Plugins / Unlimited 2 / Tile & Mirror / Radial Tile


Effects / Plugins / AAA Frames / Foto Frame


Select None


Etapa 17

Abra o tube (fetes_noel18_tine_12.2018)

Copie e cole como nova layer

Image / Resize: 50% - all layers desmarcado

Effects / Image Effects / Offset (350/-30)


Etapa 18

Layers / Duplicate

Image / Resize: 80% - all layers desmarcado

Image / Free Rotate (Right/60)


Effects / Image effects / Offset (-30/-100)


Etapa 19

Merge down

Effects / Plugins / Eye Candy 5: Impact /Perspective Shadow igual ao anterior

Drop Shadow: -5  13  50  30  preto

Adjust / Sharpness / Sharpen

Merge visible

Resultado:


Etapa 20

Abra o tube (ltdstudio_MChristmas_texto)

Copie e cole como nova layer

Posicione conforme o modelo

Merge visible


Etapa 21

Coloque sua assinatura

Coloque a marca de Lady Tess

Salve: File / Export / Jpeg Optimizer


Obrigada por fazer minhas traduções