Versão original de Saturnella
This tutorial is by Saturnella and was translated with your permission.
Original HERE
****
Credits:
Material provided by Saturnella
****
Material - Download HERE
****
Plugins:
Mehdi / Wavy Lab 1.1 / Sorting Tiles
Flaming Pear / Sphère Wrap B / Flexify 2
AP 01 [Innovations] / Lines - SilverLining
Mura's Meister / Perspective Tiling
Eye Candy 5: Impact / Perspective Shadow / Glass
VanDerLee / Unplugged-X / Defocus
AAA Frame / Photo Frame
Blog Plugins: HERE
****
Orientações:
*Clique nos prints para visualizar melhor
*Lembre-se de salvar o trabalho durante sua execução
*Altere o Blend Mode, a cor, a opacidade e o Drop Shadow de acordo com suas imagens
*A ferramenta Pick Tool substitui a ferramente Deform das versões antigas do PSP
*Se o seu PSP for uma versão antiga, use o material marcado com "psp antigo"
***
Meu E-Mail: AQUI
* Mande suas versões
*Me avise caso tenha algum problema no tutorial
***
Vejam suas versões AQUI
***
Participe dos meus grupos:
Facebook: AQUI
Google: AQUI
******
SCRIPT:
01
Open masks on PSP and minimize
Circus font is in the material
Double click on the presets below to export them to the plugin.
These are the colors used in the tutorial:
Open the alpha file (Alpha_chaperon)
Duplicate (Shift + D) / Close Original
Rename to Raster 1
Put color 1 in the foreground and color 2 in the background
02
Effects / Plugins / Mehdi / Wavy Lab 1.1
Color Sequence: 2-1-3-4
03
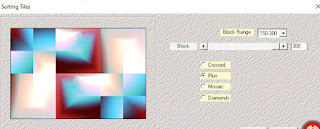
Effects / Plugins / Mehdi / Sorting Tiles
04
Layers / Duplicate
Image / Resize: 80% - all layers unchecked
05
Effects / Plugins / Flaming Pear / Sphére Warp B
06
Effects / Image Effects / Seamless Tiling
07
Effects / Plugins / Flaming Pear / Flexify 2
Image / Resize: 80% - all layers unchecked
08
Open the landscape tube (sat_for02)
Copy and paste as new layer
Activate the Pick Tool and configure:
Positions: Horizontal (X): 160 Vertical (Y): 115
Press M to exit selection.
09
Layers / Duplicate
Image / Mirror / Horizontal Mirror
Merge down
Best position the image in the center of the cylindrical image
10
Selections / Load selection from alpha channel / Selection 1
Selections / Invert
Press Delete on your keyboard
Select None
Merge Down
10.1
Selections / Select All
Selections / Float
Selections / Defloat
Selections / Modify / Select selection borders
Fill the selection with color 2
Selections / Modify / Remove Specks and Holes
Effects / 3D Effects / Inner Bevel
Select None
Activate the Pick tool and configure:
Positions: Horizontal (X): 100 Vertical (Y): 21
Press M to exit selection.
11
Enable lower layer (Raster 1)
Add a new layer
Fill in with color 4
Layers / New Mask Layer / From Image / Mask (coly-mask23)
Effects / Edge Effects / Enhance More
Merge group
12
Effects / Plugins / AP 01 [Innovations] / Lines - SilverLining
13
Effects / Plugins / Mura's Meister / Perspective tiling
14
Drop Shadow: 0 0 80 41 black
15
Layers / Duplicate
Merge down
16
Add a new layer
Fill the layer with color 2
Layers / New Mask Layer / From Image / Mask (ildiko @ create0028_mask)
Effects / Edge Effects / Enhance
Merge Group
17
Adjust / Add / Remove Noise / Add Noise
Adjust / Sharpness / Sharpen
18
Effects / Plugins / Eye Candy 5: Impact / Perspective Shadow / Preset (chaperon_shadow)
19
Enable lower layer (Raster 1)
Effects / Reflection Effects / Rotating Mirror
20
Effects / Plugins / VanDerLee / Unplugged-X / Defocus
Effects / Edge Effects / Enhance
21
Image / Add borders / 1px / color 2
Image / Add borders / 3px / color 4
Image / Add borders / 1px / color 2
22
Selections / Select all
Image / Add borders / 30px / color 3
Selections / invert
Effects / Reflection Effects / Kaleidoscope
Select None
23
With Magic Wand (Mode+Add shift), select the 4 blue rectangles as per print
Effects / Plugins / Eye Candy 5: Impact / Glass / Preset (chaperon_glass)
Select None
24
Image / Add borders / 1px / color 2
Image / Add borders / 3px / color 4
Image / Add borders / 1px / color 2
25
Selections / Select all
Image / Add borders / 50px / color 4
Selections / invert
Fill in this Linear gradient with color 4 in the foreground and color 2 in the background.
26
Effects / Artistic Effects / Halftone
Effects / Edge Effects / Enhance
27
Effects / Plugins / AAA Frame / Photo Frame
28
Selections / Invert
Drop shadow: 0 0 80 41 black
Repeat Drop shadow
Select None
29
Repeat the Foto Frame with this setting:
30
Open the tube (sat_ani38) / Open the layer by clicking on the eye.
Copy and paste as new layer
Image / Resize: 80% - all layers unchecked
Adjust / Sharpness / Sharpen
Position as image
31
Effects / Plugins / Eye Candy 5: Impact / Prespective shadow same as above
32
Open the tube (sat_chap01) / Open the layer by clicking on the eye.
Image / Mirror / Horizontal Mirror
Image / Resize: 80% - all layers unchecked
Adjust / Sharpness / Sharpen
Effects / Plugins / Eye Candy 5: Impact / Perspective Shadow same as above
33
Image / Add borders / Symmetric unchecked / color 2
Open tube titre
Copy and paste as new layer
Or write the title with the source in the material.
Position as image
34
Put your signature
Image / Add borders / 1px / black
Image / Resize: Width 900px
Adjust / Sharpness / Unsharp mask
Save: File / Export / Jpeg Optimizer
Thank you for doing my translations.
My version. Tubes find in the web.


Nenhum comentário:
Postar um comentário
Observação: somente um membro deste blog pode postar um comentário.