segunda-feira, 6 de janeiro de 2020

Lady Tess - Black & White - in english

A Lady Tess's original version

My version with LB Tubes


This tutorial is by Lady Tess and has been translated with your permission.

Original HERE


****

Credits:
LB Tubes
Nena Silva

****

Material - HERE


If any material does not open, contact me

****

Plugins:
Mehdi / Vibrations 1.1
Mura's Meister / Perspective Tiling / Copies
Eye Candy 5: Impact / Perspective Shadow / Glass
Unlimited 2 / Tile & Mirror / distortion Mirror (Vertical)
AAA Frames / Photo Frame

Plugins - HERE


****

Orientations:

Click on the prints for a better view.
Remember to save work as it runs
Change Blend Mode, Opacity, and Drop Shadow to Your Images
Pick Tool replaces Deform tool from older versions of PSP
***

My E-Mail: HERE

Send us your versions or let me know if you have any problems
with the tutorial or material

***

Versions: HERE

***

Groups:


********


SCRIPT:


01. Save the gradient below to the PSP Gradients folder
- petitclic

02. Colors used in the tutorial


03. Put color #ffffff in the foreground and color # 000000 in the background

04. In the color palette, click the Gradient option and select the gradient (petitclic) and
configure as print


05. Open the file (ltdstudio_Black & White_AlphaImage)

06. Duplicate (Shift + D) / Close Original / Rename to Raster 1

07. Fill the image with the gradient above

08. Layers / Duplicate

09. Adjust / Blur / Gaussian Blur: 40


10. Add a new layer

11. Selections / Select All

12. Open the tube (3147-woman-LB Tubes)

13. Copy and paste to selection

14. Select None

15. Effects / Image Effects / Seamless Tiling / Default


16. Merge Down

17. Effects / Plugins / Mehdi / Vibrations 1.1


17. Adjust / Blur / Radial Blur


18. Result


19. Selections / Load selection from alpha channel / Selection 2


20. Selections / promote selection to layer

21. Keep Selection

22. Adjust / Blur / Gaussian Blur: 40


23. Open the tube (vvs-landscape0184)

24. Copy and paste as new layer

25. Position the layer as per print
Note: Position so that the image you want stands out in the selection


26. Selections / Invert

27. Press Delete on your keyboard

28. Select None

29. Adjust / Sharpness / Sharpen More

30. Merge Down

31. Image / Resize: 90% - all layers unchecked

32. Effects / Image Effects / Seamless Tiling


33. Selections / Load selection from alpha channel / Selection 3


34. Enable layer Raster 1

35. Selections / Promote selection to layer

36. Select None

37. Layers / Arrange / Bring to top

38. Effects / Plugins / Mura's Meister / Perspective Tiling


39. Effects / Edge Effects / erode

40. Layers / Properties / Blend Mode: Overlay


41. Add new layer

42. Selections / Load selection from alpha channel / Selection 1


43. Fill selection with gradient

44. Adjust / Blur / Gaussian Blur: 30


45. Select None

46. ​​Layers / Duplicate

47. Merge Down

48. Selections / Load selection from alpha channel / Selection 1 (again)


49. Selections / Modify / Select selection borders


50. Add new layer

51. Fill in the selection with color # 000000

52. Effects / Texture Effects / Weave


53. Select None

54. Merge Down

55. Drop Shadow: 5 5 50 20 black

56. Repeat Drop Shadow on negative: -5 -5 50 20 black

57. Effects / image Effects / Offset (20/0)


58. With the help of the Pick Tool, we enlarge the image vertically by pulling up and down as per print


59. Open the tube (3147-woman-LB Tubes)

60. Copy and paste as new layer

61. Image / Resize: 75% - all layers demarcated

62. Fit the tube to the image

63. Adjust / Sharpness / Sharpen

64. Effects / Plugins / Eye Candy 5: Impact / Perspective Shadow
/ Preset (Drop Shadow, Blurry)
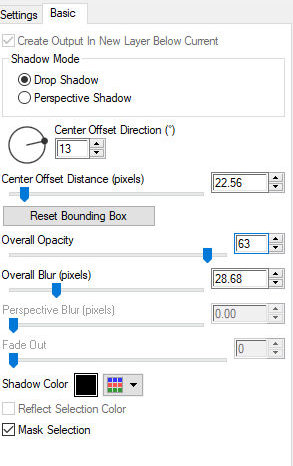


65. Merge Down

66. Image / Resize: 95% - All layers unchecked

67. Effects / Plugins / Mura's Meister / Copies
Note: Double-click the 1 / n Fade Out option.


68. Objects / Align / Left


69. Layers / Duplicate

70. Image / Mirror / Mirror Horizontal

71. Effects / Image Effects / Offset (-70/0)


72. Merge Down

73. Objects / Align / Horizontal Center


74. Move up slightly

75. Result:


76. Add new layer

77. Selections / Load selection from alpha channel / Selections 4


78. Fill in the selection with color # 000000

79. Effects / Plugins / Eye Candy 5: Impact / Glass /
/ Preset (Clear With Reflection)


80. Select None

81. Drop Shadow: -6 15 100 0 color #ffffff - SHADOW ON NEW LAYER MARKED


82. Effects / Texture Effects / Weave - Invert Colors


83. Activate the layer above - Raster 3

84. Click on the link / Unlink option


85. Merge down

86. Drop Shadow: 0 0 60 30 black - (uncheck the shadow on new layer option)

87. Adjsut / Sharpness / Sharpen More

88. Layers / Duplicate

89. Image / Mirror / Mirror Horizontal

90. Activate the Copy of Raster 1 layer.

91. Layers / Duplicate

92. Layers / Arrange / Bring to top

93. Selections / Load selection from alpha channel / Selection 2


94. Press Delete on Your Keyboard

95. Select None

96. Layers / Arrange / Move Down - Apply 2 times

97. Result:


98. Stay in Same Layer - Copy (2) of Raster 1

99. Effects / Plugins / Unlimited 2 / Tile & Mirror / Distortion Mirror (Vertical)


100. Result:


101. Merge visible

102. Image / Add borders / 1px / color # 000000
Image / Add borders / 20px / color #ffffff
Image / Add borders / 1px / color # 000000

103. Selections / Select All

104. Image / Add borders / 40px / color #ffffff

105. Selections / Invert

106. Effects / Plugins / AAA Frames / Photo Frame


107. Select None

108. Open the tube (ltdstudio_Black & White_Text)

109. Copy and paste as new layer

110. Objects / Align / Top

111. Objects / Align / Horizontal Center

112. Put Your Signature

113. Put Lady Tess Signature

114. Save: File / Export / Jpeg Optimizer


Thank you for doing my translations.

Lady Tess - Black & White

 Versão original de Lady Tess

Minha versão com tube de LB Tubes


Este tutorial é de Lady Tess e foi traduzido com a sua permissão.

Original AQUI


****

Créditos:
LB Tubes
Nena Silva

****

Material - AQUI


Se algum material não abrir, entre em contato comigo

****

Plugins:
Mehdi / Vibrations 1.1
Mura's Meister / Perspective Tiling / Copies
Eye Candy 5: Impact / Perspective Shadow/ Glass
Unlimited 2 / Tile &Mirror / distortion Mirror (Vertical)
AAA Frames / Foto Frame

Plugins - AQUI


****

Orientações:

*Clique nos prints para visualizar melhor

*Lembre-se de salvar o trabalho durante sua execução

*Altere o Blend Mode, a cor, a opacidade e o Drop Shadow de acordo com suas imagens

*A ferramenta Pick Tool substitui a ferramente Deform das versões antigas do PSP

***

Meu E-Mail: AQUI

* Mande suas versões
*Me avise caso tenha algum problema no tutorial

***

Vejam suas versões AQUI

***

Participe dos meus grupos:
Facebook: AQUI
Google: AQUI

ROTEIRO:


01. Salve o gradiente abaixo na pasta Gradients do PSP
- petitclic

02. Cores usadas no tutorial


03. Coloque a cor #ffffff no foreground e a cor #000000 no background

04. Na paleta de cores, clique na opção Gradient e selecione o gradiente(petitclic) e
configure conforme o print


05. Abra o arquivo (ltdstudio_Black&White_AlphaImage)

06. Duplique (Shift+D) / Feche o original / Renomeie para Raster 1

07. Preencha a imagem com o gradiente acima

08. Layers / Duplicate

09. Adjust / Blur / Gaussian Blur: 40


10. Adicione uma nova layer

11. Selections / Select All

12. Abra o tube (3147-woman-LB Tubes)

13. Copie e cole na seleção

14. Select None

15. Effects / Image Effects / Seamless Tiling / Default


16. Merge down

17. Effects / Plugins / Mehdi / Vibrations 1.1


17. Adjust / Blur / Radial Blur


18. Resultado


19. Selections / Load selection from alpha channel / Selection 2


20. Selections / promote selection to layer

21. Mantenha a seleção

22. Adjust / Blur / Gaussian Blur: 40


23. Abra o tube (vvs-paisagem0184)

24. Copie e cole como nova layer

25. Posicione a layer conforme o print
Nota: posicione de forma que a imagem que você deseja, sobressaia na seleção


26. Selections / Invert

27. Pressione Delete em seu teclado

28. Select None

29. Adjust / Sharpness / Sharpen More

30. Merge Down

31. Image / Resize: 90% - all layers desmarcado

32. Effects / Image Effects / Seamless Tiling


33. Selections / Load selection from alpha channel / Selection 3


34. Ative a layer Raster 1

35. Selections / Promote selection to layer

36. Select None

37. Layers / Arrange / Bring to top

38. Effects / Plugins / Mura's Meister / Perspective Tiling


39. Effects / Edge Effects / erode

40. Layers / Properties /Blend Mode: Overlay


41. Adicione nova layer

42. Selections / Load selection from alpha channel / Selection 1


43. Preencha a seleção com o gradiente

44. Adjust / Blur / Gaussian Blur: 30


45. Select None

46. Layers / Duplicate

47. Merge Down

48. Selections / Load selection from alpha channel / Selection 1 (novamente)


49. Selections / Modify / Select selection borders


50. Adicione nova layer

51. Preencha a seleção com a cor #000000

52. Effects / Texture Effects / Weave


53. Select None

54. Merge Down

55. Drop Shadow: 5 5 50 20 preto

56. Repita o Drop Shadow em negativo: -5 -5 50 20 preto

57. Effects / image Effects / Offset (20/0)


58. Com a ajuda da Pick Tool , aumentamos a imagem verticalmente, puxando pra cima e para baixo, conforme o print


59. Abra o tube (3147-woman-LB Tubes)

60. Copie e cole como nova layer

61. Image / Resize: 75% - all layers demarcado

62. Ajuste o tube na imagem

63. Adjust / Sharpness / Sharpen

64. Effects / Plugins / Eye Candy 5:Impact / Perspective Shadow
/ Preset (Drop Shadow, Blurry)


65. Merge Down

66. Image / Resize: 95% - All layers desmarcado

67. Effects / Plugins / Mura's Meister / Copies
Nota: Clique duas vezes na opção 1/n Fade Out


68. Objects / Align / Left


69. Layers / Duplicate

70. Image / Mirror / Mirror Horizontal

71. Effects / Image Effects / Offset (-70/0)


72. Merge Down

73. Objects / Align / Horizontal Center


74. Mova levemente para cima

75. Resultado:


76. Adicione nova layer

77. Selections / Load selection from alpha channel / Selections 4


78. Preencha a seleção com a cor #000000

79. Effects / Plugins / Eye Candy 5: Impact / Glass /
/ Preset (Clear With Reflection)


80. Select None

81. Drop Shadow: -6 15 100 0 cor #ffffff - SHADOW ON NEW LAYER MARCADO


82. Effects / Texture Effects / Weave - inverter as cores


83. Ative a layer acima - Raster 3

84. Clique na opção link/Unlink


85. Merge down

86. Drop Shadow: 0 0 60 30 preto - (desmarque a opção shadow on new layer)

87. Adjsut / Sharpness / Sharpen More

88. Layers / Duplicate

89. Image / Mirror / Mirror Horizontal

90. Ative a layer Copy of Raster 1

91. Layers / Duplicate

92. Layers / Arrange / Bring to top

93. Selections / Load selection from alpha channel / Selection 2


94. Pressione Delete em seu teclado

95. Select None

96. Layers / Arrange / Move Down - Aplique 2 vezes

97. Resultado:


98. Permaneça na mesma layer - Copy (2) of Raster 1

99. Effects / plugins / Unlimited 2 / Tile & Mirror / Distortion Mirror (vertical)


100. Resultado:


101. Merge visible

102. Image / Add borders / 1px / cor #000000
Image / Add borders / 20px / cor #ffffff
Image / Add borders / 1px / cor #000000

103. Selections / Select All

104. Image / Add borders / 40px / cor #ffffff

105. Selections / Invert

106. Effects / Plugins / AAA Frames / Foto Frame


107. Select None

108. Abra o tube (ltdstudio_Black&White_Texto)

109. Copie e cole como nova layer

110. Objects / Align / Top

111. Objects / Align / Horizontal Center

112. Coloque sua assinatura

113. Coloque a assinatura de Lady Tess

114. Salve: File / Export / Jpeg Optimizer


Obrigada por fazer minhas traduções