
Imaginaire
Este tutorial é de Frannie
Margot e foi traduzido com a sua permissão
Original
aqui

******
Créditos:
Tubes: Frannie Margot
******
Material
fantastique_232_franiemargot
fantastique_244_franiemargot
Imaginaire_1
Imaginaire_2
Download AQUI
******
Plugins:
Unlimited 2 / VM Instant Art / Three Cuts
AP [Lines] / Lines SilverLining
VM Toolbox / Blast
Graphics Plus / Panel Stripes
Kiwi's Oelfilter /
3,5 Promille
Plugins do
blog: AQUI
******
Meu E-mail: AQUI
Envie suas versões ou me avise
caso tenha problemas
com o material ou tutorial
******
Vejam suas versões
AQUI
******
Salve as seleções na pasta Selections do PSP
Tabela de cores:

Clique nos prints para visualizar melhor
Lembre-se de salvar o trabalho durante sua execução Altere o blend Mode, a opacidade e o Drop Shadow de acordo com suas imagens A ferramenta Pick Tool substitui a ferramente Deform das versões antigas do PSP
******
ROTEIRO:
01. Coloque a cor #d4dc96 no foreground e a cor #2e501c no
background
02. Prepare um
gradiente Sunburst

03. Abra
uma nova imagem com 750x500px
04. Preencha a imagem com o gradiente
05. Layers / duplicate
06.
Effects / Reflection Effects / Feedback
 
07. Effects / Edge Effects / Enhance More
08. Layers / New Raster Layer
09. Selections / load selection from disk / Selection (imaginaire_1)

10. Ative a Flood Fill(Baldinho) / Altere Opacity para 50

11. Preencha a seleção com a cor #f8f5dc
12. Volte a opacidade(Opacity) da Flood Fill para 100
13. Effects / Plugins / Unlimited 2 / VM Instant Art / Three Cuts
Nota: Altere a configuração em Color para adaptar o efeito às
cores que estiver usando
 
14. Layers / Properties / Blend Mode: Soft Light ou Luminance (L)

15. Mantenha a seleção
16.
Selections / Modify / Select selection borders

17. Layers / New Raster Layer
18. Preencha a seleção com a cor #f8f5dc
19. Effects / Texture Effects / Blinds / cor #2e501c / Light from
Left/Top marcado

20. Repita
o Texture Effects / Blinds / Horizontal e Light from left/Top
marcados

21. Effects / Edge
Effects / Enhance
22.
Select None
23. Drop Shadow:
2 2 100 15 - cor #2e501c

24. Repita o Drop Shadow em negativo: -2 -2 100 15 - #2e501c

25. Tire a visibilidade das 2 layers de baixo(Raster 1 e Copy
of Raster 1)

26. Ative a
layer Raster 3
27. Merge
Visible
28. Volte a
visibilidade das duas layers
29. Mantenha-se na layer superior (Merged)
30. Selections / Load selection from disk / Selection (Imaginaire_2)

31. Selections / promote selection to layer
32. Effects / Distortion Effects / Wave
 
33. Select None
34. Layers
/ Duplicate
35. Effects /
Distortion Effects / Polar Coordinates
 
36. Image / Mirror / Mirror Vertical
37. Ative a layer do meio (Merged)
38. Adjust / blur / Gaussian Blur: 10

39. Ative a layer Copy of Raster 1 (segunda de baixo pra cima)
40. Adjust / sharpness / sharpen
41. Effects / Plugins / AP [Lines] / Lines-SilverLining
 
42. Ative a layer inferior (Raster 1)
43. Image / Canvas Size

44.
Prepare um gradiente Radial, com as cores do início no foreground e
background

45. Layers / New
Raster Layer
46. Preencha a
layer com este gradiente
47. Effects / Plugins / VM Toolbox / Blast

48. Repita o VM Toolbox / Blast com Strenght=0
 
49. Layers / Arrange / Send to Bottom
50. As layers estarão assim

51. Ative a layer acima (raster 1)
52. Image / Resize: 110% - all layers desmarcados
53. Selections / select all
54. Selections / Float / Selections / Defloat
55. Effects / Plugins / Graphic Plus / Panel Stripes
 
56. Adjust / Sharpness / Sharpen
57. Mantenha-se na layer Raster 1
58. Layers / New Raster Layer
59. Preencha a layer com a cor #f9f5dc
60. Selections / Modify / Contract: 10px

61. Pressione Delete em seu teclado
62. Select None
63. Merge
Down
64. Com a Magic Wand,
selecione a borda formada com a aplicação do Contract:10
65. Drop Shadow: 10 10 100 30 cor #2e501c

66. Repita o Drop shadow em negativo: -10 -10 100 30 cor #2e501c

67. Select None
68. Ative a
layer Copy of Raster 1
69.
Selections / Select All
70.
Selections / Float / Selections / Defloat
71. Layers / New Raster Layer
72. Preencha a layer com a cor #2e501c
73. Selections / modify / Contract: 10px

74. Pressione Delete em seu teclado
75. Select None
76. Com a
Magic Wand, selecione a borda formada com a aplicação do contract:10

77. Merge down
78. Effects
/ 3D Effects / Inner Bevel

79. Select None
80. Drop
Shadow: 0 0 100 30 cor #2e501c

81. Merge visible
82.
Selections / Select all
83.
Image / Add borders / 50px / cor #f8f5dc
84. Selections / Invert
85.
Effects / Plugins / Kiwi's Oelfilter / 3.5 promille

86. Selections / Invert
87.
Drop shadow igual ao anterior
88. Select None
89. Abra o
tube (fantastique_244) / Copie e cole como nova layer
90. Posicione ligeiramente à esquerda conforme o modelo
91. Drop Shadow igual ao anterior
92. Coloque sua assinatura
93. Image / Add borders / 2px / cor #2e501c
94. Salve: File > Export > JPEG Optimizer
Obrigada por fazer minhas traduções
Participe dos
meus grupos:
No Face: AQUI
No
Google: AQUI
|

quinta-feira, 5 de setembro de 2019
Frannie Margot - Imaginaire

Marcinha - Flowers and Whispers
 Flowers and Whispers This tutorial is by Marcinha for the site SIM-PSP and was translated with your permission. Original here  ****** Credits: Karine Dreams Marcinha ****** Material: misted_flowers_byme Narah_mask_0422 Narah_Mask_1428 Wordart 1 female tube (not supplied) 1 flower misted tube (not supplied) Download: HERE ****** Plugins: AAA Frame Blog Plugins: HERE ****** My email AQUI Submit your versions or let me know if you have problems with the material or tutorial ****** Check out their versions HERE ****** Open masks on PSP and minimize Click on the prints for a better view. Remember to save work as it runs Change blend mode, opacity and drop shadow to suit your images Pick Tool replaces Deform tool from older versions of PSP ****** SCRIPT: 01. Put color # 562b5d in the foreground and color # dfd0e8 in the background 02. Open a new image with 880x500px 03. Fill the image with the background color. 04. Layers / New Raster Layer 05. Fill the layer with the foreground color. 06. Layers / New Mask Layer / From Image / Mask (Narah_Mask_0422)  07. Merge Group 08. Effects / image Effects / Seamless tiling  09. Adjust / Sharpness / Sharpen 10. Open your tube misted (flower) / Copy and paste as new layer 11. Position misted according to model 12. Layers / Arrange / Move down 13. Enable Raster 2 layer 14. Layers / Duplicate 15. Get the visibility of the Copy of Raster 2 layer by clicking on the eye. 16. Click on the raster layer 2 17. Effects / Image Effects / Seamless Tiling  18. Adjust / Blur / Motion Blur  19. Return the visibility of the Copy of Raster 2 layer by clicking the eye and activating it. 20. Layers / properties / Opacity: 70% 21. Merge Visible 22. Image / Add borders / 1px / black 23. Effects / Plugins / AAA Frame / Photo Frame  24. Selections / Select All 25. Selections / Modify / Contract: 40px  26. Selections / Invert 27. Layers / New Raster Layer 28. Fill the selection with the color #ffffff 29. Layers / New Mask Layer / From Image / Mask Narah_Mask_1428)  30. Merge Group 31. Layers / New Raster Layer 32. Fill this layer with the color #ffffff 32.1 Minimize Your Work 33. Open the mask (Narah_Mask_1428) on the desktop 34. Image / rotate right  35. Result:  36. Maximize Your Work Image 37. Layers / New Mask layer / From Image / Mask (Narah_Mask_1428)  38. Merge Group 39. Result:  40. Merge Down 41. Effects / Edge Effects / Enhance 42. Merge Visible 43. Selections / invert 44. Drop Shadow: -4 -4 100 20 Black  45. Select None 46. Open your main tube / Copy and paste as new layer 47. Drop Shadow: 0 0 80 10 Black  48. Open Wordart / Copy and paste as new layer 49. Drop Shadow: 0 0 50 5 black  50. Image / Add borders / 1px / black 51. Enter your signature 52. Save: File> Export> JPEG Optimizer Thank you for doing my translations. Join my groups: Facebook: HERE Google: HERE |
terça-feira, 3 de setembro de 2019
Dilek - Keep going
 Keep Going
Este tutorial é de Dilek e foi traduzido com a sua permissão
Original aqui

******
Créditos:
Grisi
Narah
******
Material
Keep going-Alpha Layer
Preset - going-1.fls Preset - going-2.fls Preset - going-3.fls Keep Going.PspBrush Texture - hatch fine.bmp Keep Going-Border Frame Hazal Mask Jpg Narah_mask_0457.jpg femme552-coly.png Grisi_Tube_Decoration_316 Keep Going.jpg Colors
Download
AQUI
******
Plugins:
Mura's Meister / Perspective tiling
Eye Candy 6 / Text Selection / Glass / Perspective Shadow (ou Eye Candy 5:Impact)
Plugins do blog:
AQUI
******
Meu e-mail
AQUI
Envie suas versões ou me avise caso tenha problemas
com o material ou tutorial
******
Vejam suas versões
AQUI
Exporte os brushs: File > Export > custom Brush > Nomeie > OK
Abra as masks no PSP e minimize
Clique duas vezes
nos presets Alien skin, para exportá-los automaticamente para o
plugin
Salve a textura na pasta Textures do PSP
Clique nos prints para visualizar melhor
Lembre-se de salvar o trabalho durante sua execução Altere o blend Mode, a opacidade e o Drop Shadow de acordo com suas imagens A ferramenta Pick Tool substitui a ferramente Deform das versões antigas do PSP
******
ROTEIRO:
01. Coloque a cor #ffffff no foreground e a cor #403a5c no
background
02. Prepare um
gradiente Sunburst

03. Abra
o arquivo (Keep Goping-AlphaLayer) / duplique (Shift+D) / Feche o
original
04. Preencha com a
cor do background
05.
Layers / New Raster Layer
06. Preencha com a cor do foreground
07. Layers / New Mask Layer / From Image / mask (Mask Hazal)

08. Merge Group
09. Adjust
/ sharpness / sharpen
10.
Merge down
11. Effects /
Texture Effects / Texture (Hatch Fine)

12. Layers / duplicate
13.
Effects / Mura's Meister - Perspective tiling

14. Adjust / Sharpness / Sharpen
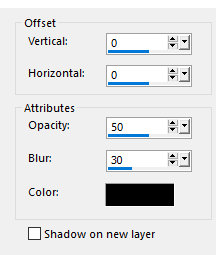
15. Drop Shadow:0 0 50 30 preto
16.
Resultado:

17. Layers / New
Raster Layer
18. Selections
/ Load selection from alpha channel / Selection #1

19. Preencha a seleção com a cor do background
20. Effects / Texture Effects / Fur

21. Effects / Texture Effects / Blinds

22. Effects / Eye Candy 6: Text Selection / Glass / Outside Bevel /
Clear(Ou Eye Candy 5: impact/Glass)

23. Select None
24. Resultado

25. Layers /
New Raster Layer
26.
Selections / Load selection from alpha channel / Selection #2

27. Preencha com a cor do foreground
28. Effects / Texture Effects / Blinds - igual ao anterior

29. Selections / Modify / Contract: 10

30. Preencha a seleção com o gradiente
31. Effects / Texture Effects / Texture (Hatch Fine) - igual ao
anterior

32. Select None
33. Effects / Plugins / Eye Candy 6: Text Selection / Perspective
shadow / Preset (Going 1)

34. Selections / Load selection from alpha channel / Selection #3

35. Preencha a seleção com a cor do background
36. Effects / Texture Effects / Blinds - igual ao anterior

37. Effects / Eye Candy 6: Text Selection / Glass / Preset (With
Reflection/Steel)
(Ou Eye candy5: Impact / Glass (Preset Clear with Reflection)) 
38.
Select None
39. Layers /
New Raster Layer
40.
Selections / Load selection from alpha channel / Selection #4

41. Preencha com o gradiente
42. Select None
43. Effects
/ Plugins / Eye Candy 6: Text Selection / Perspective shadow /
Preset (going 2)

44. Layers
/ New Raster Layer
45.
Selections / Load selection from alpha channel / Selection #5

46. Preencha a seleção com o gradiente
47. Select None
48. Effects
/ Plugins / eye Candy 6: Text Selection / Perspetive Shadow / Preset
(going-2)
49. Layers / New
Raster Layer
50. Ative a
Paint Brush / Selecione o Brush (Keep going) / Estampe com o
gradiente . Veja o local no modelo

51. Adjust / sharpness / sharpen
52. Effects / Plugins / Eye Candy 6 / Text Selection / Perspective
Shadow / Preset (going-3)

53. Ative a layer Raster 1
54. Layers / New Raster Layer
55. Preencha a seleção com o a cor do background
56. Layers / New Mask Layer / From Image / Mask (Narah_mask_0457)

57. Merge Group
58. Adjust
/ Sharpness / Sharpen
59.
Merge visible
60.
Resultado:
61. Copie a
imagem (ficará na memória)
62. Abra o tube (Keep going -Border Frame)
63. Cole como nova layer, a imagem copiada no item 61

64. Abra o tube (femme552-coly) / Copie e cole como nova layer
na keep going-Border Frame
65. Image / Resize: 60% - all layers desmarcado
66. Effects / Image Effects / Offset (50/-5)

67. Adjust / Sharpness / Sharpen
68. Drop Shadow igual ao anterior
69. Abra o tube (Grisi_Tube_Decoration_316) / Copie e cole como nova
layer
70. Image / Resize:
30% - All layers desmarcado
71. Effects / Image Effects / Offset (-393/-158)

72. Drop Shadow igual ao anterior
73. Coloque sua assinatura
74. Merge all
75. Image /
Resize: Width 900px
76.
Salve: File > Export > JPEG Optimizer
Obrigada por fazer minhas traduções
Participe do
meu grupo no Facebook:
AQUI
|

Assinar:
Postagens (Atom)