This tutorial is from Saturnella and was translated with your permission
| Tutorial |
Sabrina, de Saturnella Original - AQUI |
| Credits | Tube principal: Lily Garnier Outros materiais: Saturnella |
| Material | AQUI |
| Plugins do tutorial | Plugins: Simple / Pizza Slice Mirror / Blintz / Zoom Out and Flip Carolaine and Sensibility / CS-Halloween2 / CS_LDots Eye Candy 5: Impact / Glass / perpsective Shadow Mura's Meister Copies |
| Plugins do blog | AQUI |
| before starting | Double-click on Alien Skin presets to export them to plugins |
| Contacts | My e-mail:
AQUI My group Facebook: AQUI Your versions: AQUI |
SCRIPT:
(click on the prints for a better view)
01. Place color 1 in the foreground and color 2 in the background
02. open the alpha file / duplicate (shift + d) / close the original / rename to raster 1
03. paint the image with this Linear gradient
04. adjust / blur / gaussian blur: 25
05. effects / plugins / simple / pizza slice mirror
06. effects / plugins / simple / blintz
07. repeat the simple / blintz
08. effects / reflection effects / rotating mirror
09. effects / plugins / simple / zoom out and flip
10. effects / plugins / carolaine and sensibility / cs-halloween 2
11. image / mirror / mirror vertical (flip)
12. effects / reflections effects / rotating mirror
13. selections / load selection from alpha channel / selection 1
14. add a new layer
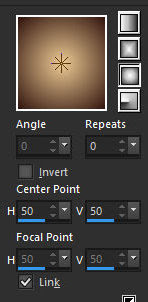
15. Paint the selection with this Sunburst gradient:
16. effects / plugins / eye candy 5: impact / glass /
preset (sabrina-glass)
17. select none
18. drop shadow: 1 1 100 30 black
19. effects / plugins / mura's meister / copies
20. activate the bottom layer - raster 1
21. add new layer
22. paint the layer with color 1
23. layers / new mask layer / from image / mask (smart-maszk-61)
24. effects / edge effects / enhance
25. merge group
26. effects / image effects / offset (0/50)
27. drop shadow like the previous one
28. selections / load selection from alpha channel / selection 2
29. add new layer
30. copy the image (image-nuages) and paste into the selection
31. layers / arrange / move down
32. select none
33. activate the top layer
34. merge down
35. activate the bottom layer - raster 1
36. selections / load selection from alpha channel / selection 3
37. selections / promote selection to layer
38. select none
39. layers / duplicate
40. image / mirror / mirror horizontal (mirror)
41. merge down
42. layers / properties / blend mode: multiply
43. effects / plugins / carolaine and sensibility / cs-ldots
44. activate the bottom layer - raster 1
45. selections / load selection from alpha channel / selection 4
46. selections / promote selection to layer
47. select none
48. layers / duplicate
49. image / mirror / mirror horizontal (mirror)
50. merge down
51. layers / properties / blend mode: multiply
52. effects / plugins / carolaine and sensibility / cs-ldots
same as the previous
53. activate the top layer
54. add new layer
55. paint with color 1 (light)
56. layers / new mask layer / from image / mask (smart-maszk-72)
57. effects / edge effects / enhance
58. merge group
59. image / mirror / mirror horizontal
60. drop shadow: 2 2 100 1 black
61. layers / properties / blend mode: hard light / opacity: 60%
62. image / add borders / 1px / color 2
63. image / add borders / 3px / color 1
64. image / add borders / 1px / color 2
65. image / add borders / 30px / color 3
66. image / add borders / 1p / color 2
67. image / add borders / 3px / color 1
68. image / add borders / 1px / color 2
69. selections / select all
70. image / add borders / 50px / color 3
71. drop shadow: 0 0 80 40 black
72. select none
73. copy the female tube and paste it as a new layer
74. image / mirror / mirror horizontal (mirror)
75. image / resize: 90% - all layers unchecked
76. adjust / sharpness / sharpen
77. position according to model
78. effects / plugins / eye candy 5: impact / perspective shadow / preset (sabrina-shadow)
79. copy the Saturnella watermark (filigree) and paste it as a new layer
80. position as desired
81. place your signature
82. image / add borders / 1px / color 2
83. image / resize: width 900px
84. adjust / sharpness / unsharp mask
85. save: file / export / jpeg optimizer
thanks for doing my translations


Nenhum comentário:
Postar um comentário
Observação: somente um membro deste blog pode postar um comentário.