

Versão original de Maria José

Minha versão
This tutorial is from Maria José and was translated with your permission
Original AQUI
****
Credits:
Original:
Luz Cristina
Version:
****
Material - Download AQUI
****
Plugins:
Fantastic Machines
Brush Strokes
Tramages
AAA Frames
Nik Color Efec Por 1.0e
(esse plugin você encontra AQUI)
Blog's Plugins: AQUI
****
Preparation:
Save Selections to PSP Selections Folder
****
Orientations:
Click on the prints for a better view.
Remember to save work as it runs
Change Blend Mode, Opacity, and Drop Shadow to Your Images
Pick Tool replaces Deform tool from older versions of PSP
If your PSP is an older version, use material labeled "PSP ANTIGO"
Remember to save work as it runs
Change Blend Mode, Opacity, and Drop Shadow to Your Images
Pick Tool replaces Deform tool from older versions of PSP
If your PSP is an older version, use material labeled "PSP ANTIGO"
***
My E-Mail: HERE
Send us your versions or let me know if you have any problems
with the tutorial or material
with the tutorial or material
***
Versions: HERE
***
Groups:
******
SCRIPT:
Colors:

1- # 54410e
2- # bba777
3- # 876e3b
Before you begin:
Put color 1 in the foreground and color 2 in the background
In running this tutorial you will use these two gradients:
Gradient 1: Radial / Angle = 90 / Repeats = 9 / Invert Marked / Center Point + 50-50

Gradient 2: Linear / Angle = 90 / Repeats = 3 / invert marked

01. Open a new image with 1000x700px
Fill the image with gradient 1
02. Effects / Plugins / Fantastic Machines / PaintEngine

03. Effects / Plugins / Brush Strokes / Angled Strokes / Deafult - Apply 2 times

04. Layers / Duplicate
Image / Resize: 90% - all layers unchecked
05. Drop shadow: 1 1 100 1 black
Repeat Drop Shadow on negative: -1 -1 100 1 black
06. Effects / Image Effects / Seamless tiling

07. Layers / Duplicate
Image / Resize: 90% - all layers unchecked
08. Drop shadow: 1 1 100 1 black
Repeat Drop Shadow on negative: -1 -1 100 1 black
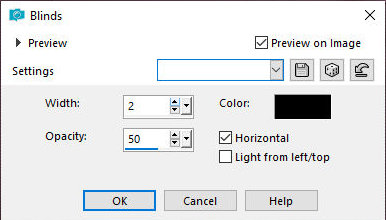
09. Effects / Texture Effects / Blinds
Layers / properties / blend Mode: Luminance (L)
10. Copy and paste as new layer tube (deco_trudy_mj)
Layers / Properties / Blend Mode: Luminance (L)
11. Effects / Image Effects / Seamless tiling / Default
12. Selections / Load selection from disk / Selection (trudy_mj)

13. Add a new layer
Fill in with gradient 2
14. Effects / Plugins / Tramages / Tow the Line / Default

Select None
15. Layers / Duplicate
Image / Mirror / Horizontal Mirror
Merge down
Layers / Arrange / Move down
16. Copy and paste as new layer tube (deco_trudy_1_mj)
Layers / Arrange / Bring to top
Layers / Properties / Blend Mode: Luminance (L)
17. Copy and paste as new layer tube (deco_trudy_2_mj)
Layers / Properties / Blend Mode: Luminance (L)
18. Enable the Copy (2) layer of Raster 1
Selections / Load selection from disk / Selection (trudy_1_mj)
19. Add new layer
Effects / 3D Effects / Cutout

Select None
20. Layers / Duplicate
Image / Flip
Merge down
21. Layers / Duplicate
Image / Mirror / Horizontal Mirror
Merge down
22. Enable the Copy (2) layer of Raster 1
Selections / Load selection from disk / Selection (trudy_2_mj)
Selections / promote selection to layer
Layers / Arrange / Bring to top
23. Adjust / Blur / Gaussian Blur: 20
24. Add a new layer
Effects / 3D Effects / cutout - same as above
Merge down
25. Effects / Plugins / AAA Frames / Photo Frame

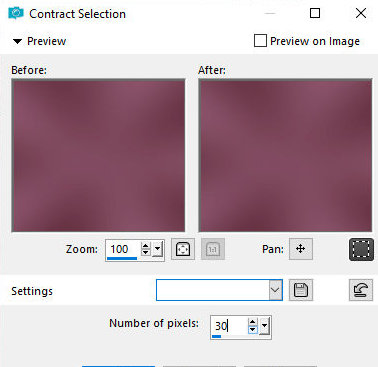
26. Selections / Modify / contract: 30
Repeat item 25
27. Selections / Modify / contract: 5
28. Copy and paste as new layer tube (4806-luzcristina)
Position tube in selection
Selections / Invert
Press Delete on your keyboard
Select None
The layers will look like this:

29. Effects / Plugins / Nik Color Effex Pro 1 / Contrast Only

30. Image / Add borders / 1px / black
Image / Add borders / 10px / color # 876e3b
Image / Add borders 1px / black
Image / Add borders 15px / color # 876e3b
31. Selections / select all
Edit / Copy (will be in memory)
Image / Add borders / 30px / white
32. Selections / Invert
Paste in the selection the image copied in item 31
Drop Shadow: 0 0 60 30 Black
Selections / Invert
Repeat Drop Shadow
Select None
33. Image / Add borders / 1px / black
34. Put your signature
Merge all
35. Image / Resize: Width 1000px
Save: File / Export / Jpeg Optimizer
Thank you for doing my translations.
Nenhum comentário:
Postar um comentário
Observação: somente um membro deste blog pode postar um comentário.