
ROTEIRO: Tabela de cores:  Etapa 01 Abra o arquivo (Selections From Alpha Channel) / Duplique (Shift+D)/ Feche o original Etapa 02 Pinte a imagem com a cor 1 Adicione uma nova layer Selections / Select All Copie e cole na seleção o tube(jolcsi495) Select None Etapa 03 Effects / Image Effects / Seamless Tiling / Default  Adjust / blur / Gaussian Blur: 30  Merge Down Layers / Duplicate Etapa 04 Effects / Plugins / Unlimited 2 / BKG Designer sf10 I / Alf's border Mirror Bevel 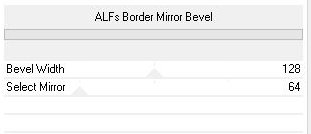 Etapa 05 Selections / Load selection from alpha channel / Selection #1  Selections / promote selection to layer select None Ative a Pick Tool e configure como no print (0/227)  Drop Shadow: 0 0 100 100 preto / Shadow on new layer marcado  Effects / plugins / AP[Lines] / SilverLining  Effects / image Effects / Seamless Tiling / Default  Ative a layer Promoted Selection Drop Shadow: -9 0 67 38 preto Etapa 06 Ative a layer Copy of Raster 1 Selections / Load selection from alpha channel / Selection #1  Selections / Promote selection to layer Layers / Arrange / Bring to top Selections / Modify / Contract: 30  Adicione nova layer Pinte com a cor escura ou clara, a cor que você preferir Selections / Modify / Contract: 3  Edit / Cut Effects / 3D Effects / Cutout  Mantenha a seleção Etapa 07 Ative a layer Promoted Selection 1 Effects / Texture Effects / Weave / Cor 1 e 3  Selections / Modify / Contract:30  Ative a layer Copy of Raster 1 Selections / promote selection to layer Layers / Arrange / Bring to top Etapa 08 Effects / Textura Effects / Texture (texture)  Selections / Modify / Contract: 30 Ative a layer Copy of Raster 1 Selections / Promote selection to layer Layers / Arrange / Move Up Repetir Move UP 5 vezes Adicione nova layer Effects / 3D Effects / Cutout - mesma configuração anterior Select None Etapa 09 Selections / Load selection from alpha channel / Selection #2  Adicione uma nova layer Copie e cole na seleção o tube (festmény) Effects / Plugins / FM Tile Tools / Blend Emboss  Adjust / Sharpness / Sharpen Select None Layers / Duplicate Image / Mirror Ative a layer Raster 3 Feche as 4 layers inferiores clicando no olho (raster 1, Copy of Raster 1, Promoted Selection Shadow 1, Promoted selection)  Merge visible Volte a visibilidade das layers Etapa 10 Image / Resize: 85% - All layers desmarcado(Layer Merged) Drop Shadow: 0 0 67 38 preto Etapa 11 Ative a layer Copy of Raster 1 Selections / Load selection from alpha channel / Selection #3  Selections / Promove selection to layer Layers / Arrange / Bring to top Drop Shadow - mesma configuração anterior Etapa 12 Selections / Modify / Contract:45  Effects / 3D Effects / Cutout - mesma configuração anterior Copie e cole na seleção o tube (Jolcsi141) Effects / Plugins / FM Tile Tool / Blend Emboss  Adjust / Sharpness / Sharpen Ative a Promoted selection shadow 1 Edit / Cut Select None Etapa 13 Ative a layer superior (Promoted Selection 1) Selections / Load selection from alpha channel / Selection #3 Selections / Modify / Select selection borders  Effects / 3D Effects / Inner Bevel  Select None Etapa 14 Ative a layer Raster 1 Layers / Arrange / Bring to top Effects / Plugins / Mura's Meister / Perspective Tiling  Drop shadow - mesma configuração anterior Etapa 15 Copie e cole como nova layer o tube (joldec) Ative a Pick Tool e configure conforme o print (0/23)  Adjust / Sharpness / Sharpen Etapa 16 Image / Add borders / 1px / cor 1 Image / Add borders / 2px / cor 2 Image / Add borders / 1px / cor 1 Copie esta imagem (Edit / Copy) Selections / Select All Etapa 17 Image / Add borders / 45px / cor 1 Selections / invert Cole na seleção a imgem copiada na etapa 16 Adjust / Blur / Gaussian Blur mesma configuração anterior Selections / Invert Drop Shadow mesma configuração anterior Select None Etapa 18 Copie e cole como nova layer o tube (Jolcsi495) Image / Resize: 75% - all layers desmarcado Posicione e coloque Drop Shadow conforme sua preferência Etapa 19 Copie e cole como nova layer o tube (text) Posicione conforme o modelo Etapa 20 Copie e cole como nova layer o tube (falevél) Posicione conforme o modelo Coloque sua assinatura Merge All Salve: File > Export > JPEG Optimizer Obrigada por fazer minhas traduções |

terça-feira, 1 de outubro de 2019
Jolcsi - I like Autumn
Assinar:
Postar comentários (Atom)
Nenhum comentário:
Postar um comentário
Observação: somente um membro deste blog pode postar um comentário.