


This tutorial is by Maria José and was translated with your permission
*Double click on the preset (glass_majo) to export to the plugin
*Save selections (Butterfly_1_mj / Butterfly_mj) in the Selections folder on the PSP
*Save the texture (brown172) in the Textures folder of the PSP
|
SCRIPT:
(Click on the prints to see better)
01. Place color # a49b92 in the foreground and color # 474644 in the background

02. Prepare a Linear gradient

03. Open a new transparent image with 1000x700px
04. Paint with the gradient
05. Layers / New Mask Layer / From Image / Mask (mask_majo_mj) / INVERT MARKED


06. Merge Group
07. Effects / Texture Effects / Weave - color: #000000

08. Effects / Plugins / Mura's Seamless / Emboss at Alpha / Default

09. Effects / Plugins / Simple / Top Left Mirror


10. Layers / Properties / Blend Mode: Screen


11. Add new layer
12. Layers / Arrange / Move down
13. Fill with the gradient
14. Effects / Texture Effects / Weave

15. Effects / Plugins / Mehdi / Sorting Tiles

16. Effects / Plugins / Simple / Top Let Mirror


17. Effects / Plugins / distort / Turn Your Inside Outside

18. Selections / Load selection from disk / Selection (butterfly_mj)


19. Selections / Promote selection to layer
20. Layers / Arrange / Bring to top
21. Image / Resize: 90% - all layers unchecked
22. Selections / Modify / Contract: 20px


23. Drop Shadow: 0 0 60 30 black
24. Selections / Modify / Contract: 20px
25. Effects / Plugins / Eye Candy 5: Impact / Glass
Preset (glass_majo)


26. Select None
27. Layers / Duplicate
28. Image / Resize: 15% - all layers unchecked
29. Selections / Load selection from disk / Selection (butterfly_1_mj)


30. Selections / Modify / Contract: 10


31. Effects / Plugins / Eye Candy 5: Impact / Glass
Preset (glass_majo)


32. Select None
33. Effects / Image Effects / Offset (-335/150)


34. Effects / Plugins / Mura's Meister / Copies

35. Layers / Duplicate
36. Image / Mirror / Mirror Horizontal
37. Merge down
38. Drop Shadow: 0 0 60 30 black
39. Activate the Raster 1 layer
40. Effects / Texture Effects / Texture (brown172)

41. Layers / Duplicate
42. Effects / Plugins / Mura's Meister / Perspective Tiling

43. Effects / Image Effects / Seamless Tiling

44. Drop Shadow: 0 0 60 30 black
45. Copy the tube (C.Evers_deco_43) / Paste it as a new layer
46. Layers / Arrange / Move Up
47. Layers / Properties / Blend Mode: Screen


47.1 Activate the top layer
48. Copy the character / Paste tube as a new layer
49. Image / Resize: 58% - all layers unchecked
50. Position according to the model
51. Apply a Drop Shadow of your choice
52. Copy the tube (butterfly_mj) / Paste it as a new layer
53. Position according to model
54. Layers / Properties / Blend Mode to your liking
55. The layers will look like this:


56. Merge visible
57. Image / Add borders / 1px / dark color
Image / Add borders / 3px / light color
Image / Add borders / 1px / dark color
58. Selections / Select All
59. Image / Add borders / 40px / white
60. Selections / Invert
61. Paint the selection with the gradient
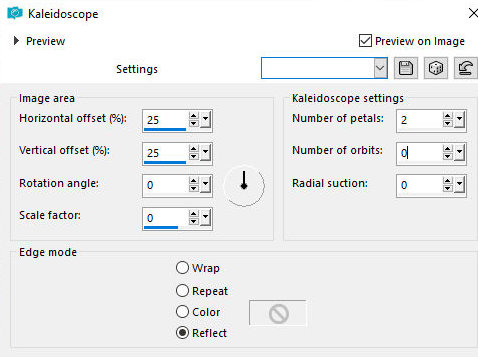
62. Effects / Reflection Effects / Kaleidoscope
63. Selections / Invert
64. Drop Shadow: 0 0 60 30 black
65. Select None
66. Place your signature
67. Merge all
68. Image / Add borders / 1px / dark color
69. Image / Resize: Width 1000px
70. Save: File / Export / Jpeg Optimizer
Thank you for doing my translations
Nenhum comentário:
Postar um comentário
Observação: somente um membro deste blog pode postar um comentário.